What is it?
NestJS is a NodeJS server-side application framework. This means it serves as a ‘backend’ for your website or web application. Designed with scalability and maintenance in mind, NestJS uses modern development design patterns and best-practices for accomplishing those goals (e.g., dependency injection, loose coupling). Its services are accessed through an API and provide a robust architecture and infrastructure.
Why use it?
It’s a full-featured framework that saves you from having to create an application from scratch. It is based on ExpressJS, uses TypeScript, and uses an architecture based on modules and dependencies. All you have to do is design your application’s modules and you can start coding. As well, there is a strong community of developers, and it is one of the most popular and widely used backend NodeJS frameworks, so there is a lot of documentation, plugins, support, stack exchange discussions, etc.Quick details:
Built on ExpressJS
Uses TypeScript – the future of Javascript and makes development more robust and less bug prone.
Middleware capabilities, examine or manipulate a request before it reaches routing, or a response before it is sent back.
Decorators are used for defining routes and adding other functionality.
Provides an architecture using modules and dependency injection for tying everything together.
Provides scaffolding, CRUD generation, and other CLI tools.
Great documentation, robust development community, open source, and many community-created packages that add functionality.
It includes infrastructure for a robust web application, from authorization, validation, routing, etc. NestJS is designed with flexibility in mind. You really can do anything, you won’t be bogged down or restricted or have to hack anything.
Embraces SOLID principles (
https://en.wikipedia.org/wiki/SOLID
)
Was inspired by Angular
What infrastructure do I need for it?
Node.js
How?
NestJS uses a familiar design pattern of controllers and services. Controllers handle the requests that come in and use services to process those requests. You can use a number of database ORMs, but TypeORM is a TypeScript-based ORM, so they integrate well together.As always, it is easiest to learn by doing hands on, so let’s set up a NestJS API server. We’ll use TypeORM, which NestJS itself recommends for data access.
Create a NestJS Application
Let’s create a test application, which we’ll name “api-project”.Create a directory for the project, switch into it, then run the following:
npm i -g @nestjs/cli
nest new api-project
The first line installs the NestJS command line tools, which are required to spin up a project and later use scaffolding, generators, etc. After it installs, you can get an idea of what the NestJS CLI can do by using ‘nest’ with no args.The second line creates the NestJS app in the directory.NestJS will then go through an interactive process and ask you which package manager you want to use. I chose npm.When it’s done you’ll have a complete NestJS app scaffold. Two things I recommend at this point are to use VS Code as your editor, and to also create a Docker Container for your project. Setting both up is beyond the scope of this initial look at NestJS, but perhaps we’ll cover them in a future article.To test your new app:
npm run start:dev
Access the app in your browser at http://localhost:3000/, and you should see “Hello World!”. If you examine the files generated, of immediate interest will be the app.controller.ts and app.service.ts. These files handle the routing and result seen in the browser.app.controller.ts
@Controller()
export class AppController {
  constructor(private readonly appService: AppService) {}

  @Get()
  getHello(): string {
    return this.appService.getHello();
  }
}
Things to note:
The
@Controller()
decorator that transforms the class into NestJS Controller, ready to receive requests.
The constructor, which injects the appService provider. Just setting this here allows you to access it via this.appService.
The
@Get()
decorator above the getHello() method.
The two decorators and their arguments work together to create a route. When accessing http://localhost:3000, we basically told the API that we wanted a Controller and Get decorator with no arguments. To illustrate, pass in an argument of ‘greetings’ to the @Controller decorator:
@Controller('greetings')
Now reload http://localhost:3000 and you’ll see a 404 response. Change the URL to http://localhost:3000/greetings and it works again. Let’s go one step further and set a subpath for the greetings route. Pass ‘hi’ to the @Get decorator:
@Get('hi')
Refresh http://localhost:3000/greetings and you’ll get a 404, but http://localhost:3000/greetings/hi now works.Of course the capabilities extend well beyond what we’ve seen here, but it gives a general idea of how the architecture works. You inject providers in class constructors, which instantiates and makes them accessible within the class. You use decorators to affect various properties of the class and methods within.
Modules (and Resources)
Modules are an organizational unit that groups related functionality. Commonly you’d create modules for each of the entities your app will use, in turn entities commonly represent individual database tables. Let’s say we’re creating an app to track animals at a zoo. We’ll start by creating a module for representing and interacting with the animals. We want various REST API endpoints to interact with the animal records, and the easiest way to do that is to have NestJS generate a ‘resource’. This will generate the scaffolding, including the module, for everything needed for each of the REST API endpoints.Run this command:
nest g resource animals
This results in NestJS creating an ‘animals’ directory with controller, module, service, and entity files. To represent our animals we’ll use the animal entity, which we’ll map to an ‘animal’ table in the database.Let’s back up a second and take a look at the Module component of the NestJS architecture.app.module.ts:
import { Module } from '@nestjs/common';
import { AppController } from './app.controller';
import { AppService } from './app.service';

@Module({
  imports: [],
  controllers: [AppController],
  providers: [AppService],
})
export class AppModule {}
Each component of an application is grouped into Modules. The app itself has one, as will other specific areas of functionality created moving forward. This is also where you tell NestJS about what services (providers), and libraries you’ll be using. Next we’ll add TypeORM.
Database access using TypeORM
From the project directory, run:
npm install @nestjs/typeorm typeorm mysql2
Edit app.module.ts and update the imports section as follows:
@Module({
  imports: [
    TypeOrmModule.forRoot({
      type: 'mysql',
      host: 'localhost',
      port: 3306,
      username: 'root',
      password: '$hhh',
      database: 'api_project',
      entities: [],
      synchronize: false,
    }),
  ],
  controllers: [AppController],
  providers: [AppService],
})
We import and pass a database configuration to the TypeOrmModule. As the database configuration gets more complex, one can move it to an external file (that the testing suite and other modules can also use). Also note the ‘synchronize’ key, this is a setting that keeps your database schema synchronized with your entities. You can use that, but most people use migrations, and you definitely don’t want it enabled on production.
Define Animal Entity
Creating a New Animal
If you look at the Animals module we generated earlier, the generator created an Animal entity for us. Look at src/animals/entity/animal.entity.ts and you’ll see it’s very barebones because NestJS does not know which ORM you’ll be using or what attributes it will have. Update the file to make it an TypeORM entity and also to represent an Animal:
import { Entity, PrimaryGeneratedColumn, Column } from 'typeorm';

@Entity()
export class Animal {
  @PrimaryGeneratedColumn()
  id: number;

  @Column()
  commonName: string;

  @Column()
  species: string;

  @Column()
  isActive: boolean;
}
You can see the use of decorators to define each property as a column, and TypeScript defines the variable type.We also have to let the TypeORM configuration know we’ll be using this entity, so back in app.module.ts, add the Animal entity to the ‘entities’ array:
import { AnimalsModule } from './animals/animals.module';
import { Animal } from './animals/entities/animal.entity';

@Module({
  imports: [
    TypeOrmModule.forRoot({
      type: 'mysql',
      host: 'localhost',
      port: 3306,
      username: 'root',
      password: '$hhh',
      database: 'api_project',
      entities: [Animal],
      synchronize: true, // <- never leave as ‘true’
    }),
    AnimalsModule,
  ],
  controllers: [AppController],
  providers: [AppService],
})
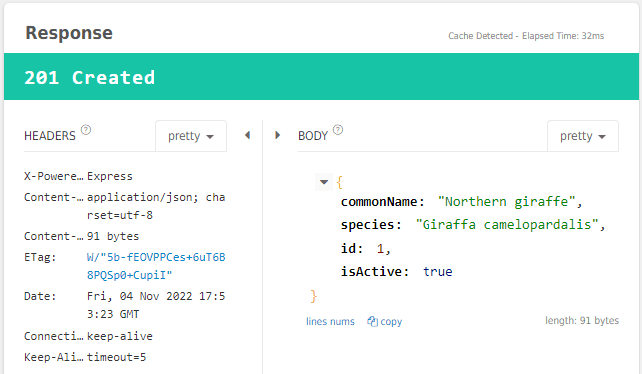
Also notice how the generator added the AnimalsModule to the App module’s imports as well.If you save and then temporarily set the TypeORM config ‘synchronize: true’ and then restart the app, TypeORM should create the table for you. This might be ok for prototyping and early development, but using migrations is a safer strategy. If you do use synchronize, a best practice is to change it back to false after it generates the table.If you go to the Animals endpoints right now, you’ll be met with placeholders: http://localhost:3000/animals => This action returns all animals http://localhost:3000/animals/1 => This action returns a #1 animalLet’s use the POST endpoint to create an Animal record. For that you’ll need a way to send more than just GET requests. I’m using this chrome extension: https://chrome.google.com/webstore/detail/talend-api-tester-free-ed/aejoelaoggembcahagimdiliamlcdmfm/related?hl=enUsing whatever method (Postman, Insomnia, the plugin mentioned above), send a POST request with the following payload:
{
  "commonName": "Northern giraffe",
  "species": "Giraffa camelopardalis"
}
If you submit that request, you’ll see a response of 201 (created) and a message, “This action adds a new animal”. We’ll need to replace the placeholder message with code to create the database record.
Creating the Database Record
NestJS uses the Repository pattern, which injects repositories into services. To do so, we’ll have to let the Animal module know we’re going to use the Animal repository.animals.module.ts
import { Module } from '@nestjs/common';
import { AnimalsService } from './animals.service';
import { AnimalsController } from './animals.controller';
import { TypeOrmModule } from '@nestjs/typeorm';
import { Animal } from './entities/animal.entity';

@Module({
  imports: [TypeOrmModule.forFeature([Animal])],
  controllers: [AnimalsController],
  providers: [AnimalsService],
})
export class AnimalsModule {}
And now we have to inject the repository into the Animals service.animals.service.ts
import { Injectable } from '@nestjs/common';
import { InjectRepository } from '@nestjs/typeorm';
import { Repository } from 'typeorm';
import { CreateAnimalDto } from './dto/create-animal.dto';
import { UpdateAnimalDto } from './dto/update-animal.dto';
import { Animal } from './entities/animal.entity';

@Injectable()
export class AnimalsService {
  constructor(
    @InjectRepository(Animal)
    private animalRepo: Repository,
  ) {}
...
And finally, we can use that injected repo to insert a record into the table.animals.service.ts (create method)
async create(animalData: CreateAnimalDto) {
    const animal = new Animal();
    animal.commonName = animalData.commonName;
    animal.species = animalData.species;
    return await this.animalRepo.save(animal);
  }
But what is “CreateAnimalDto”? That is a ‘Data Transfer Object’ that you can use for validation and other transformations to the data. For now we’ll just add our expected fields:create-animal.dto.ts
export class CreateAnimalDto {
  readonly commonName: string;
  readonly species: string;
}
Submit the POST request again and you should see your record created in the response and in the database.
Front End
You can now use any front end to access the API, as long as it’s REST API compatible. We often use React Admin which has CRUD functionality built in.
Conclusion
NestJS is very well designed and extremely easy to work with. You can have a REST API up and running very quickly. We’ve only touched the surface with NestJS’ capabilities, but this tour should give you a good idea of how easy it is to design and develop using the framework.