Introduction
In a previous article, I wrote about the desirable features that React Admin offers. Additionally, I mentioned a few components that a developer (or team) could add to the software to improve the user experience and data management. If you need to catch up on React Admin, you can read the first article or check React Admin’s documentation page. The purpose of this article? – Efficiently create record using React modal.
We’ll set up a basic project providing context for the modal dialog with components and sample data. Then, we’ll go through the code, using two types of resources (Users and Posts), showing how to add User resources on the fly while creating new Posts.
In the end, you should be comfortable implementing this user interface improvement to your React Admin dashboard and have a better understanding of React Admin!
Prerequisites
There are a couple of prerequisites that this tutorial requires:
Understanding of how ReactJS works
Basic networking jargon (i.e., request, API call, fetch)
How to open and use the command line on your OS
Code editor (i.e., VSCode, Sublime Text, Atom, Vim)
I am using VSCode on a macOS system.You can check the finished project repository if you need guidance along the way. Let’s begin!
Setting Up The Project
I worked through the React Admin tutorial and uploaded the code to a repository on Github. The tutorial code will act as a convenient starting place for the project.
If you want, you may follow the tutorial yourself to set up the project. Otherwise, you can clone the repository onto your local file system with:
$ git clone https://github.com/jdretz/starter-template-react-admin.git react-admin-create-modal
Then, change directories in react-admin-create-modal and download the required packages.
$ cd react-admin-create-modal $ yarn add react-admin ra-data-json-server prop-types
Once the packages download, you start the project by running the command:
$ yarn start
If successful, a new browser opens to the project dashboard.

Great start! Next, I’ll provide context on the starter project and React Admin.
Project Overview
Resources
Notice that we have three side panel options:
Dashboard
Users
Posts
The React Admin tutorial uses jsonplaceholder.typicode.com for sample data. There are two example resources that we borrow from this fake data source: Users and Posts. Behind the scenes, React Admin uses the dataProvider to manage data requests.
Open src/app.js and find the dataProvider variable.
const dataProvider = jsonServerProvider('https://jsonplaceholder.typicode.com');
We pass this value into React Admin’s top-level component (<Admin>) so React Admin can fetch data at this endpoint. Additionally, in src/app.js, we declare the resources we want to fetch using <Resource> components.
The <Resource> component accepts props for different dashboard views. Currently, there is a list view for Users and list, edit, and create views for the Posts resource.
... <Resource name="users" list={UserList} icon={PostIcon} /> <Resource name="posts" list={PostList} edit={PostEdit} create={PostCreate} icon={UserIcon} /> ...
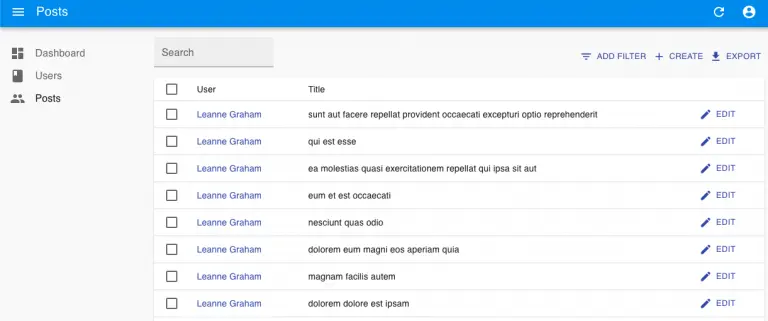
Clicking on the Users or Posts items in the dashboard renders the list view for each resource.
Click on the Posts item. You should see a list of Posts with options to Add Filter,
Create, or Export. Furthermore, there is an inline option to Edit individual Posts.
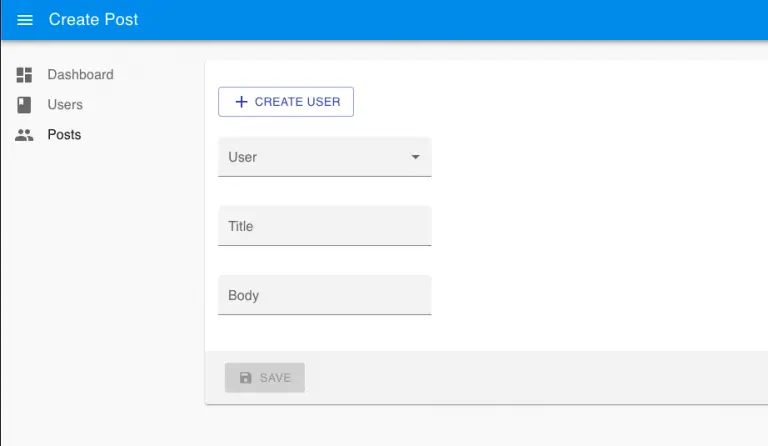
Selecting the Edit or Create buttons renders the component that we passed in for the corresponding prop. For example, click the Create button in the top right. You redirect to a form where you could add a new post.
Specifying resources and their view components is easy. It’s what makes React Admin so beneficial. However, you may be wondering, where do we get the view components?
Views
Each of the resources has a file in the src directory with a matching name. Inside src/posts.js you find the <PostCreate>, <PostList>, <PostFilter>, and <PostEdit> components. These components render when a user clicks on action buttons like Create or Edit.
Furthermore, they reside at predefined routes. React Admin hooks up the routes under the hood through the <Admin> and child <Resource> components. The <PostCreate> component is passed as the value for the create prop in the Posts <Resource> component.
<Resource … create={PostCreate} />
Therefore, when we click Create to write a new post, the app directs us to the /users/create route, which renders <PostCreate>.
It’s convenient that React Admin does all the routing for us, but it also marries the application to this pattern. In addition, the <SimpleForm> components (used for editing and creating resources) redirects the user to specific routes when you click Save. This built-in automation is an obstacle if we want to add related resources on the fly.
For example, we start to create a new post but find out that the author isn’t listed. We click on the Users tab, add the user, go back to the create view, and select the newly created user.
This lengthy process is trivial given the example with Users and Posts, but what if it were article tags, categories, product variants, or contact information? It would be helpful to have the ability to quickly add this data in a modal, compared to navigating to a different view.
Next, we’ll start building this feature. We’ll add a Create User button to the <PostCreate> view that triggers a modal. A create user form will be inside the modal giving us the ability to quickly add a user on the fly when composing a new post.
Add <UserCreateButton>
First, let’s create our base component that uses Material-UI’s <Button> Component. React-Admin uses the Material UI library, so we don not need to download the package.
Inside of src/users.js, add the following code.
... import { withStyles } from '@material-ui/core' import MuiButton from '@material-ui/core/Button'; import AddIcon from '@material-ui/icons/Add'; const Button = withStyles({ root: { margin: '16px 0px' } })(MuiButton); export const UserCreateButton = () => { return ( <> <Button variant="outlined" color="primary" aria-label="create"> <AddIcon style={{ marginRight: '4px' }} /> Create User </Button> </> ) } ...
Then, we can import this button and add it to the Posts edit form.
In src/posts.js, import the UserCreateButton and add it to the top of the form.
import { UserCreateButton } from './users'; ... export const PostCreate = props => ( <Create {...props}> <SimpleForm> <UserCreateButton /> ... </SimpleForm> </Create> );
Save the files. Now, when you navigate to the <PostCreate> view, you see a Create User button.

However, it currently doesn’t do anything. Let’s hook it up to a modal dialog.
Create Modal
We can create the modal using Material-UI’s <Dialog> component and other child Dialog components.
Back in src/users.js, import the following modules at the top of the file.
import Dialog from '@material-ui/core/Dialog'; import DialogTitle from '@material-ui/core/DialogTitle'; import DialogContent from '@material-ui/core/DialogContent';
Then, using React hooks, let’s add a state variable before the return statement in <UserCreateButton>.
export const UserCreateButton = () => { const [open, setOpen] = React.useState(false); // Controls modal return ( ... ) }
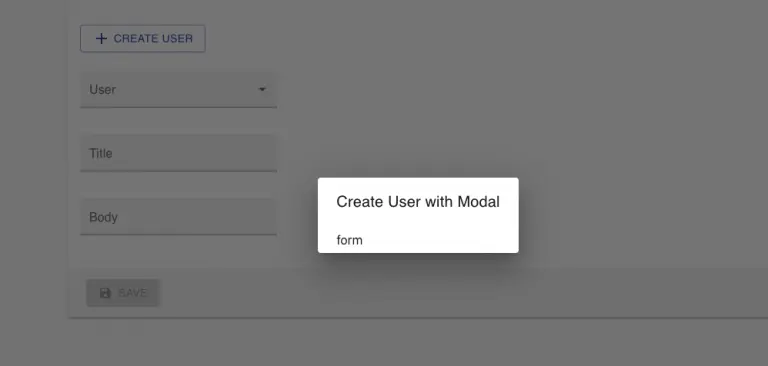
Next, add the following <Dialog> component and its children underneath the <Button> component in the return statement.
... <Dialog open={open} onClose={() => setOpen(false)} aria-labelledby="form-dialog-title" > <DialogTitle id="form-dialog-title">Create User with Modal</DialogTitle> <DialogContent> form </DialogContent> </Dialog> …
Finally, hook up the button to the open dialog variable by passing in a function for the onClick attribute value.
... <Button variant="outlined" color="primary" aria-label="create" onClick={() => setOpen(true)}> <AddIcon style={{ marginRight: '4px' }} /> Create User </Button> ...
Save the file. Now, when we click the button, we should see a friendly modal!
Let’s pause here to prepare for the jump in complexity that happens next. As mentioned, by default, React-Admin relies on routing to determine the endpoint and request for sending or fetching data.
However, we are trying to create a resource that differs from the resource in the current URL. To keep the user on the same page, we don’t want React Admin to redirect the user to different component views automatically.
Therefore, we need to create a custom form, bypassing React Admin’s redirect, that also allows us to create a User while on the <PostCreate> view.
Build Form
React Admin relies on the react-final-form library for handling forms in its built-in components. The documentation provides information on customizing a form with components like <FormWithRedirect>.
This component almost works for our use case, but we don’t want to redirect. Thankfully, the documentation provides a template, using components from react-final-form, that gives us complete control of the form submit function.
Add the below code1 to src/users.js. <DialogContent> component using components imported from react-final-form. Don’t forget to import the components at the top of the file.
// ... previous imports import { Form } from 'react-final-form'; import { Field } from 'react-final-form' import { useForm } from 'react-final-form'; import arrayMutators from 'final-form-arrays'; import Save from '@material-ui/icons/Save'; import MuiTextField from '@material-ui/core/TextField' const TextInput = withStyles({ root: { margin: '16px 0px' } })(MuiTextField); ... export const UserCreateButton = () => { const [open, setOpen] = React.useState(false); // Controls modal const handleSubmit = async values => { console.log(values) }; return ( <> ... <DialogContent> <Form onSubmit={handleSubmit} mutators={{ ...arrayMutators }} // necessary for ArrayInput subscription={defaultSubscription} // do not redraw entire form each time one field changes key={version} // support for refresh button keepDirtyOnReinitialize render={({ handleSubmit, form, submitting, pristine, values }) => ( <form onSubmit={handleSubmit}> <Field name="name"> {props => ( <div> <TextInput label={"Name"} variant="filled" name={props.input.name} value={props.input.value} onChange={props.input.onChange} /> </div> )} </Field> <Field name="username" label="Username" > {props => ( <div> <TextInput label={"Username"} variant="filled" name={props.input.name} value={props.input.value} onChange={props.input.onChange} /> </div> )} </Field> <TextField source="id" /> <Field name="company.name" label="Company" > {props => ( <div> <TextInput label={"Company"} variant="filled" name={props.input.name} value={props.input.value} onChange={props.input.onChange} /> </div> )} </Field> <Button variant="contained" color="primary" type="submit" disabled={submitting || pristine}> <Save style={{ marginRight: '8px' }} /> Save </Button> </form> )} /> </DialogContent> ... </> ) }
We did a couple of things in the code above:
Imported new modules for the form component, including components from Material-UI
Modified the styling for <TextInput> component
Created a handleSubmit function logging the form’s values to the console
Passed a form component as a child to the <DialogeContent> component with three fields
Save the file.
You should get two errors because we did not define the defaultSubscription object or the version property.
defaultSubscription
In src/users.js, add the defaultSubscription object.
const defaultSubscription = { submitting: true, pristine: true, valid: true, invalid: true, };
According to the documentation, this object stops React from redrawing the entire form when only one field changes.
version
The version property supports the form’s ability to refresh. It plays a role in getting our new User rendered as part of the list of User options after we “successfully” create the User with an API call.
For now, make the version prop available to the <UserCreateButton> component. Its value will be undefined.
...... export const UserCreateButton = ({ version }) => { const [open, setOpen] = React.useState(false); // Controls modal ...
Save the file again.
After clicking Create User, the modal should render with the new form. We should have the ability to add values to the form. Clicking the Save button logs the values in the form to the developer console.
We’re getting close! Next, we can finish the handleSubmit function.
Handling Submit
React Admin exposes a series of hooks for querying the API outside of built-in components. For this example, we want to create a new User resource. We can set up a function, pass in the name of the resource to the function as an argument, and then use that function in the handleSubmit function.
import { List, Datagrid,TextField, EmailField, Urfield, useNotify, useCreate } from ‘react-admin’; … export const UserCreateButton = ({ version }) => { … const [create, { loading }] = useCreate('users'); // Access dataProvider API call const notify = useNotify(); // Initialize notify object to send notification to dashboard const form = useForm(); // Gains access to the parent form const handleSubmit = async values => { create( { payload: { data: values } }, { onSuccess: ({ data }) => { setOpen(false); notify('ra.notification.created', 'info', { smart_count: 1 }); // Default onSuccess function }, onFailure: ({ error }) => { notify('Something went wrong.', 'error'); } } ); }; return ( ...
There are a couple of essential processes taking place in this function, we are:
Importing relevant hooks
Initializing a create function for the User resource
Creating a notification object to keep the user informed
Gaining access to the parent form with the useForm hook
Passing values and success/failure handlers to the create function
At this point, the form inside the modal is functional. However, the tutorial project uses an example data source, so every API returns a success code. If you wanted to double-check that the data from the form is submitted correctly, you could check out the network tab in the developer tools of your browser.

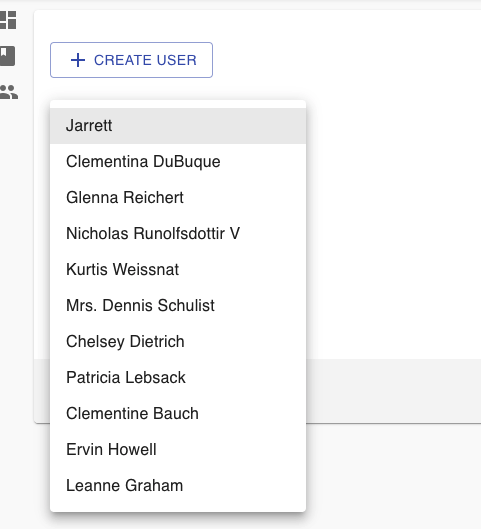
Unfortunately, the example data source will not save the new user to the database. Therefore, if you refresh the page, the new User’s name is not present. Still, the code appends the new User “successfully” and the value is accessible in the User dropdown.
You may notice that the other Users disappear from the User dropdown.
We can fix this by notifying the parent form of a change.
Correctly Updating the <PostCreate> Form
We can connect the parent <PostCreate> form to the modal User create form with the version prop and an onChange function. In src/posts.js modify the <PostCreate> component to match the code below.
export const PostCreate = props => { const [version, setVersion] = React.useState(0); const handleChange = React.useCallback(() => setVersion(version + 1), [version]); return ( <Create {...props}> <SimpleForm> <UserCreateButton onChange={handleChange} /> <ReferenceInput key={version} source="userId" reference="users"> <SelectInput optionText="name" /> </ReferenceInput> <TextInput source="title" /> <TextInput multiline source="body" /> </SimpleForm> </Create> ) }
Next, back in src/users.js, call the onChange prop at the bottom of the onSuccess handler to alert the parent form to fetch data again.
... onSuccess: ({ data }) => { setOpen(false); notify('ra.notification.created', 'info', { smart_count: 1 }); // Default onSuccess function form.change('userId', data.id); // Add the new user to the userId reference input. onChange() // Alert the form that something has changed }, ...
Save the file.
Try adding a User again while creating a new post. This time the newly created User’s name displays along with the Users from the database.
If you select a different name, the new User disappears. Again, this is a consequence of using an example database.
In theory, the onChange function forces the <ReferenceInput> component to refetch it’s data. Then, the input pulls all the IDs from the global state, not just those it knows about2.
You now should have a working modal dialog allowing users to create resources on the fly!
Conclusion
Having a modal dialog to add peripheral resources is an essential upgrade to any React Admin dashboard. If you want to skip the work of implementing the component on your own, you could try out React Admin’s enterprise <CreateDialog> and <EditDialog> components.
Regardless, I hope this tutorial is a helpful guide for understanding React Admin better and customizing the dashboard to improve the user’s experience!
References
1 “React-Admin – the Create and Edit Views.” Marmelab.com, marmelab.com/react-admin/CreateEdit.html#custom-form-component. Accessed 27 Apr. 2021
.2 Garcia, Gildas. “React Admin v3 Advanced Recipes – Adding Related Records Inline with Custom Forms.” Marmelab.com, marmelab.com/blog/2020/04/27/react-admin-tutorials-custom-forms-related-records.html. Accessed 27 Apr. 2021.