Related Services
Related Articles
<Design, Software> Google Earth DIV Overlay via iframe Shim <E-commerce, Software> The Truth About Magento and Entity-Attribute-Value <Software> SlickGrid – Versatile, Customizable, FAST Get More Useful Articles!
Introduction
Anil and I are die-hard music fans. Listening to anything ranging from the sweet sounds of an acoustic guitar to the deep depths of a bass. There is no better way to code than when we are coding to the beat of our favorite song. For this month’s content challenge here at Endertech, we decided to figure out ways we could relate code to music. We realized that a lot of music is created digitally through the use of programs like Ableton, Logic Pro X, FL Studio and wanted to see if we could fuse coding and music and create a simple music pad controller with just JavaScript, HTML and CSS. So keep scrolling down to learn how.
Demo Music Pad
Before we get into the nitty gritty on how you can create a simple music pad controller, let’s take a look at the finished product first to get you ramped up.

Now that your excitement levels are through the roof, let’s get on with the tutorial.
1. Create the Music Pad Controller Structure
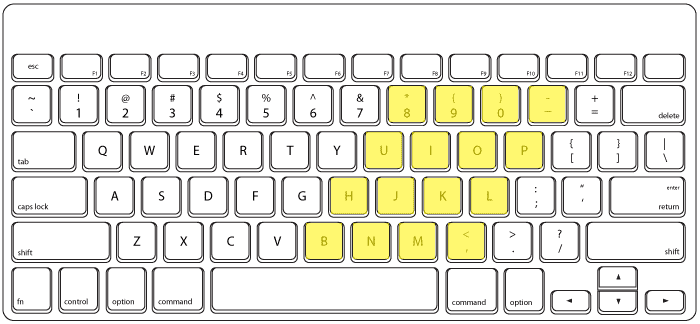
Let’s begin by implementing the visual structure of the music pad controller; a 16-block grid using CSS Grid. Each block will display a keyboard key and the type of sound it produces to help the user identify which sound they can play.We mapped the right side of keyboard from “B, N, M, ,” and going up diagonally, but you are free to map any keyboard keys you would like.
2. Register Click & Keypress Events
Now that we have created the grid we are ready to get to the action. Right now it is static; just HTML, which defines the structure and CSS which defines the styling. The first step to make the music pad controller interactive is to register two events: Click & Keypress Events. The Keypress event will allow users to use their keyboard and the Click event will allow users to use their mouse or their fingers and tap on a mobile phone to interact with the music pad controller.
The way we will detect clicks and keypresses is by using keycodes. Each key on the keyboard is mapped to a keycode that can be utilized in javascript to determine which key has been pressed. The nature of a Keypress event is to detect keystrokes so that it is easy to identify keycodes. However, with Click events are a little more ambiguous and we will have to determine which key has been pressed in reference to which pad has been tapped. By adding an id attribute id=”pad-{keycode}” to each individual pad, our Click event can retrieve the id and use it to strip the keycode.
If you want to learn more about Keyboard Events or Key Codes check this CSS-Tricks article.
Give it a try!
In the above snippet the click and keypress events are generating console.log of the keycode that has been accessed.
3. Generate Sound when interacting with each Pad.
The structure has been built, we have styled and made our pad controller interactive by registering a tap and a keypress event. Now we are ready to generate sound.
The first step is to gather all sound files and drop them in a sounds folder in your project directory. In our case we are linking directly to our github project through javascript to retrieve the sounds. To make our retrieval process easier we renamed the files in the following format ({keycode}.wav), to denote which sound should play for which keycode.
The keypress event and click event than have been modified so that on event triggered it will generate a new Audio object initialized with the audio file and play the audio. We also included a slight fade to denote a pad controller being clicked or pressed.
Give it a try!
With just a few lines of javascript, we were able to transform a simple grid into an audibly interactive pad controller, give it a try and see what beats you could create!
4. What’s next?
Well, that is up to you. The purpose of this tutorial is to show you with how little code it takes for you to create a simple digital instrument. What’s next and how you choose to expand it is all up to you.
For example: check out this alternate rendition of the Pad Controller where you can select a base melody to accompany your beats which utilizes the loop functionality of an Audio element. Or you can take it up a notch and create two pad controllers; one that controls melody samples and the other that generates beats.
Give it a try!
Test out the versatile beatpad that comes equipped with a wide variety of sounds. Give it a try and show us what beats you can create with the hashtag #enderbeats.