Introduction
For our organization, we use GitLab to store the projects we work with on a daily basis. But we don’t use all of the great features that come with it. In an effort to be a bit more efficient with our time, we decided to look into the CI/CD features of GitLab.
What is CI/CD?
CI/CD stands for Continuous Integration and Continuous Delivery/Continuous Deployment.
Any software project goes through development, testing and deployment to get to users. Continuous Integration (CI) is a modern software development practice in which incremental code changes are made frequently and reliably into a shared repository using a source code management tool like Git. Typically developers check-in their code into the repository on a daily basis. Automated build-and-test steps (Unit tests or Integration tests) are triggered by CI to ensure that the code changes being merged into the repository are reliable and bug-free. So the CI process spans the Development and the Testing phase. If the tests fail, there is typically a feedback channel to quickly report failures to developers and for the application to fall back on a previously successful build.
Continuous Delivery picks up where continuous integration ends. CD deploys all code changes in a build to the testing or staging environment.
Continuous Deployment – Automated Deployment to Production environment. This may not be as frequent in some firms and may be triggered based on release cycles. But in bigger companies like Facebook or Amazon, where continuous deployment is needed where changes go into production more frequently…this process is more applicable.
Why do we need CI/CD?
One way that we can be more efficient with our time is to automate some of our processes. This includes executing any tests a project might have to make sure that they still pass. And deployments to a staging server don’t happen as often as they should, so automating that could help with daily interactions with project managers and developers.
Some of the primary reasons many firms decide to adopt CI/CD is the increased efficiency that it brings to the software delivery process. Companies can help ship software quickly, helping companies stay competitive. Less manual intervention means reduced costs eventually. Automated tests help identify errors before code is released and deliver higher quality end-products. The process also allows rollbacks quickly in the event of issue detection during the integration and deployment process.
Evaluating our existing GitLab setup
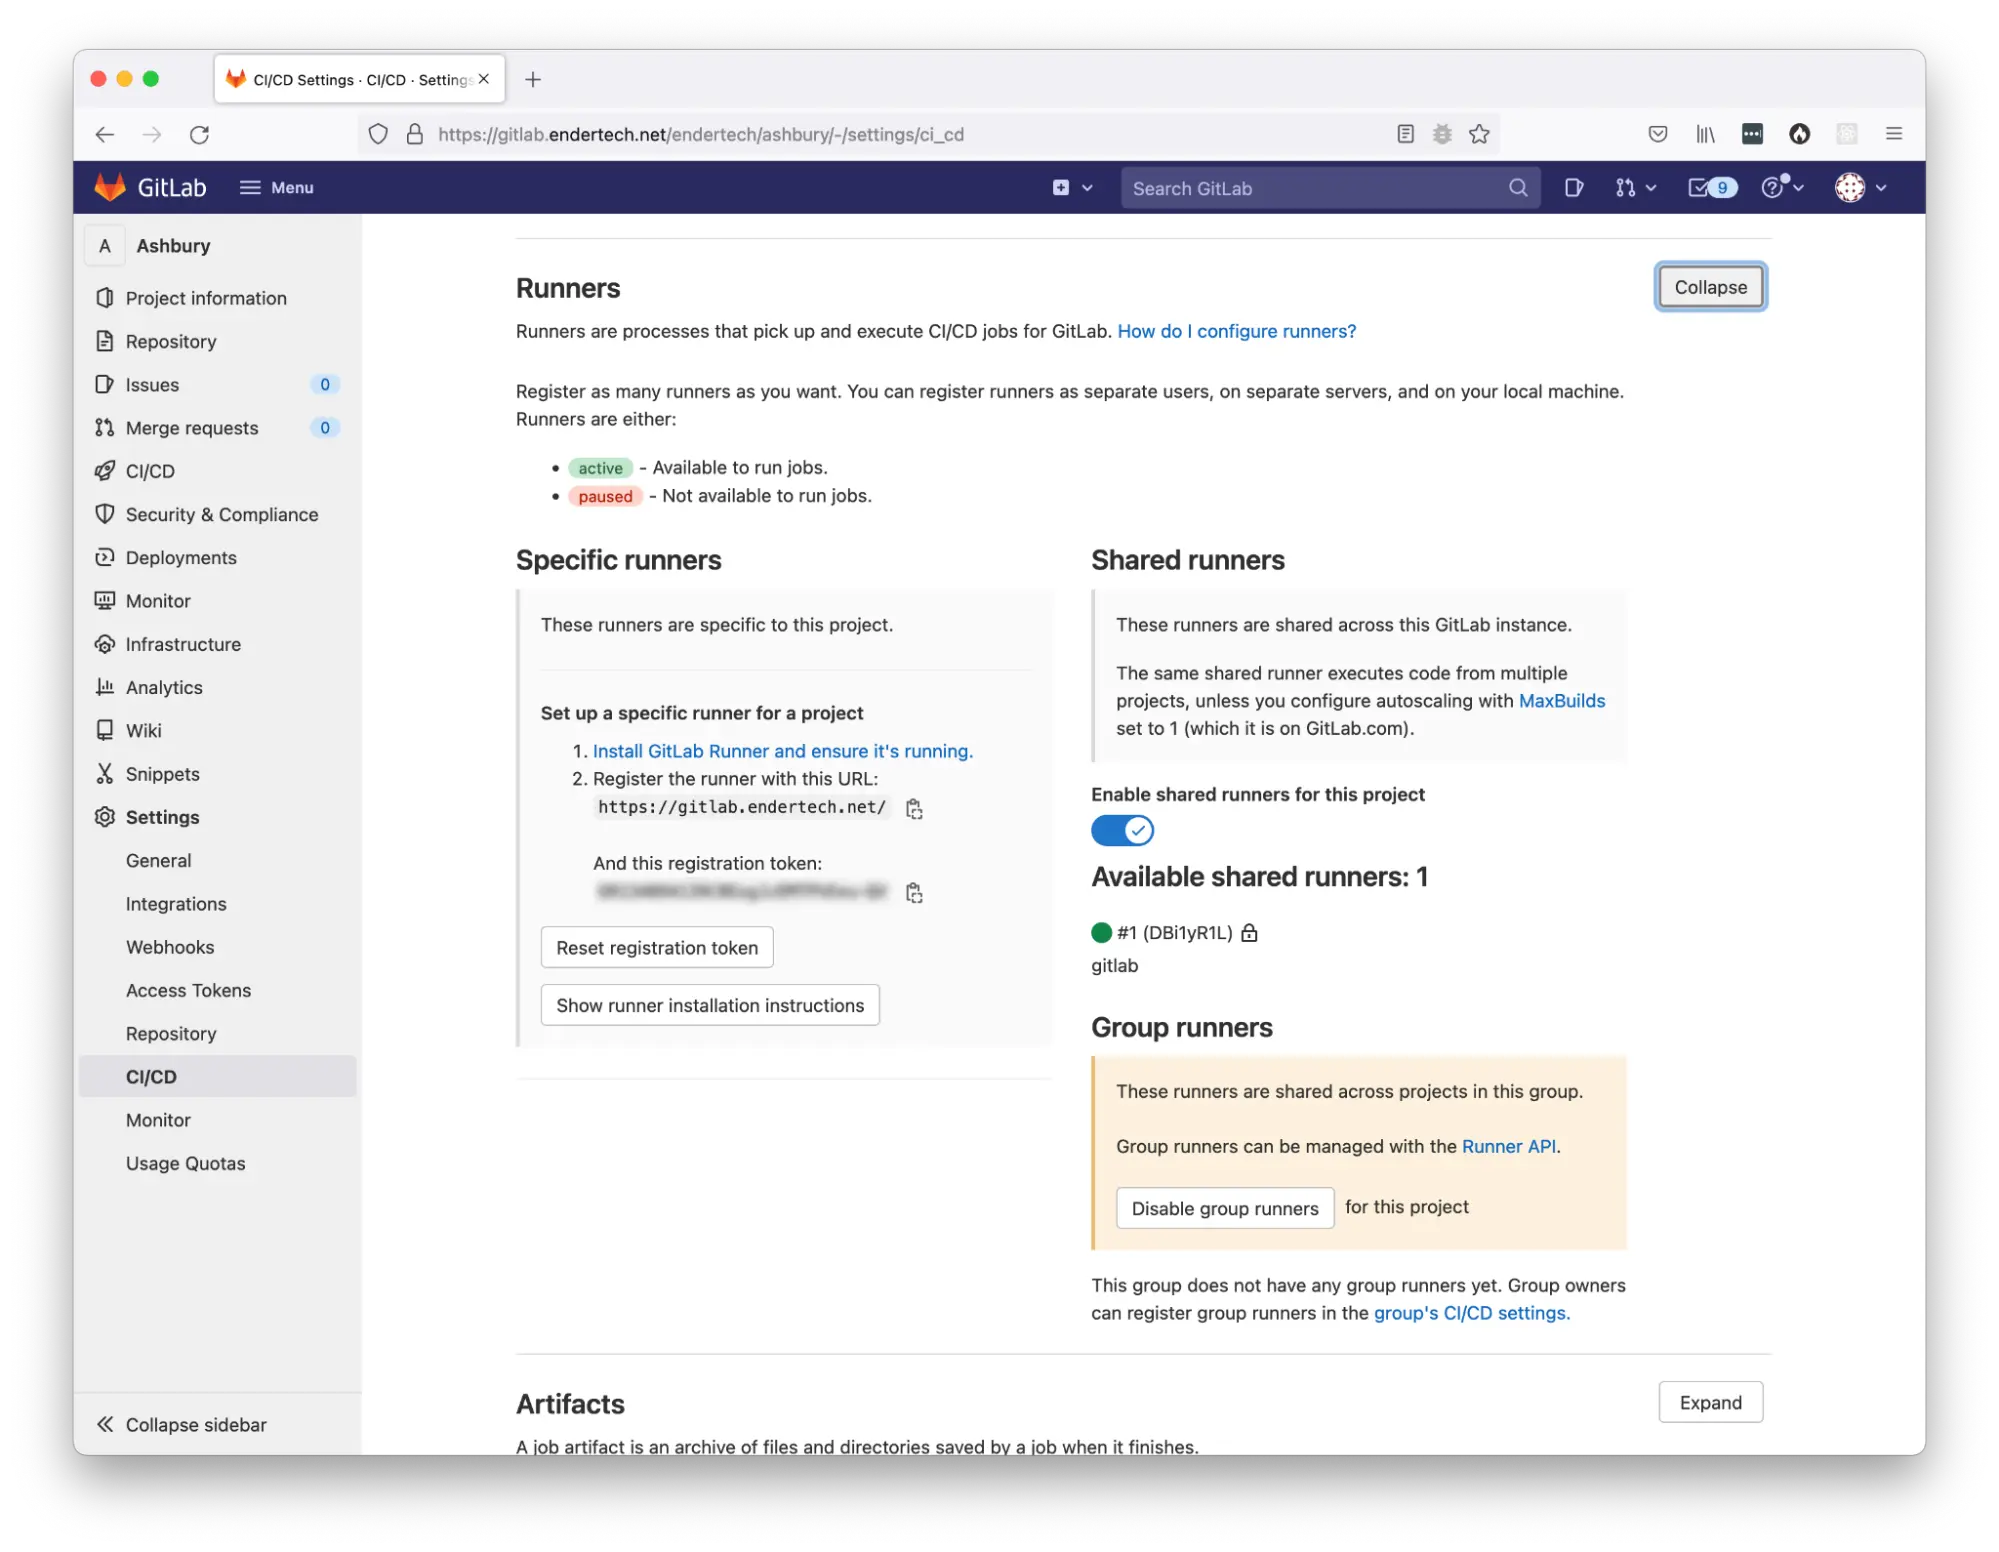
Before any configuration changes, we reviewed what was already available within our GitLab projects. When you look at a specific project, there is a left column menu with various options that include CI/CD references. When you navigate to “Settings > CI/CD” and look in the “Runners” section, we get an indication that there is something that needs to be set up beforehand in order to start using the CI/CD features. As it states on the page, “Runners are processes that pick up and execute CI/CD jobs for GitLab”. The Runners will actually perform the jobs, but there weren’t any available. That seems like one of the most important things to do.
Checking if a project has runners available
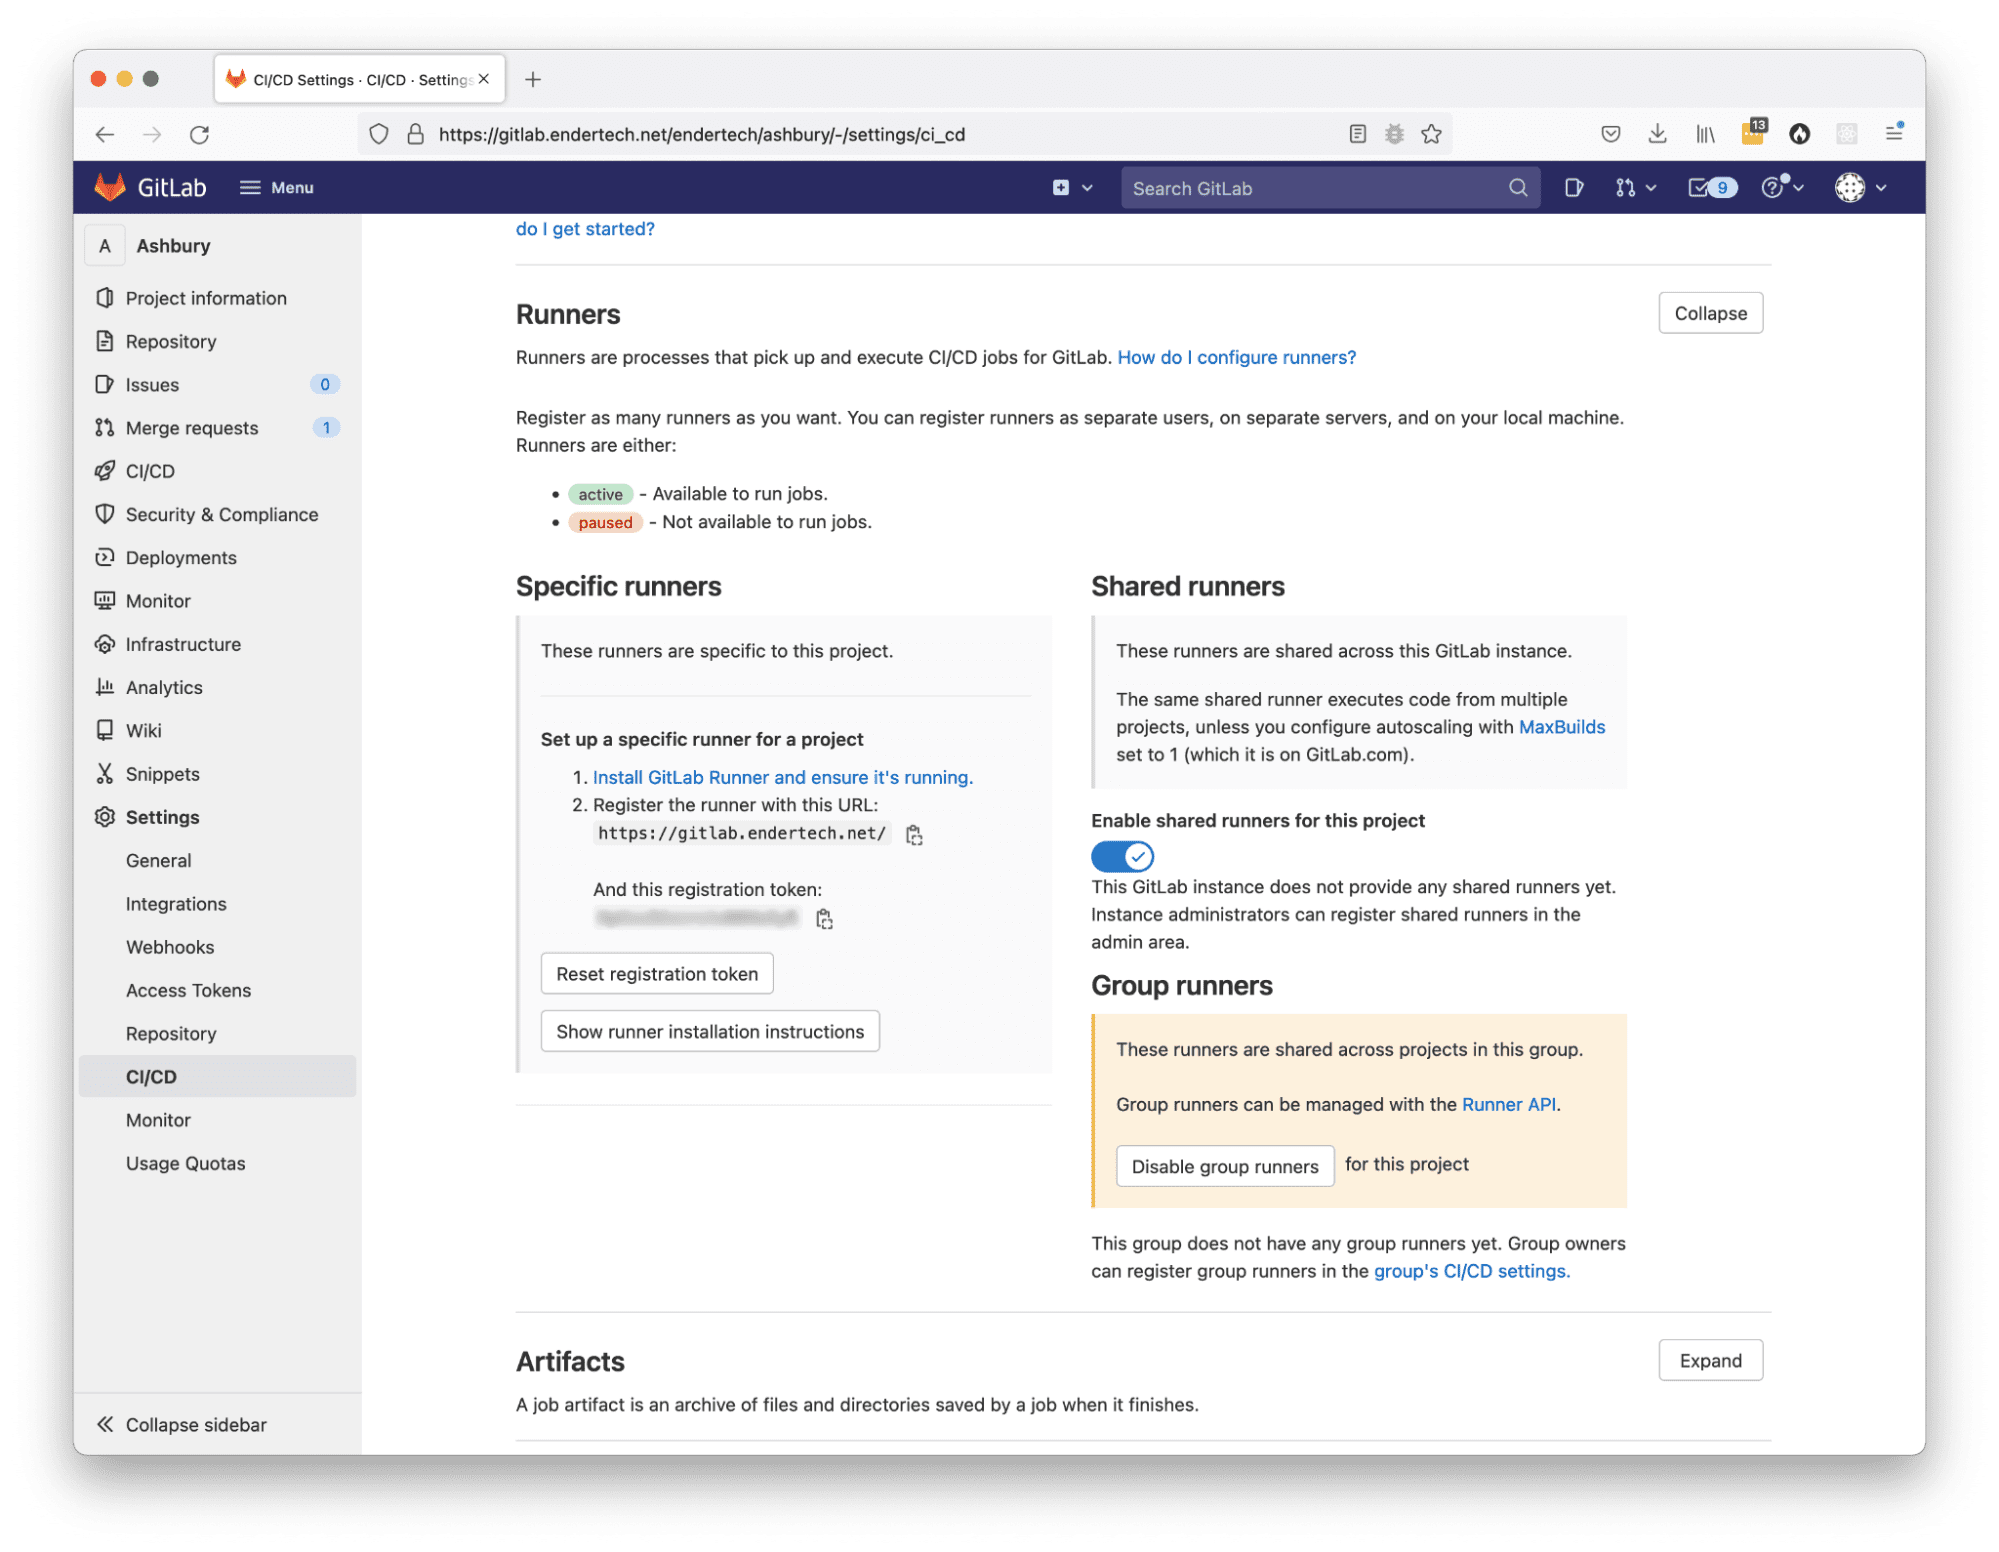
Within this page, we could see that it was possible to have different kinds of Runners available for an individual project. Since this would be the first time using this system, it would be a good idea to just get any kind of Runner set up. It seems like creating a Shared Runner will be useful for any other project that will use this system, so we will focus on creating that one. Also within this page, it gave us our next clue with the following text:
This GitLab instance does not provide any shared runners yet. Instance administrators can register shared runners in the admin area.
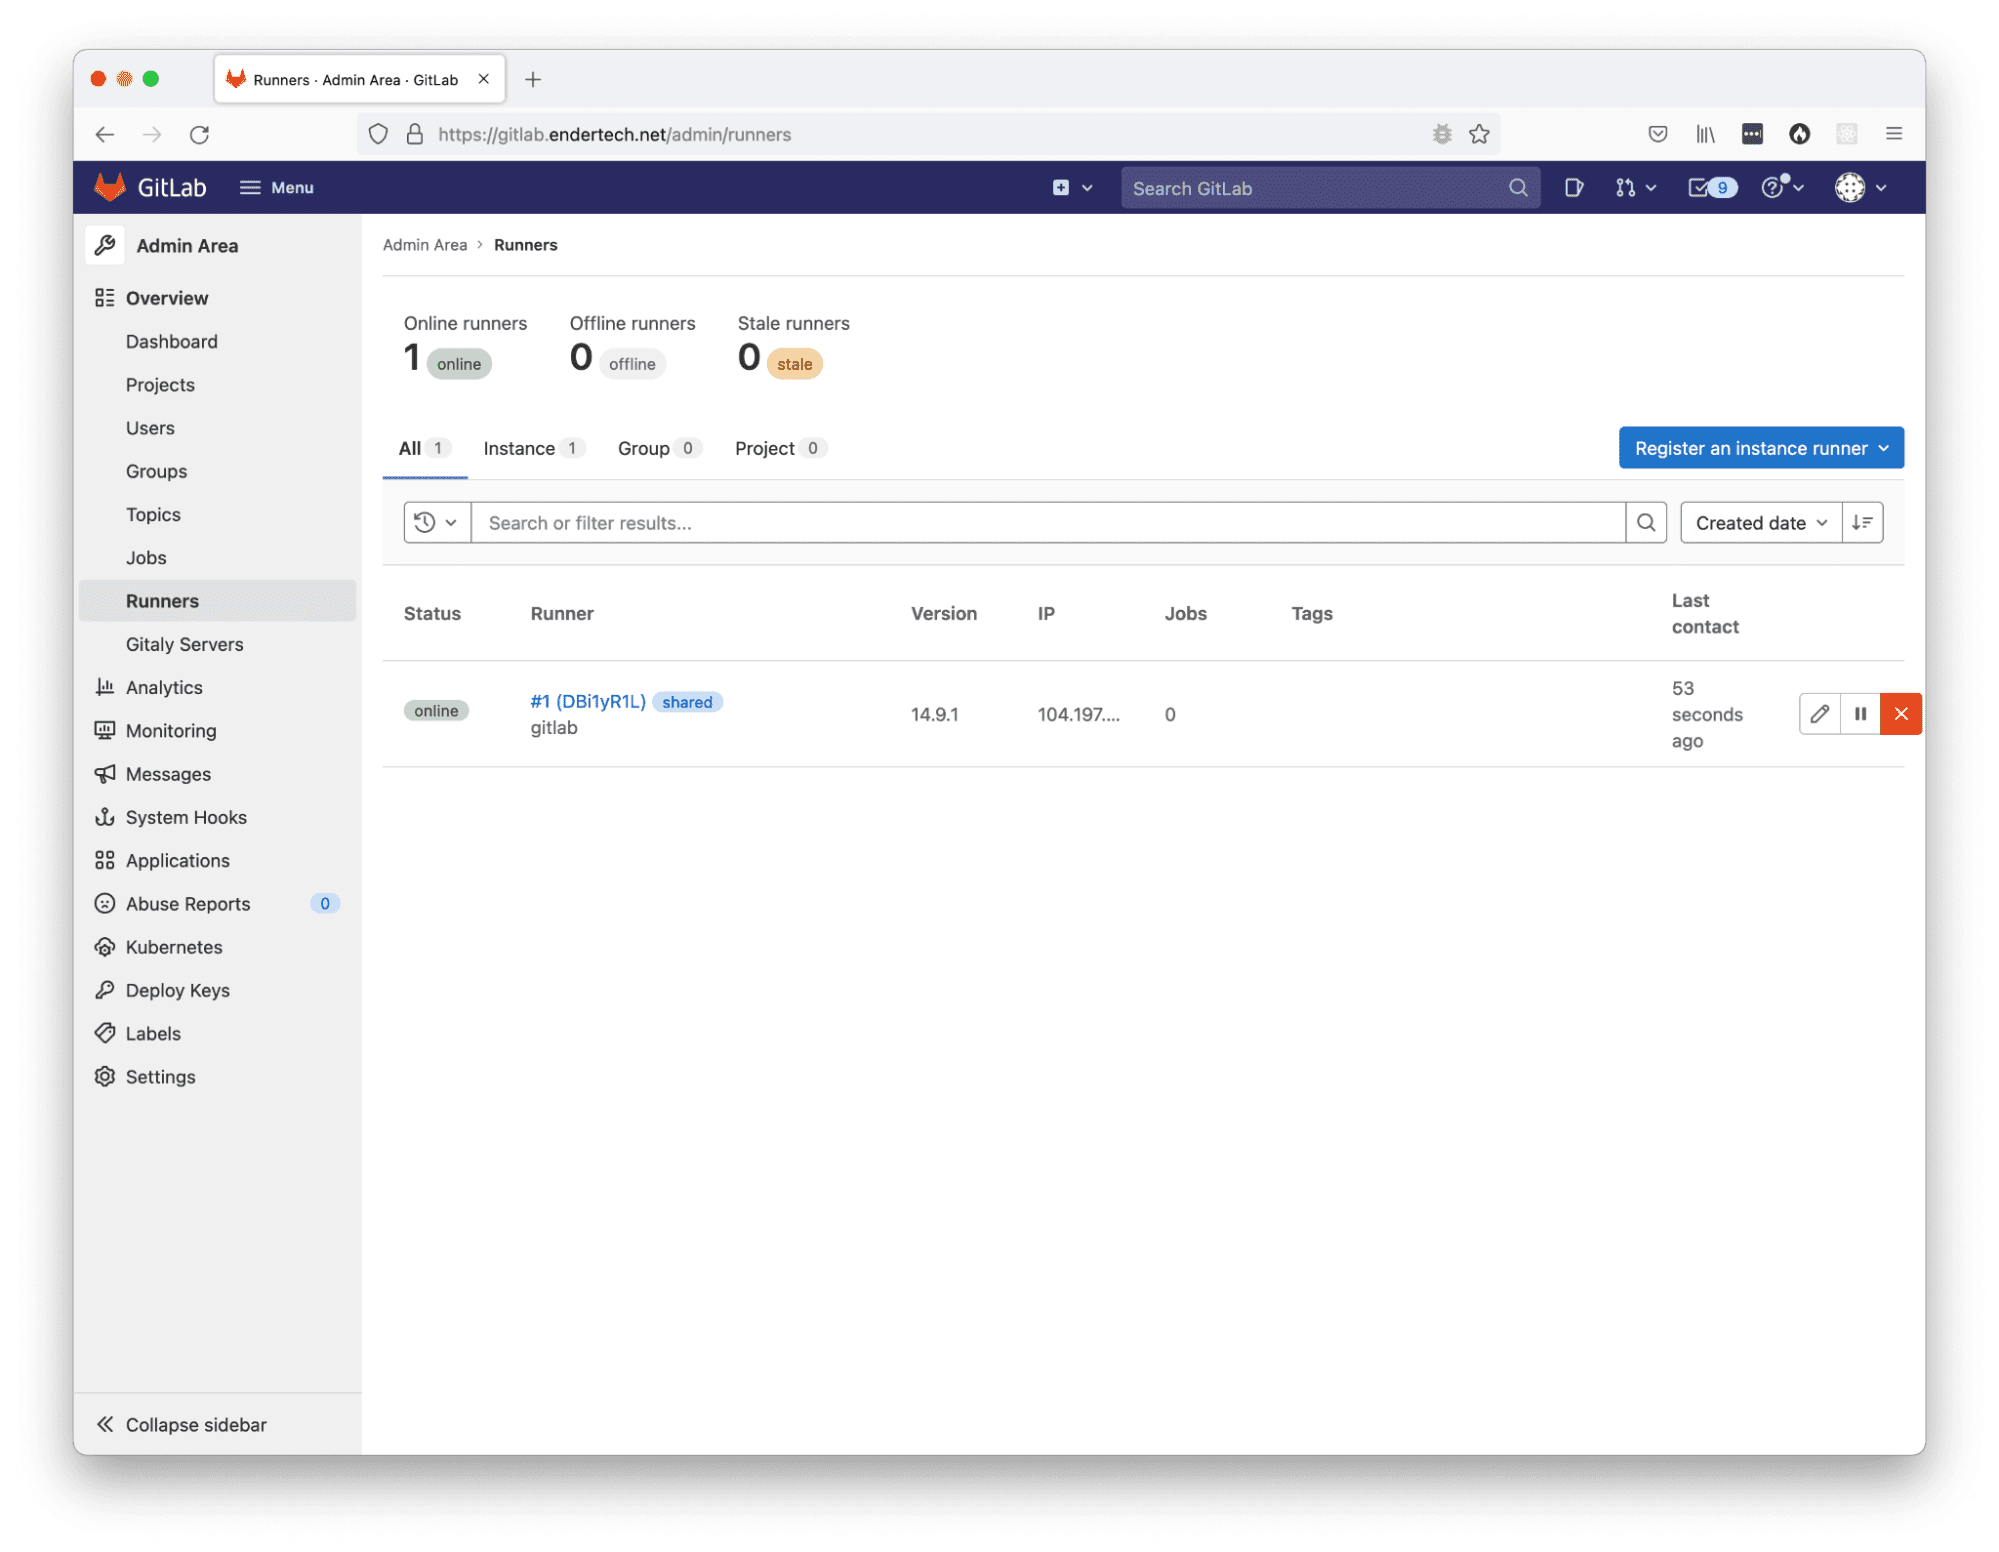
With the help of an admin, we were able to view the Admin Area of the GitLab instance we were running. Sure enough, there is a “Runners” page without any records in it. But it did have the “Register an instance runner” button, which is what we want to do!
Checking if GitLab Admin has runners defined
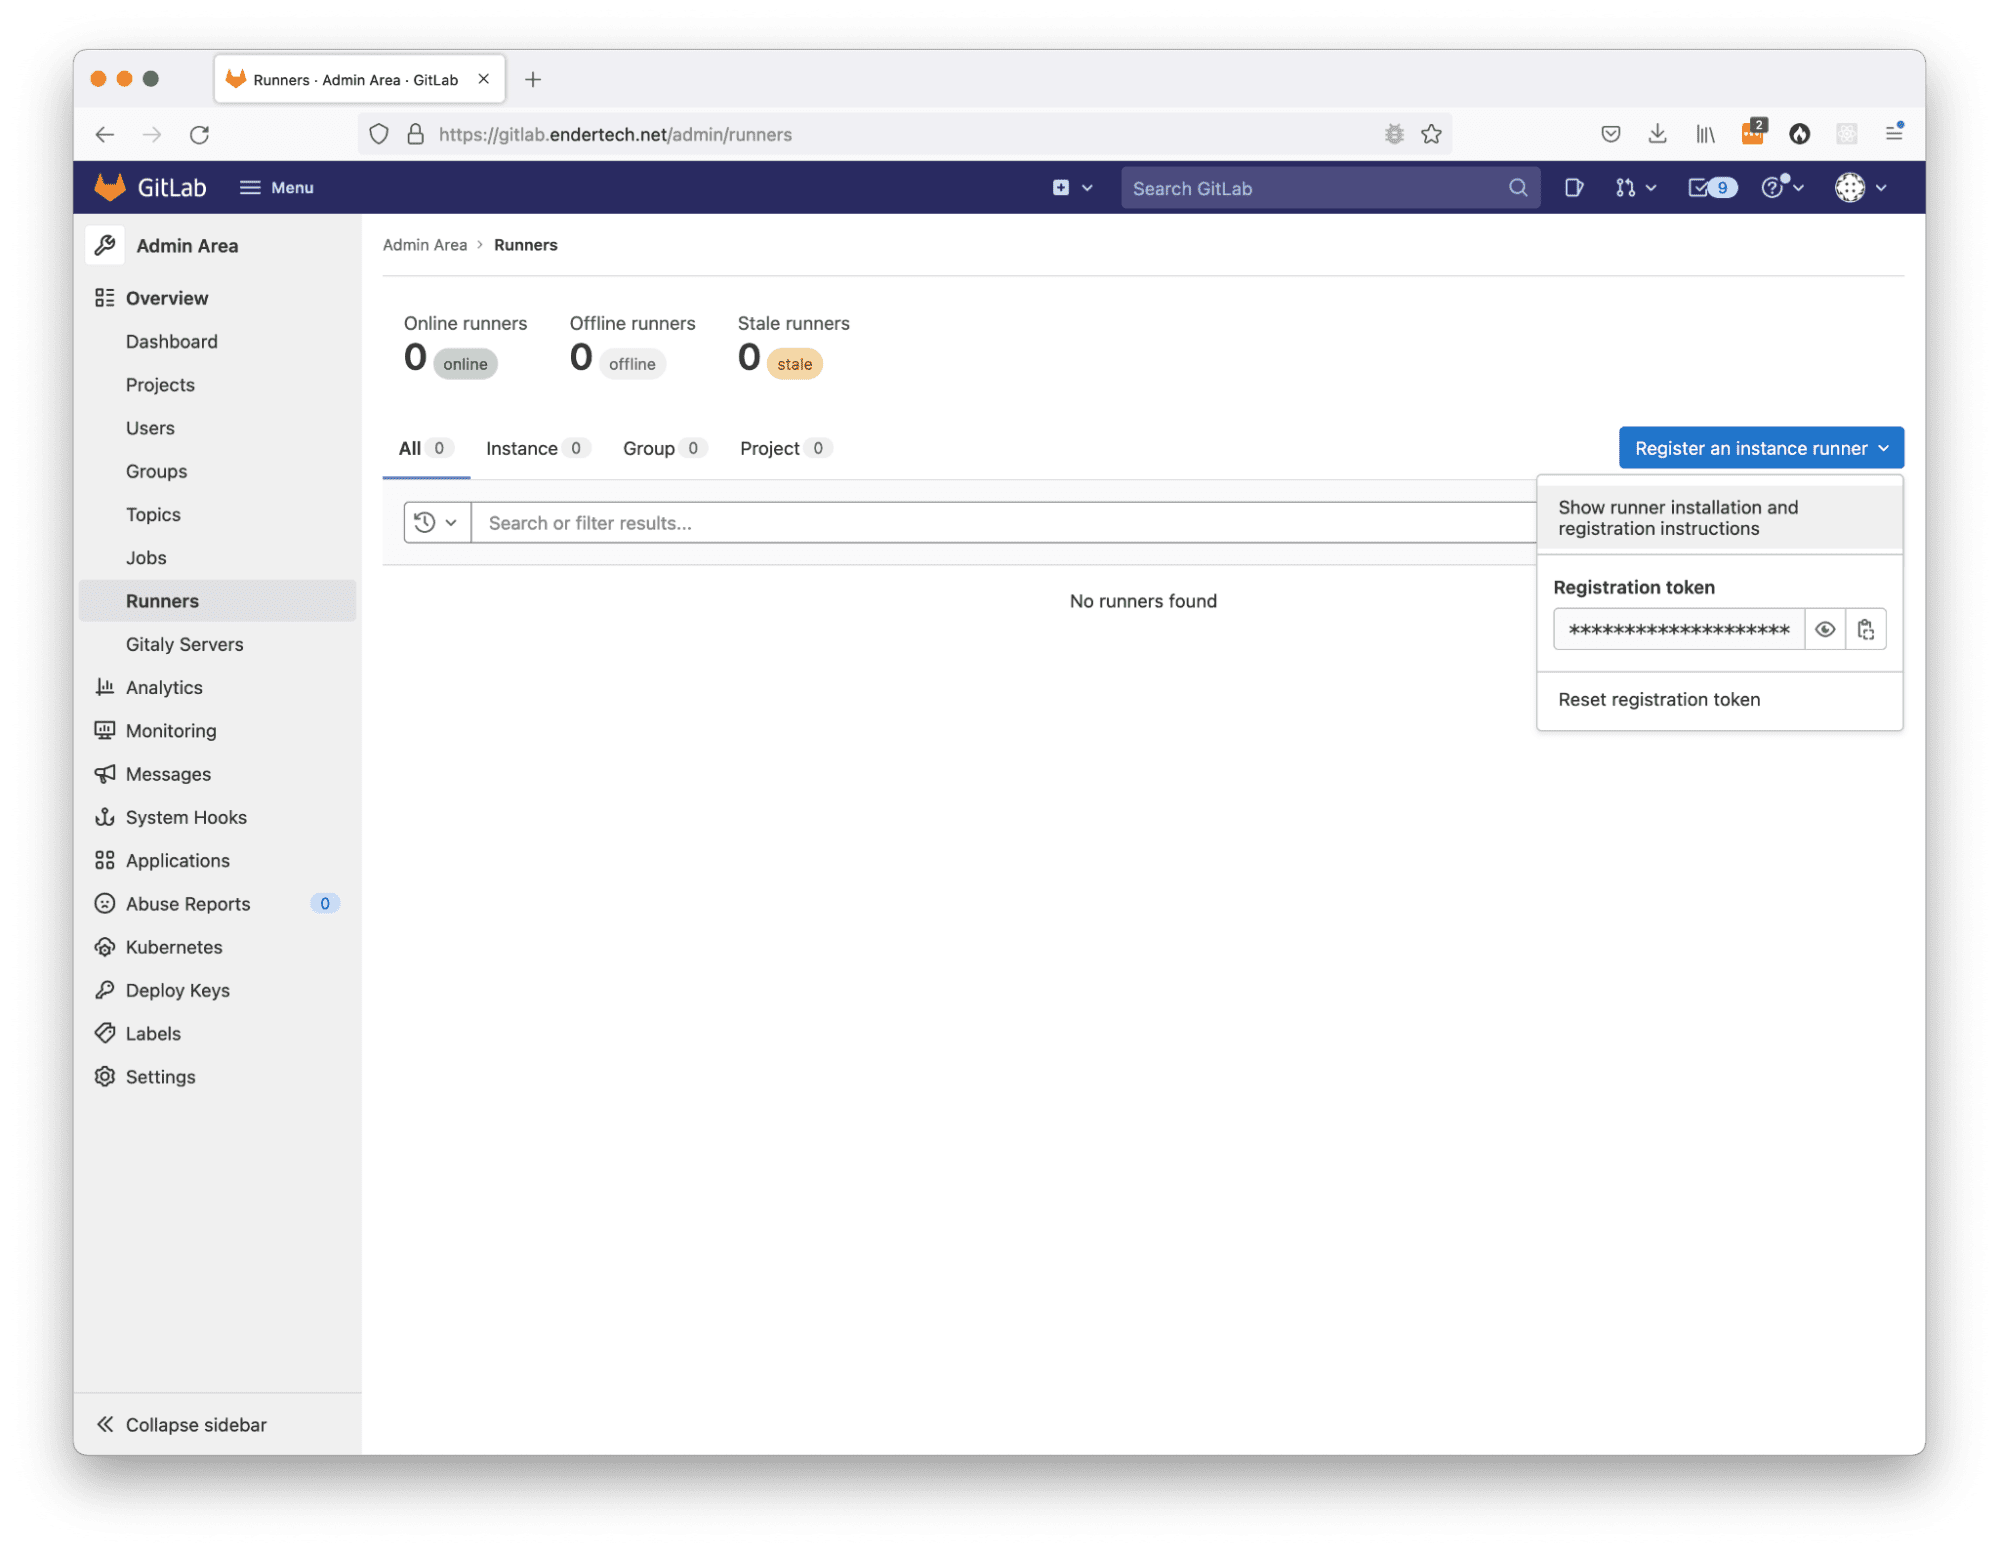
Click “Register an instance runner” Click “Show runner installation and registration instructions”
In the next window, it listed the various commands necessary to install a Runner. At this point, we are still researching what to do, so no commands will be executed just yet. We know that our server is running Linux, so we focused on those commands (which will be used later):
Linux environment Download and install binary # Download the binary for your system sudo curl -L --output /usr/local/bin/gitlab-runner https://gitlab-runner-downloads.s3.amazonaws.com/latest/binaries/gitlab-runner-linux-amd64 # Give it permission to execute sudo chmod +x /usr/local/bin/gitlab-runner # Create a GitLab Runner user sudo useradd --comment 'GitLab Runner' --create-home gitlab-runner --shell /bin/bash # Install and run as a service sudo gitlab-runner install --user=gitlab-runner --working-directory=/home/gitlab-runner sudo gitlab-runner start Command to register runner sudo gitlab-runner register --url https://gitlab.endertech.net/ --registration-token xyz123
Note: update “xyz123” to your real registration token, as well as the URL for your GitLab server.
This first research step was useful, but generated so many more questions. So it was time to do everyone’s favorite thing: Read the Documentation!
Research on GitLab CI/CD Setup
We reviewed the following pages for any information about what we might need to do for a successful system setup.
Installation instructionshttps://docs.gitlab.com/runner/install/linux-repository.html
Documentation links
https://docs.gitlab.com/ee/ci/
https://docs.gitlab.com/ee/ci/quick_start/index.html
https://docs.gitlab.com/ee/ci/introduction/index.html
https://docs.gitlab.com/ee/ci/yaml/gitlab_ci_yaml.html
https://docs.gitlab.com/ee/ci/yaml/index.html
Some of the takeaways from the documentation:
In order to actually trigger jobs based on code changes, it seems like the main way is to create/configure a .gitlab-ci.yml file.
The system will use this .gitlab-ci.yml file to perform the specified tasks in stages. These stages are typically “build”, “test”, and “deploy”.
You can use Docker configurations. This is important for us since a number of our projects use Docker to create the necessary environment to run the project code. If we can reuse that configuration it will be less work. Here is one way to execute projects with Docker configurations while the GitLab Runner itself is Docker based:
https://stackoverflow.com/questions/39868369/run-docker-compose-build-in-gitlab-ci-yml
Reading the documentation was helpful to get a better sense of what was possible. It also allowed us to think about how this system could become useful. One way was to actually incorporate a project into this CI/CD system and try it out.
One of the projects that was being worked on did have a Docker configuration using a docker-compose.yml file. It also had tests which could be executed and checked. The developers of the project also created a deployment script. So we at least had a project ready to work with.
The only thing left was to get going with the setup.
Initial Installation Attempt
We decided to install the Docker-based Runner on the same server as the GitLab instance to start with (using the “Show runner installation and registration instructions” content mentioned earlier). Using the same instance in our case had some issues, but we will get to that. We basically connected to the GitLab server remotely (via SSH) and executed the previously mentioned Linux Environment GitLab Runner Installation instructions.
Executed the installation instructions
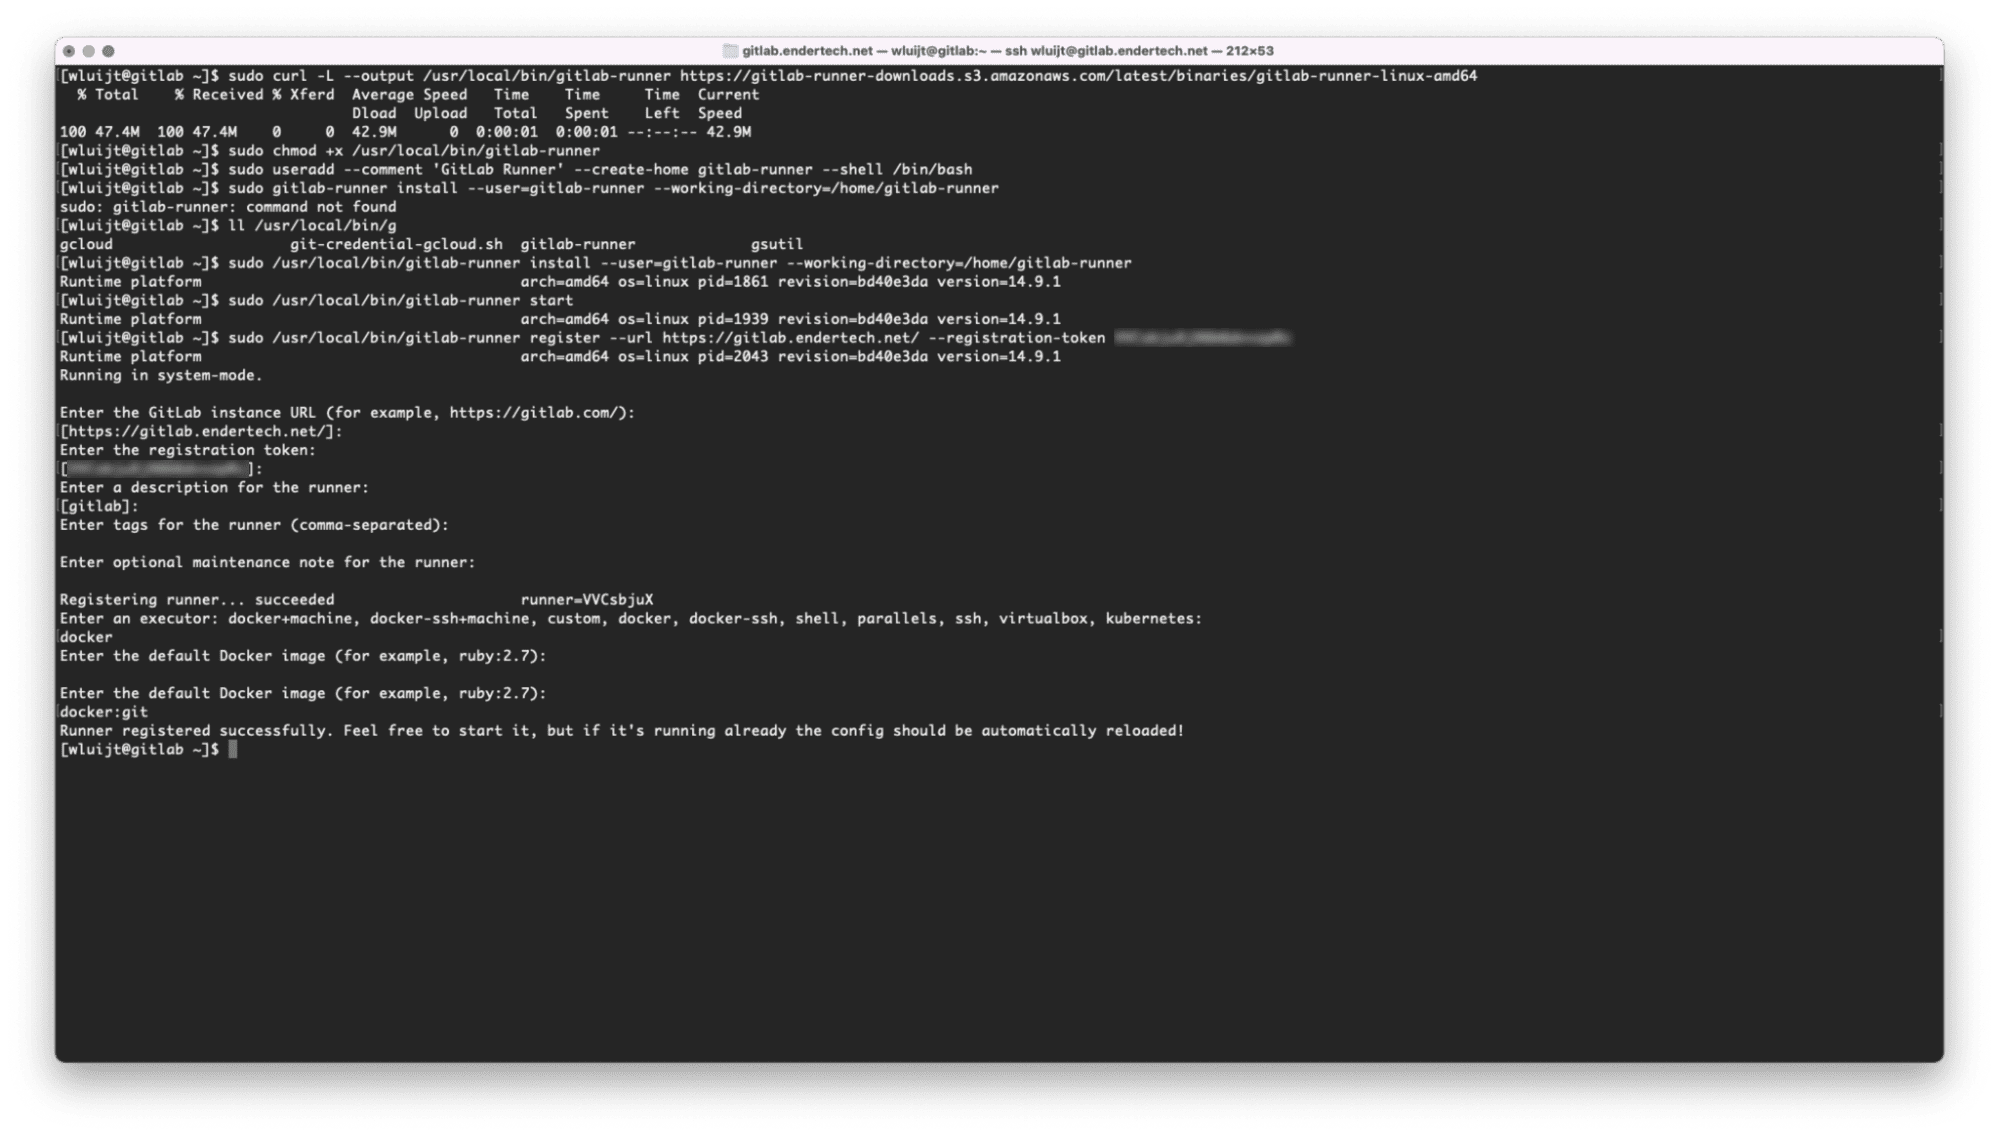
One small issue shown above was that the full path to the gitlab-runner binary needed to be used, but that was no big deal. We chose the “docker” executor and the “docker:git” default image to start with.
Now that it appeared that all of the commands executed successfully, it was time to review the GitLab Admin Area again to see if anything changed. Yes! The Runners page actually shows a new record within the list!
After registering a runner, admin list shows the shared runner instance.
This is a good sign! Previously, we looked at a specific project settings page to view the Runner configuration, so we should check there as well. And indeed it shows a new “Available shared runners” reference within the “Shared runners” section!
After registering a runner, the project settings shows a shared runner.
OK, so that part is done (for now…).
Initial .gitlab-ci.yml File
After a bit more research on the specifics of the .gitlab-ci.yml file syntax and how best to use a docker-compose.yml file configuration within it, the following file was created for our first project to try out the GitLab CI/CD system.
Initial .gitlab-ci.yml file used in project:
variables: DOCKER_HOST: tcp://docker:2375/ DOCKER_DRIVER: overlay2 image: name: docker/compose:latest services: - docker:dind before_script: - docker info - docker version - docker-compose version build: stage: build script: - ./api/bin/init-test-environment-files.sh - docker-compose down - docker-compose build - docker-compose up -d test: stage: test script: - ./api/bin/run-all-tests-with-coverage.sh
This file specifies that our first step is to build the Docker containers and then run all the tests within those running containers. That’s at least what we thought should happen. There are some issues with this specific configuration, but we needed to actually start somewhere.
So we added this .gitlab-ci.yml file to the top directory of the project, git added the file, committed, and pushed. The GitLab system did discover the file and actually executed it!
Executing the first job
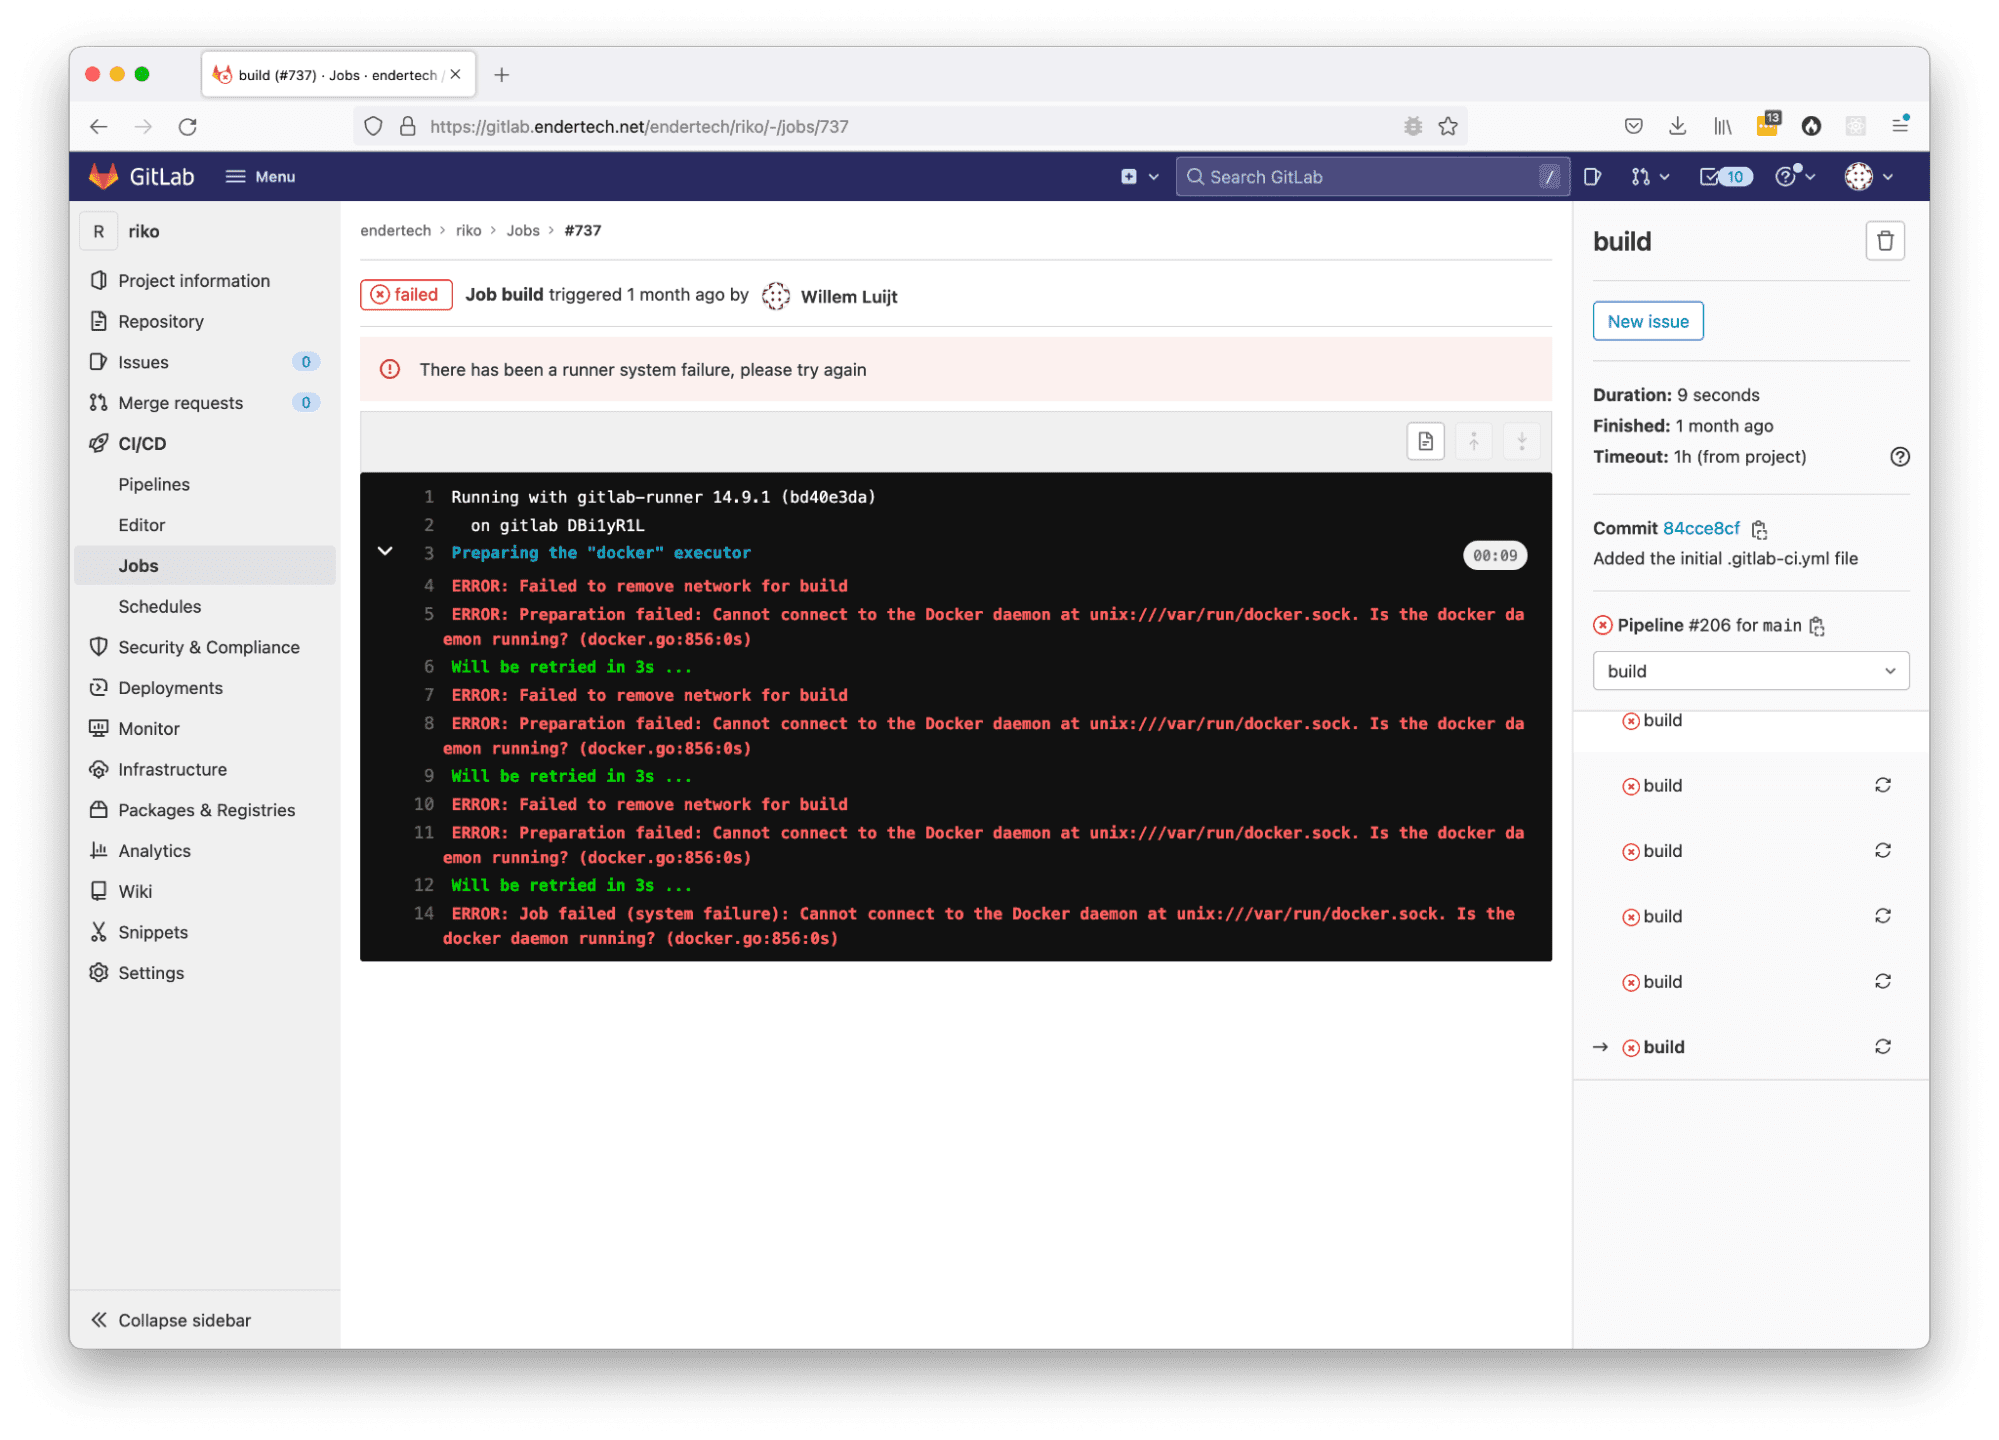
But it failed? Why? Ohh…. we actually need Docker on the server, too.
Installing Docker
At this point we only did the GitLab Runner installation, but we chose the “docker” executor. So we need to install Docker as well. We never did the actual installation of part of the system that we would rely on.
Additional steps taken:
Install Docker on the GitLab server:
sudo yum install -y docker; sudo systemctl start docker; sudo systemctl enable docker.service;
sudo systemctl enable containerd.service;
https://docs.docker.com/config/daemon/systemd/https://docs.docker.com/engine/install/linux-postinstall/#configure-docker-to-start-on-boot
Alright, so now that the server had Docker available, we were able to re-run the first failed build job. But after some more experimentation, there was a pretty big issue that we discovered. The execution was super slow. It turns out it was related to the “overlay2” configuration used (in the DOCKER_DRIVER variable in the initial .gitlab-ci.yml file) and the way that Docker stores its containers on the host system. This also revealed several other issues for our first setup.
First, our GitLab server was not configured with a lot of disk space (only around 20GB). When your projects are mainly text files for source code, it doesn’t really need the most space. When we added this first CI/CD configuration, the Docker system now wants to download full system packages for the project to execute with, taking up far more disk space as the jobs are running. That space would eventually be restored when the job finished, but it just barely fit.
Second, the host operating system running the GitLab instance was not the latest and greatest available at the time of this writing. That made it difficult to ensure that the “overlay2” driver that Docker needed could be used. If we needed to upgrade things, that might mean that other developers could not access their project git repositories due to server downtime.
Third, this server does contain our client’s projects. It would not be a good idea to continue using the main GitLab instance as the first Runner server, especially if there was some unrelated issue. We want to have this Runner instance without affecting the projects themselves.
So it was decided to create a brand new server specifically for the purpose of executing the GitLab Runner. This server would have CentOS 8 with 100GB of space. The drive that was created would also be formatted in such a way to allow the “overlay2” driver to work well. Once that was done, it was time to install… everything… again…
Re-Installation on a separate server
So the same GitLab Runner Installation instructions were executed on this new CentOS 8 server without much issue. The Docker installation was also done, but there was something not quite right. We were retrying the CI/CD jobs in the GitLab interface (usually with the blue Retry button on the job page), but there was a “Link is not supported” error we encountered.
An error related to the Docker setup
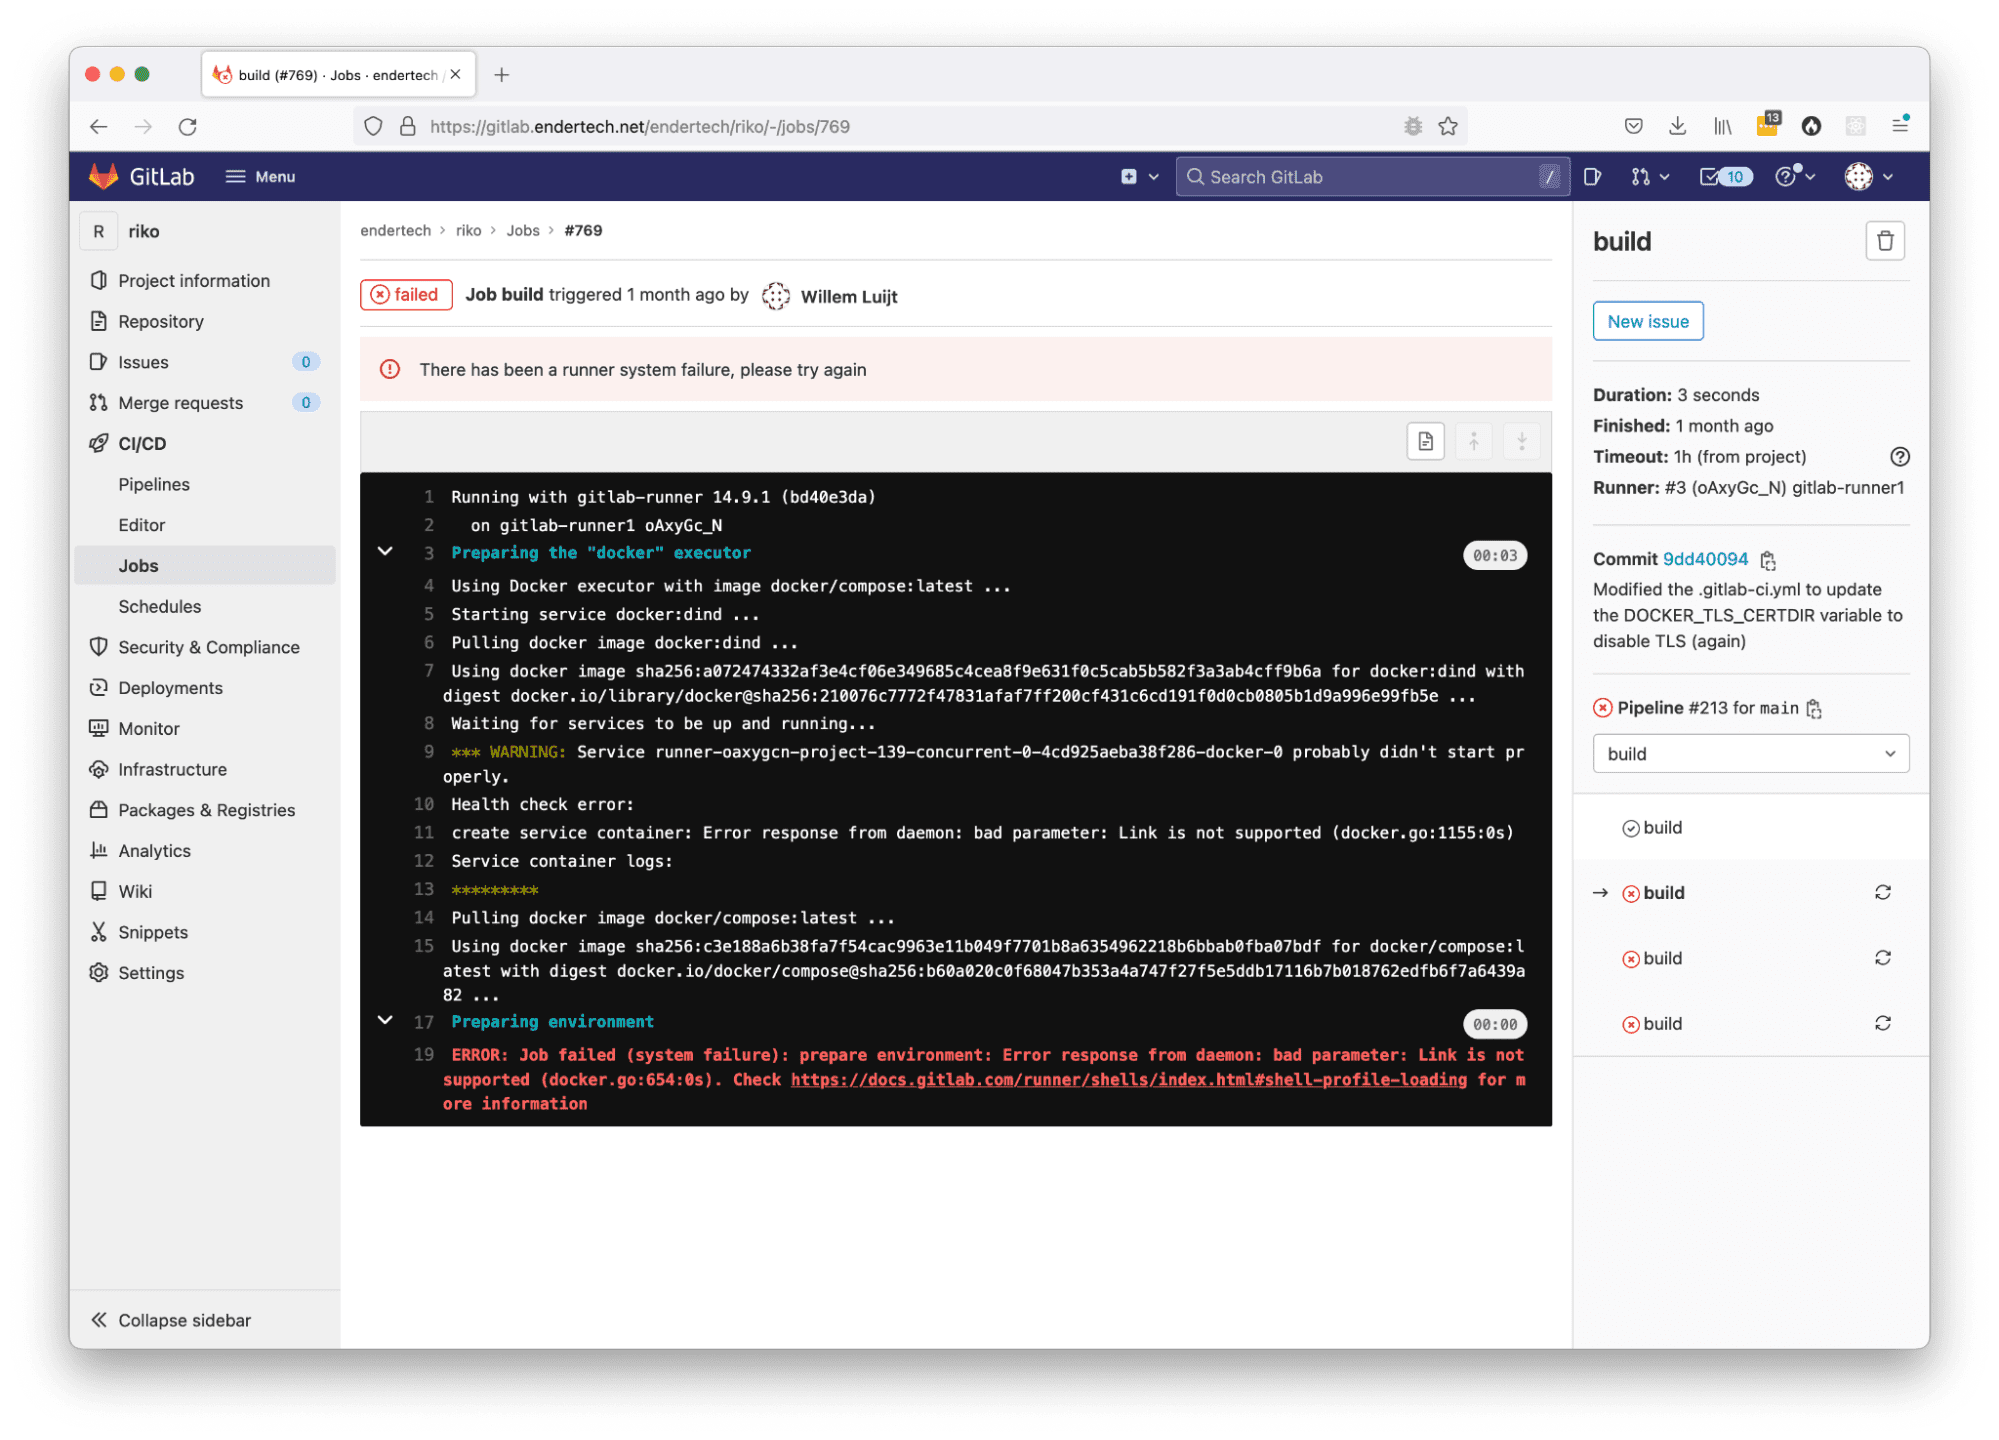
It turns out, when executing the same commands that specifically state “docker” in them (i.e. “sudo yum install -y docker;”), the CentOS 8 system will actually install Podman. For our purposes, we actually needed Docker specifically. So we actually needed to uninstall the “docker” aliased Podman system and install the “docker-ce” package instead.
CentOS 8 tries to install Podman, which might not work due to missing network Link functionality
https://linuxhint.com/install-use-docker-centos-8/
sudo dnf remove docker docker-latest docker-engine docker-client docker-common docker-client-latest docker-logrotate docker-latest-logrotate; sudo dnf config-manager --add-repo=https://download.docker.com/linux/centos/docker-ce.repo; sudo dnf install docker-ce --nobest --allowerasing -y; sudo systemctl start docker; sudo systemctl enable docker.service; sudo systemctl enable containerd.service;
Now that our system has a separate server, a Docker (specifically) GitLab Runner registered correctly, and proper disk space, the builds were taking way less time.
But we did encounter different issues during this troubleshooting process that still needed to be addressed.
Addressing Additional Configuration Issues
The following describes the text used to search with in order to find a solution to these issues.
Issue: gitlab runner you are not allowed to download code from this project
Solution: make sure that the GitLab user executing the job is a member of the project.
Display of the GitLab CI/CD job page with the ‘You are not allowed to download code from this project’ error message
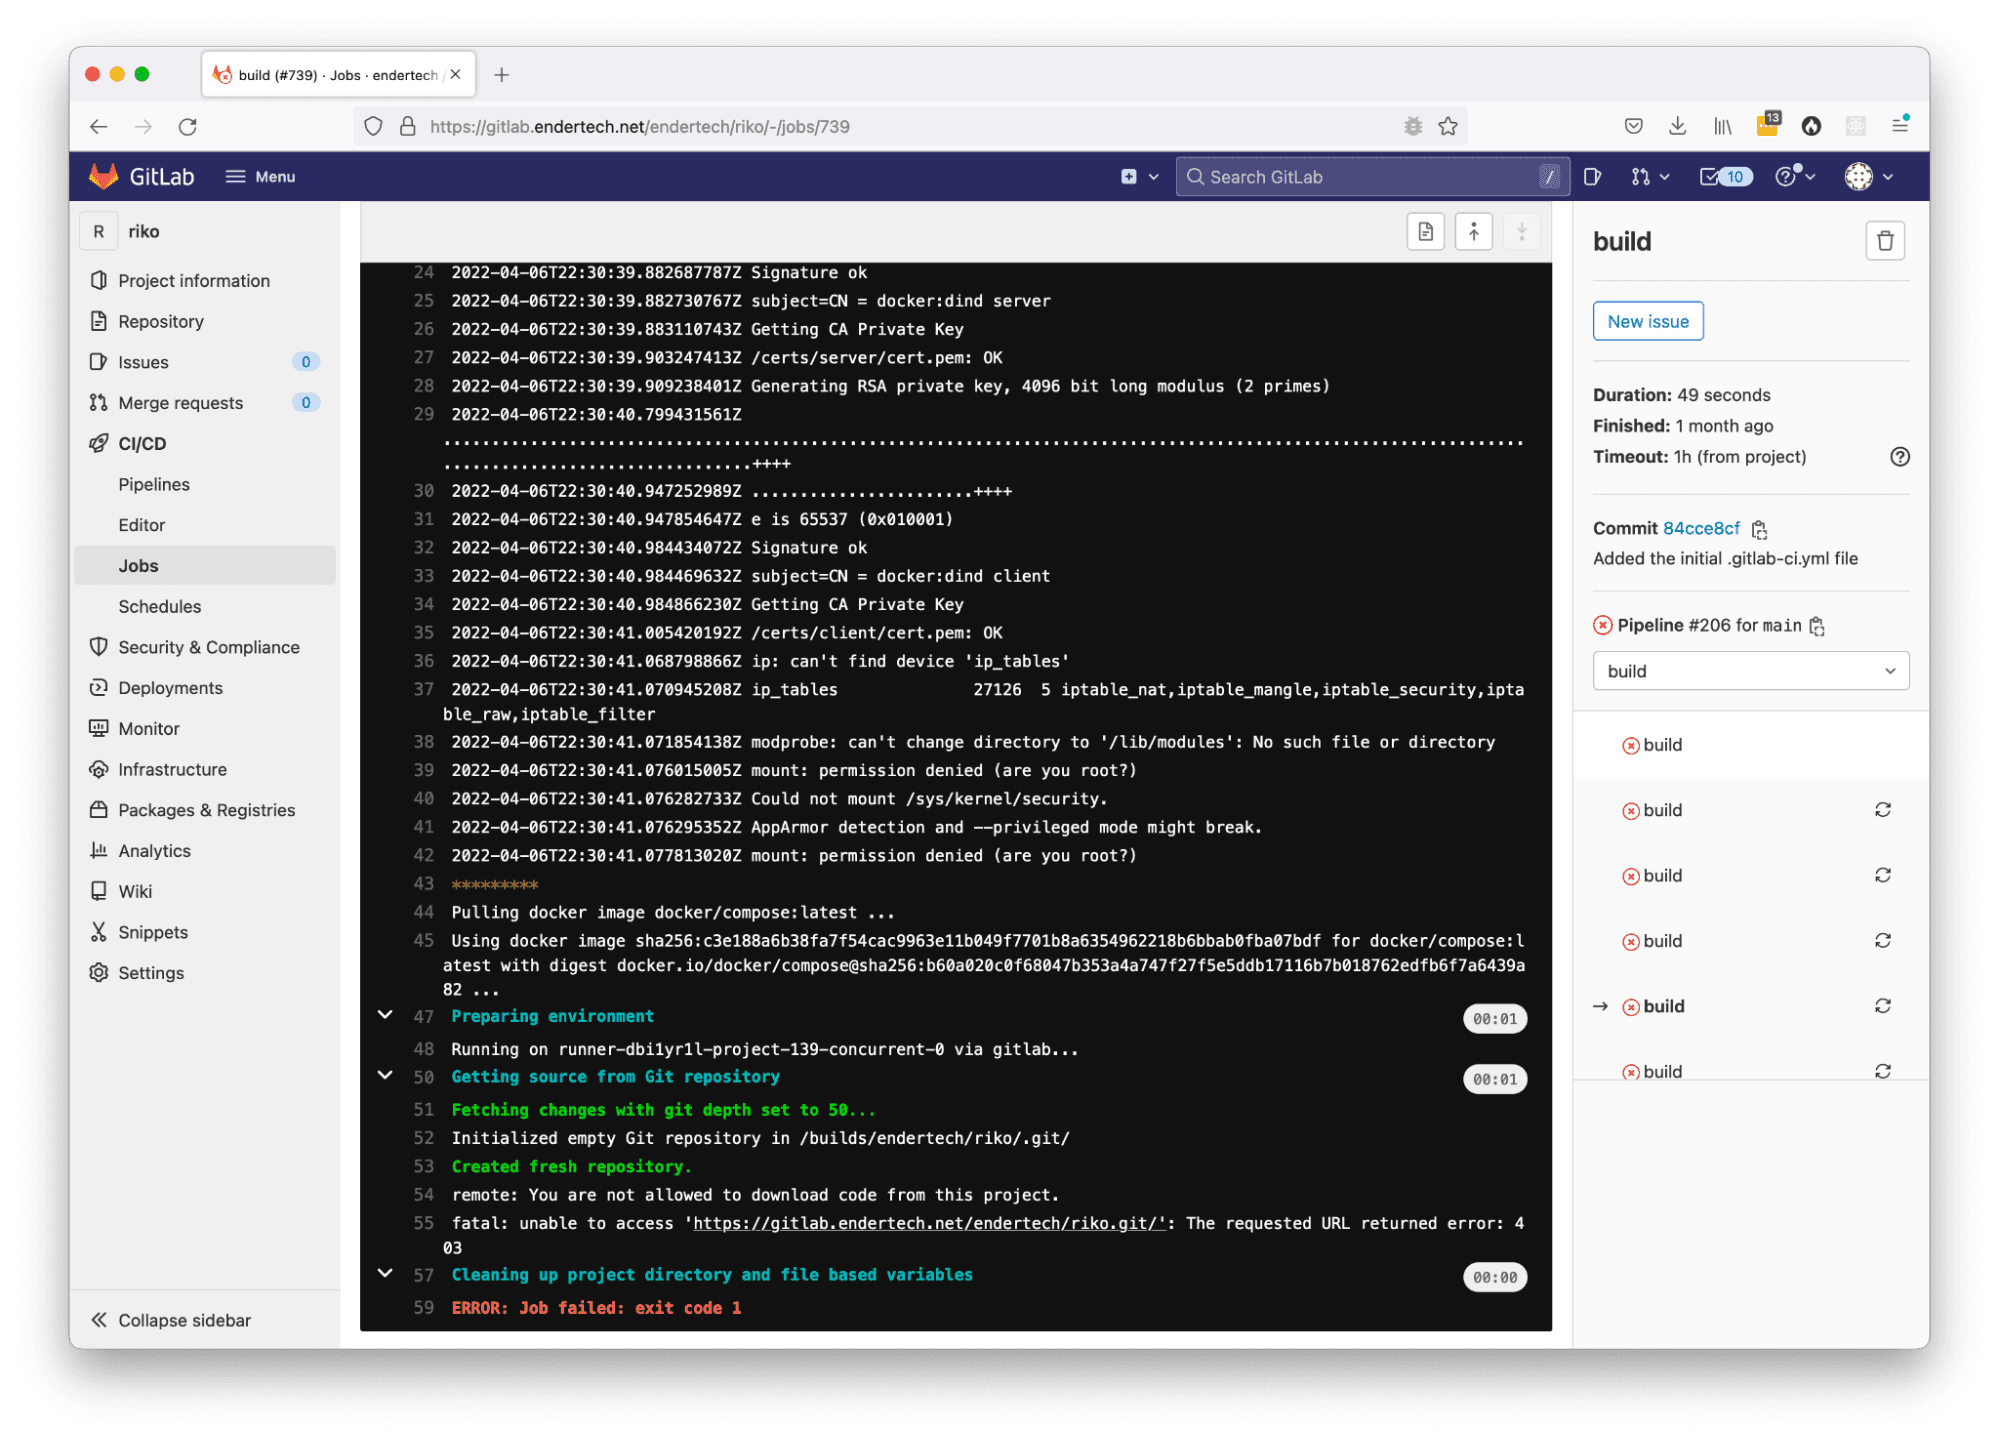
In this project we were using to test the .gitlab-ci.yml file configuration, it turns out that the user who triggered the job must be associated with the project in order for them to perform the git clone command properly within the job. Easy enough to just add them as a member of the project.
Issue: gitlab runner mount permission denied (are you root?)
Solution: docker:dind should run with –privileged flag.
Display of the GitLab CI/CD job page with the gitlab runner mount permission denied error message.
sudo vi /etc/gitlab-runner/config.toml; # change privileged = true and save file sudo /usr/local/bin/gitlab-runner restart;
https://gitlab.com/gitlab-org/gitlab-runner/-/issues/1544
Within the GitLab documentation, it did mention this privileged flag several times. It was simple enough to update.
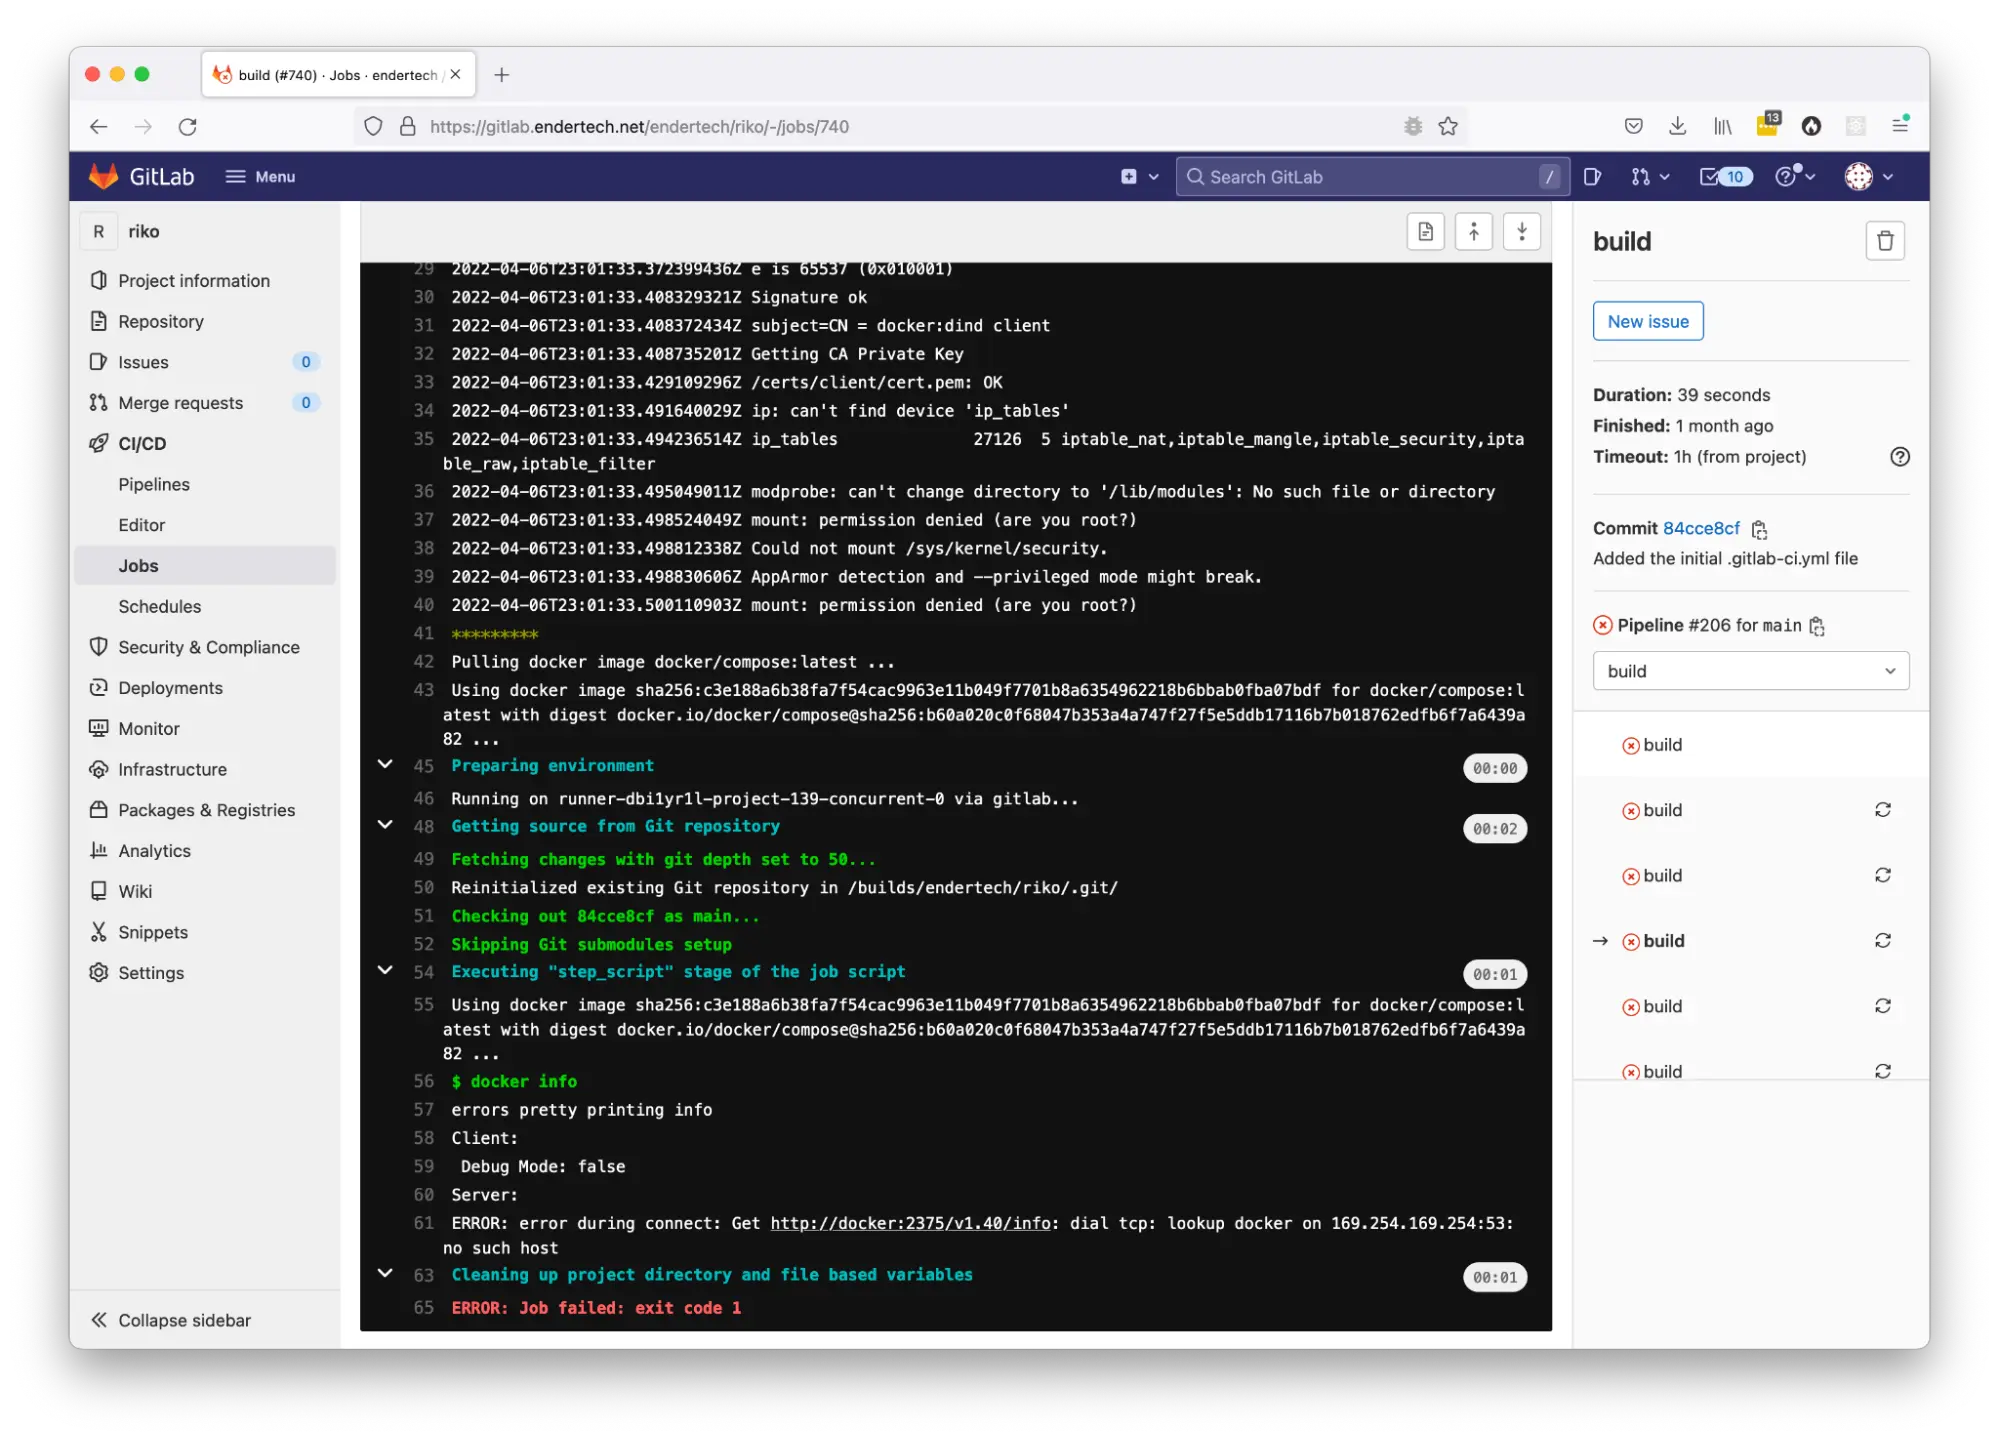
Issue: gitlab runner the input device is not a TTY
Solution: for docker-compose exec command, add the “-T” flag to disable pseudo-tty allocation
Display of the GitLab CI/CD job page with the ‘input device is not a TTY’ error message.
https://stackoverflow.com/questions/43099116/error-the-input-device-is-not-a-tty
Within some of the test execution scripts, there were docker-compose commands that were being used to trigger code execution. It seems that the output of the jobs on the GitLab webpages are not really the same as running in a local terminal. So it was simple enough to adjust those commands.
Continuous Integration (CI) Setup Successful
After a lot of server configuration issues were ironed out, the .gitlab-ci.yml file evolved a bit.
.gitlab-ci.yml file
Updated .gitlab-ci.yml file
variables: DOCKER_HOST: tcp://docker:2375/ DOCKER_TLS_CERTDIR: "" image: name: docker/compose:latest services: - docker:dind before_script: - docker info - docker version - docker-compose version - export test: stage: test script: - ./api/bin/init-test-environment-files.sh - docker-compose down - docker-compose build - docker-compose up -d - ./api/bin/init-test-environment-wait.sh - ./api/bin/run-all-tests-with-coverage.sh artifacts: paths: - ./api/tests/build/
The main difference between this file and the first file is the elimination of the build stage. In the previous setup, the test stage didn’t actually call the necessary “docker-compose up -d” command which would start up the Docker containers needed to execute the tests.
Also, this GitLab server setup doesn’t currently have the Container Registry available just yet. This means that the work done in the build stage would not be useful. Having the Container Registry will be very helpful in the future, but it will have to wait. So for this first configuration, it was much simpler to include the previous build stage into the test stage.
Because of that, a new script was added to wait for the Docker containers to be ready before actually starting the tests. Now all of the tests could be executed properly.
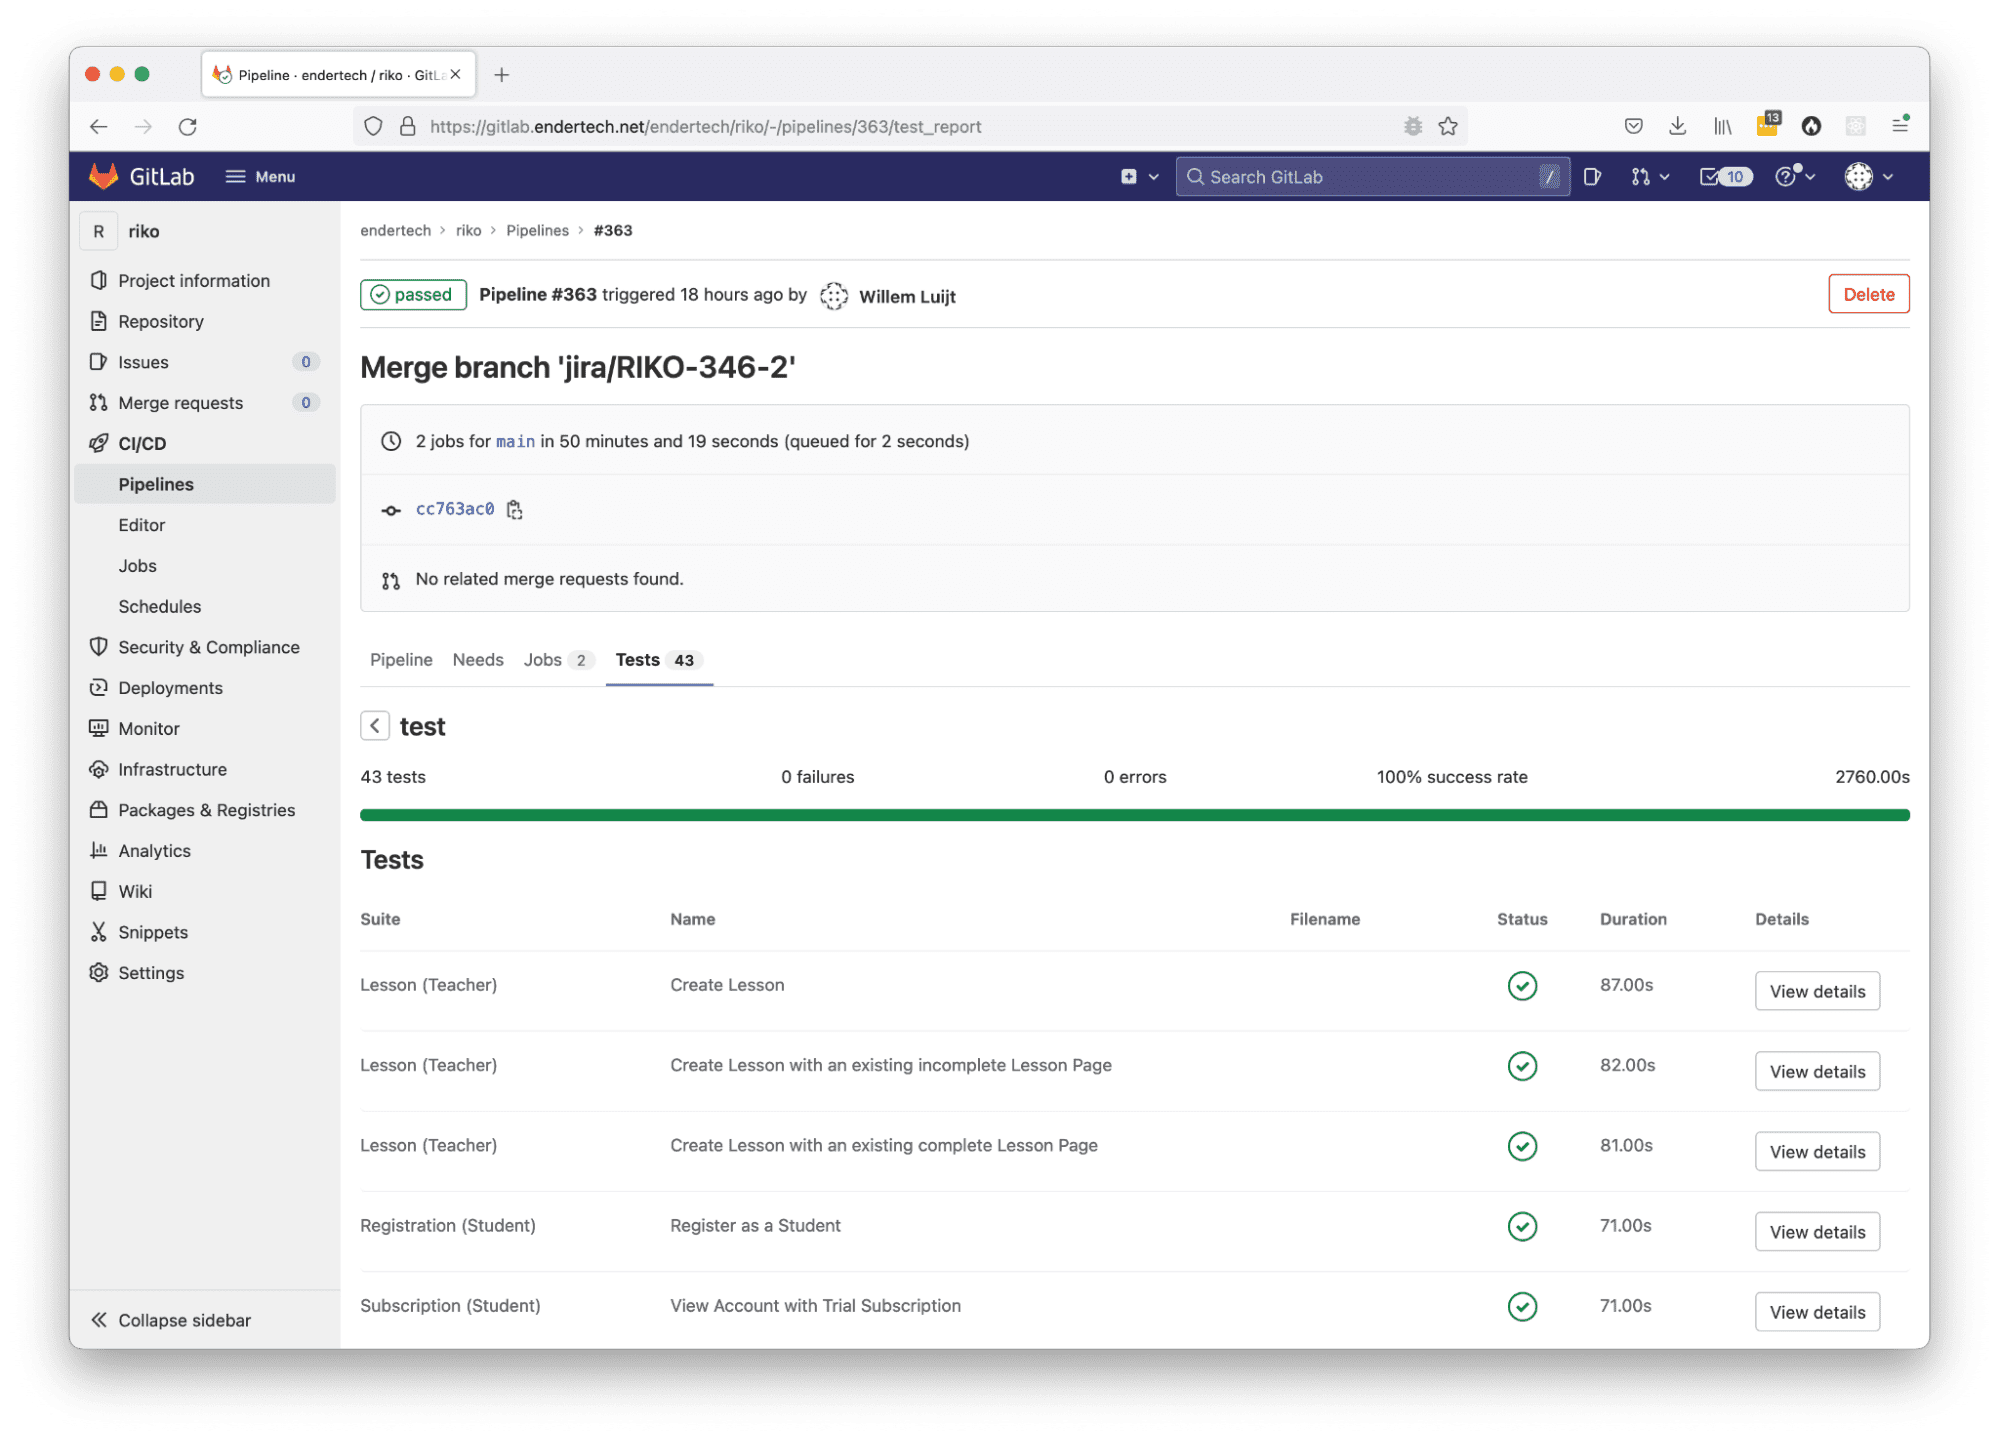
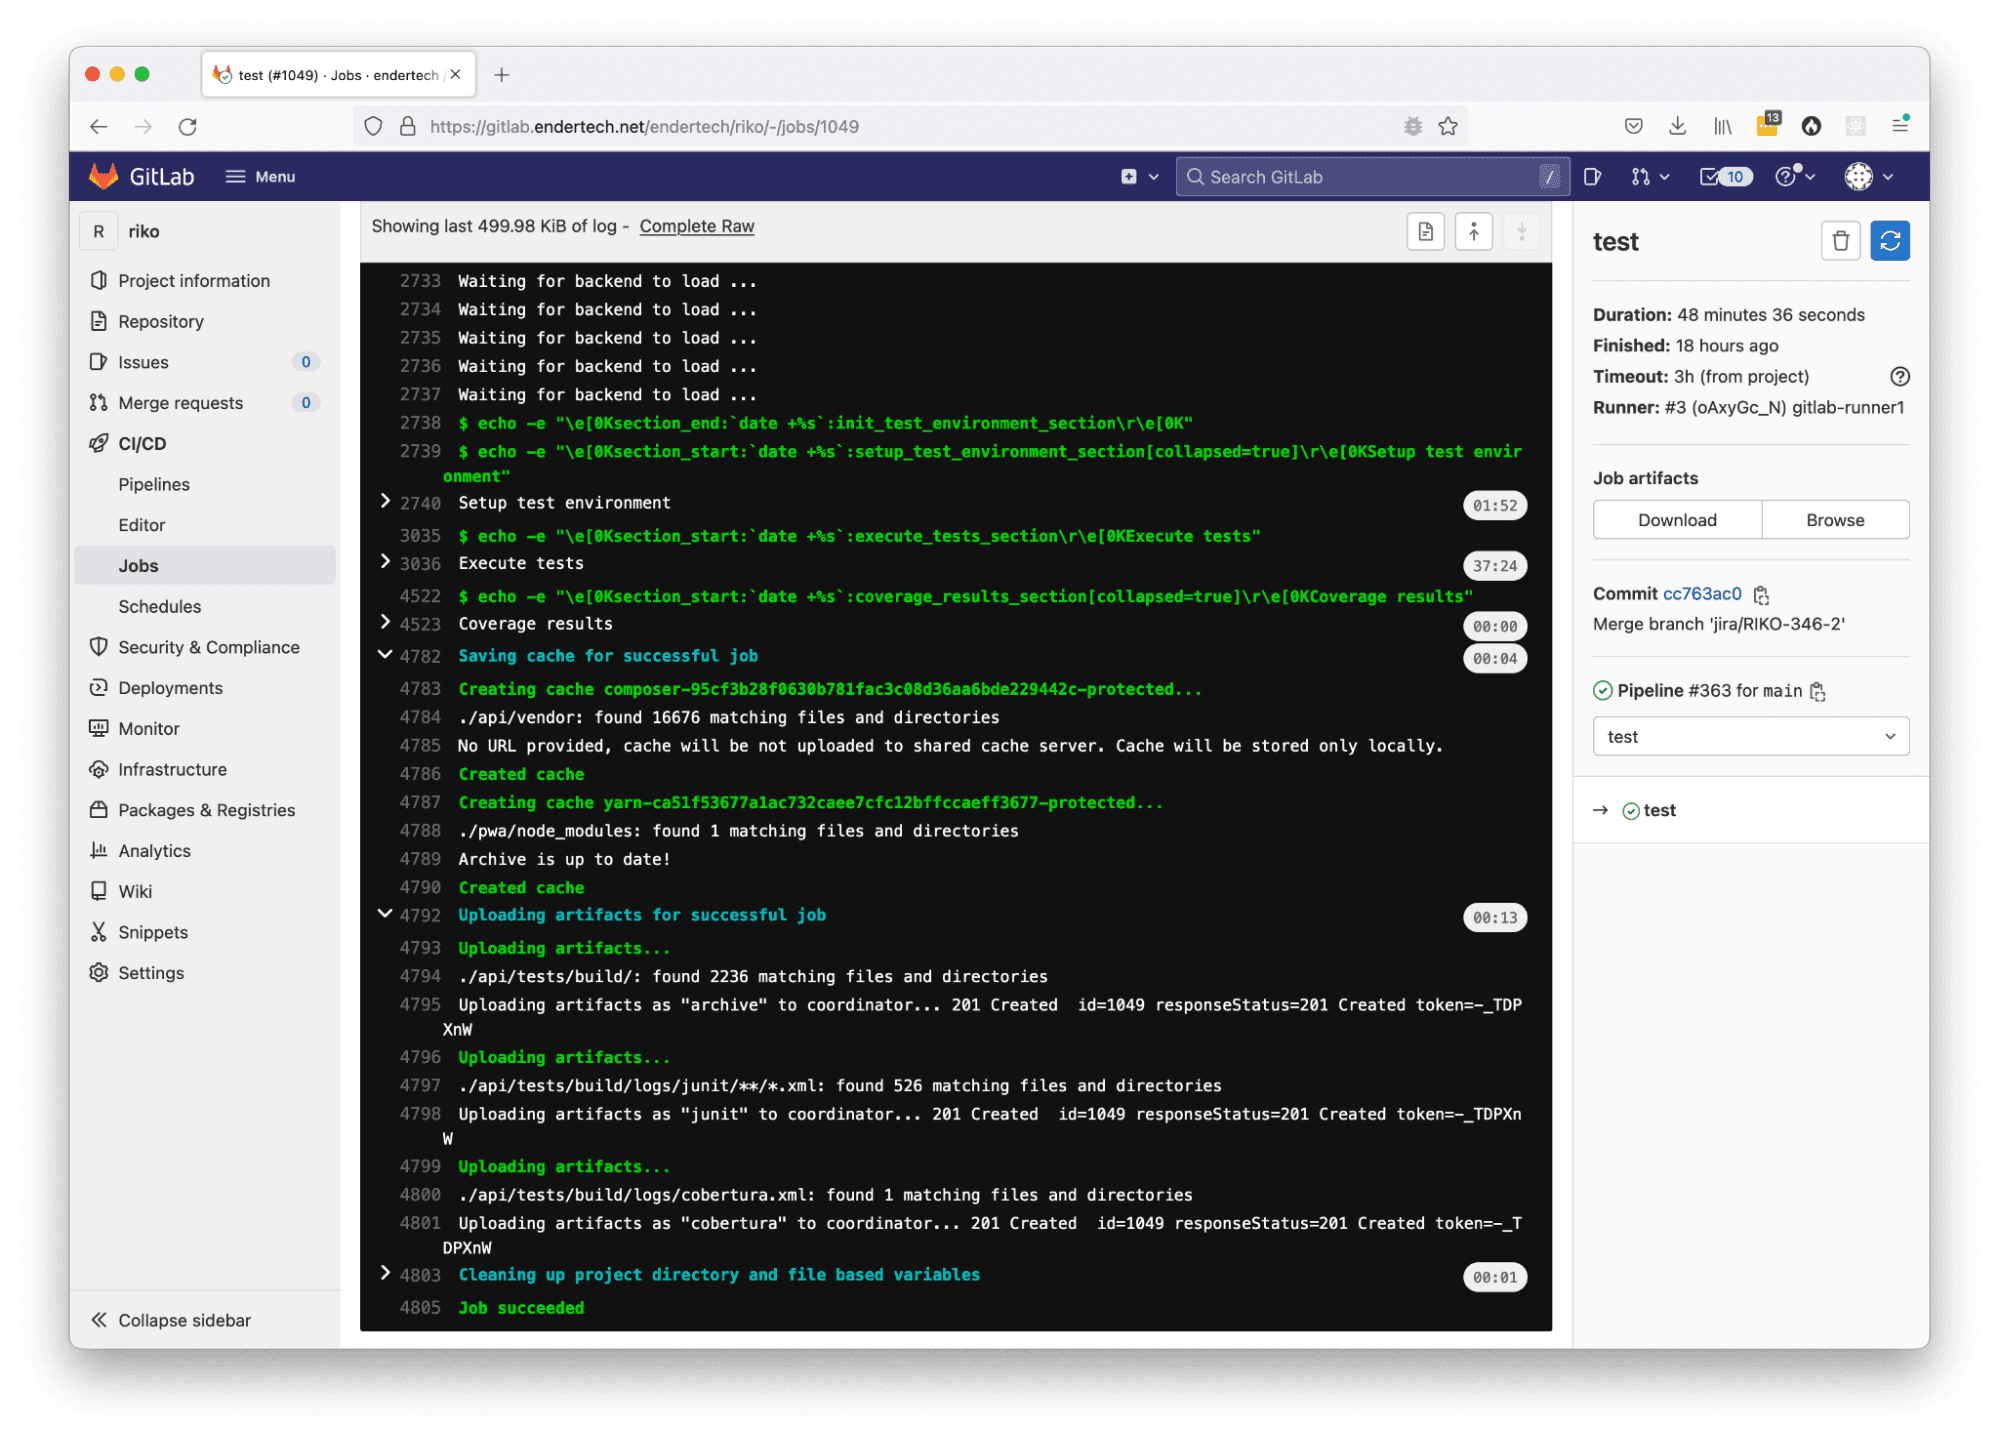
Since the tests were being executed with some degree of regularity, the artifacts section was added to capture all of the files generated during the job. The project itself was already generating screenshots during tests before using this CI/CD system. Now we could review screenshots of browser output being created by our tests.
It was time to try out the next part with an automated deployment.
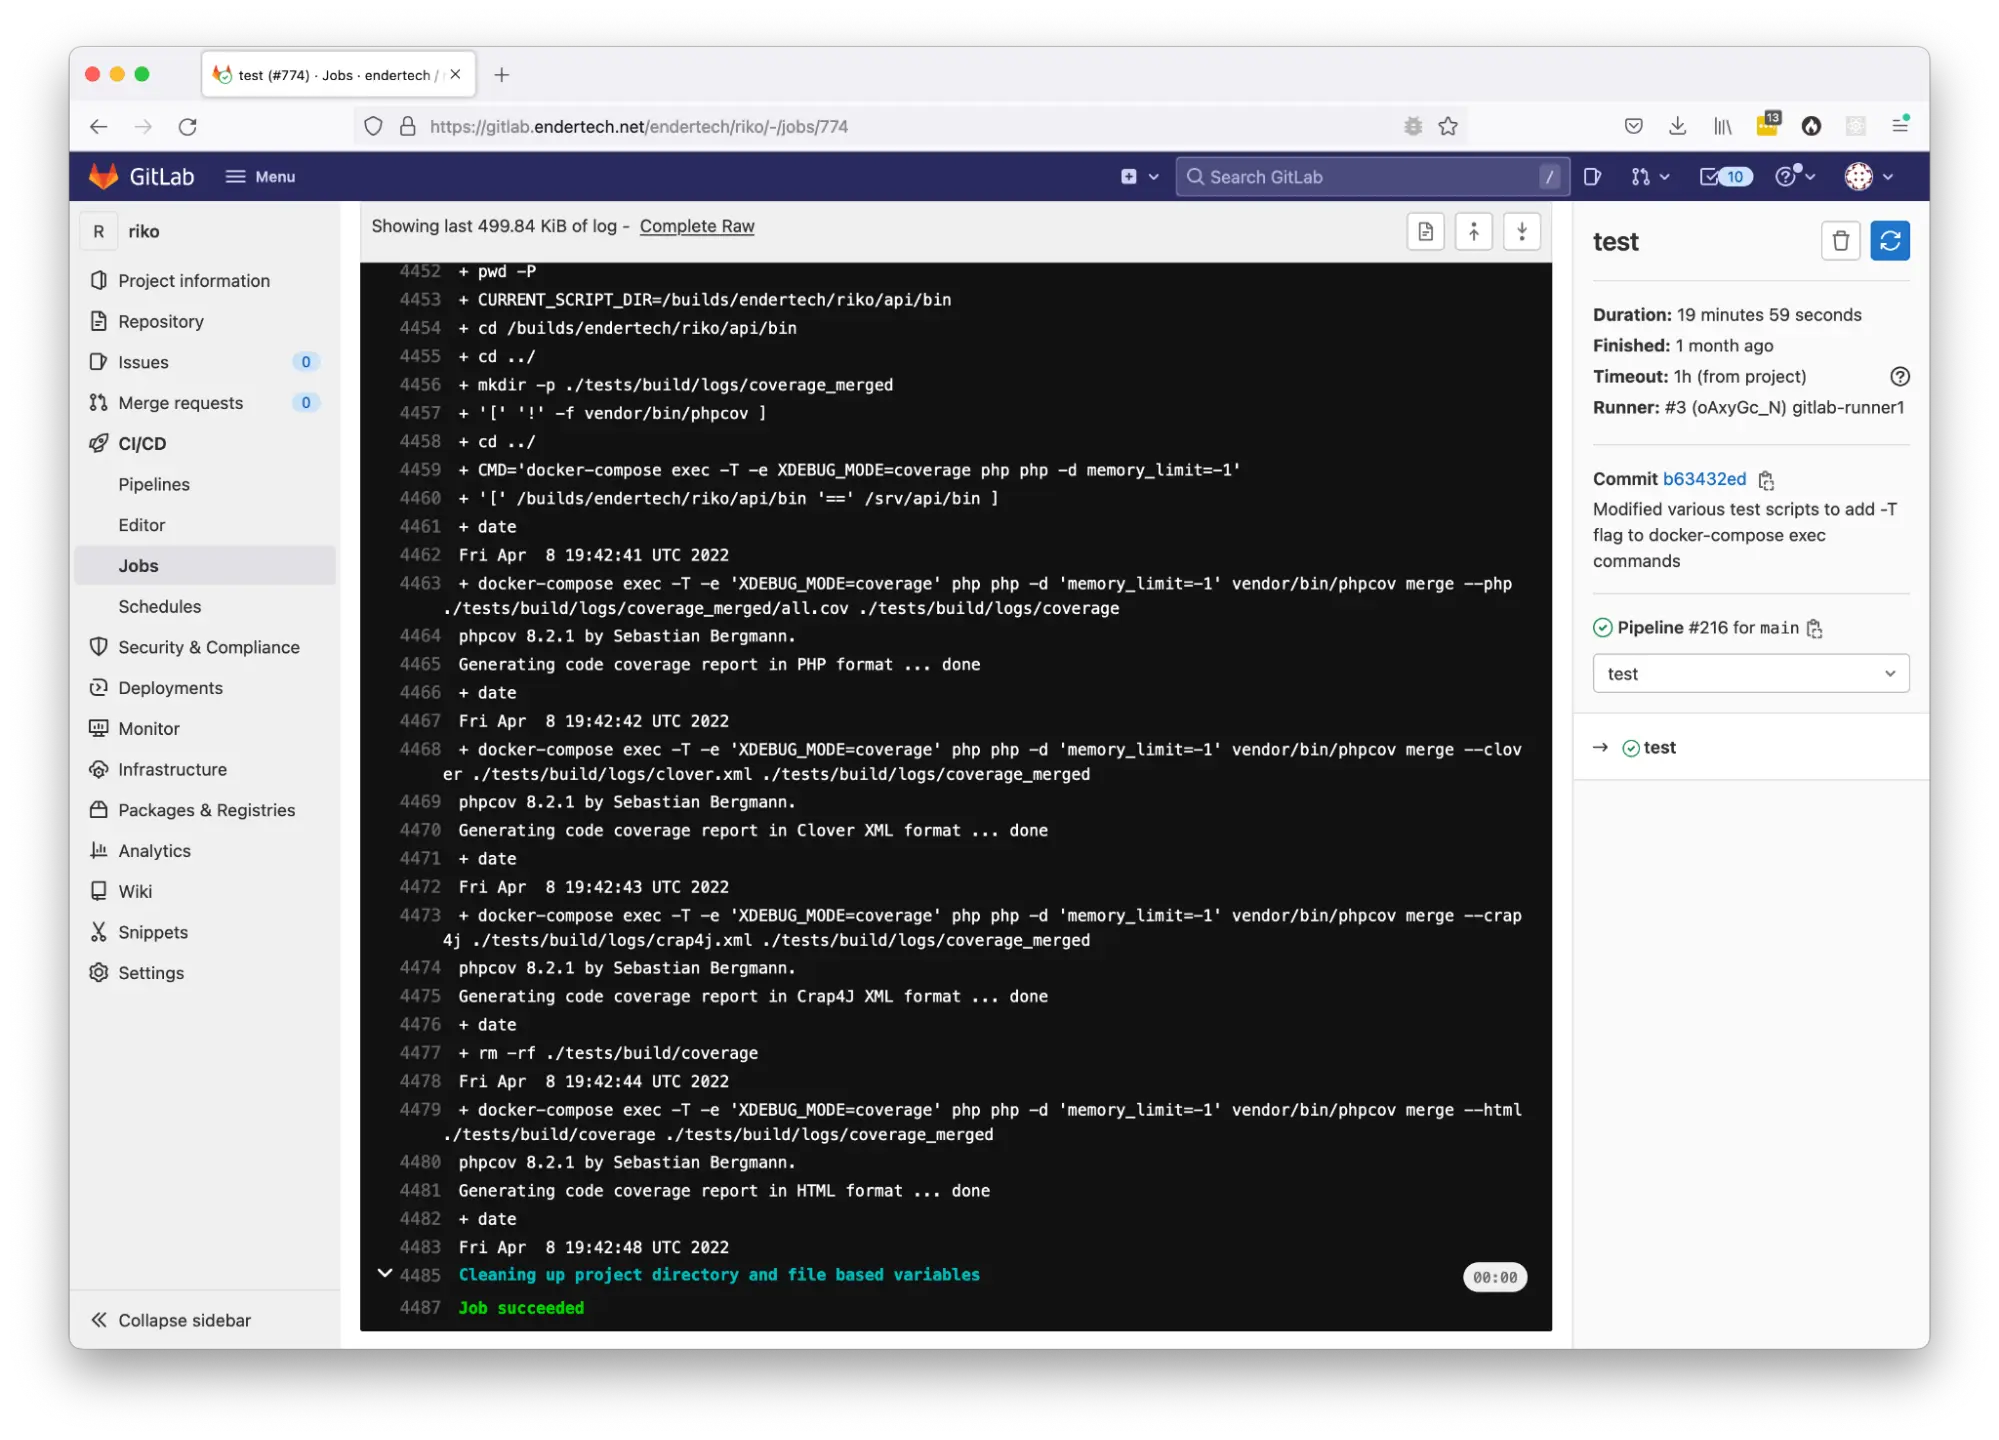
Results
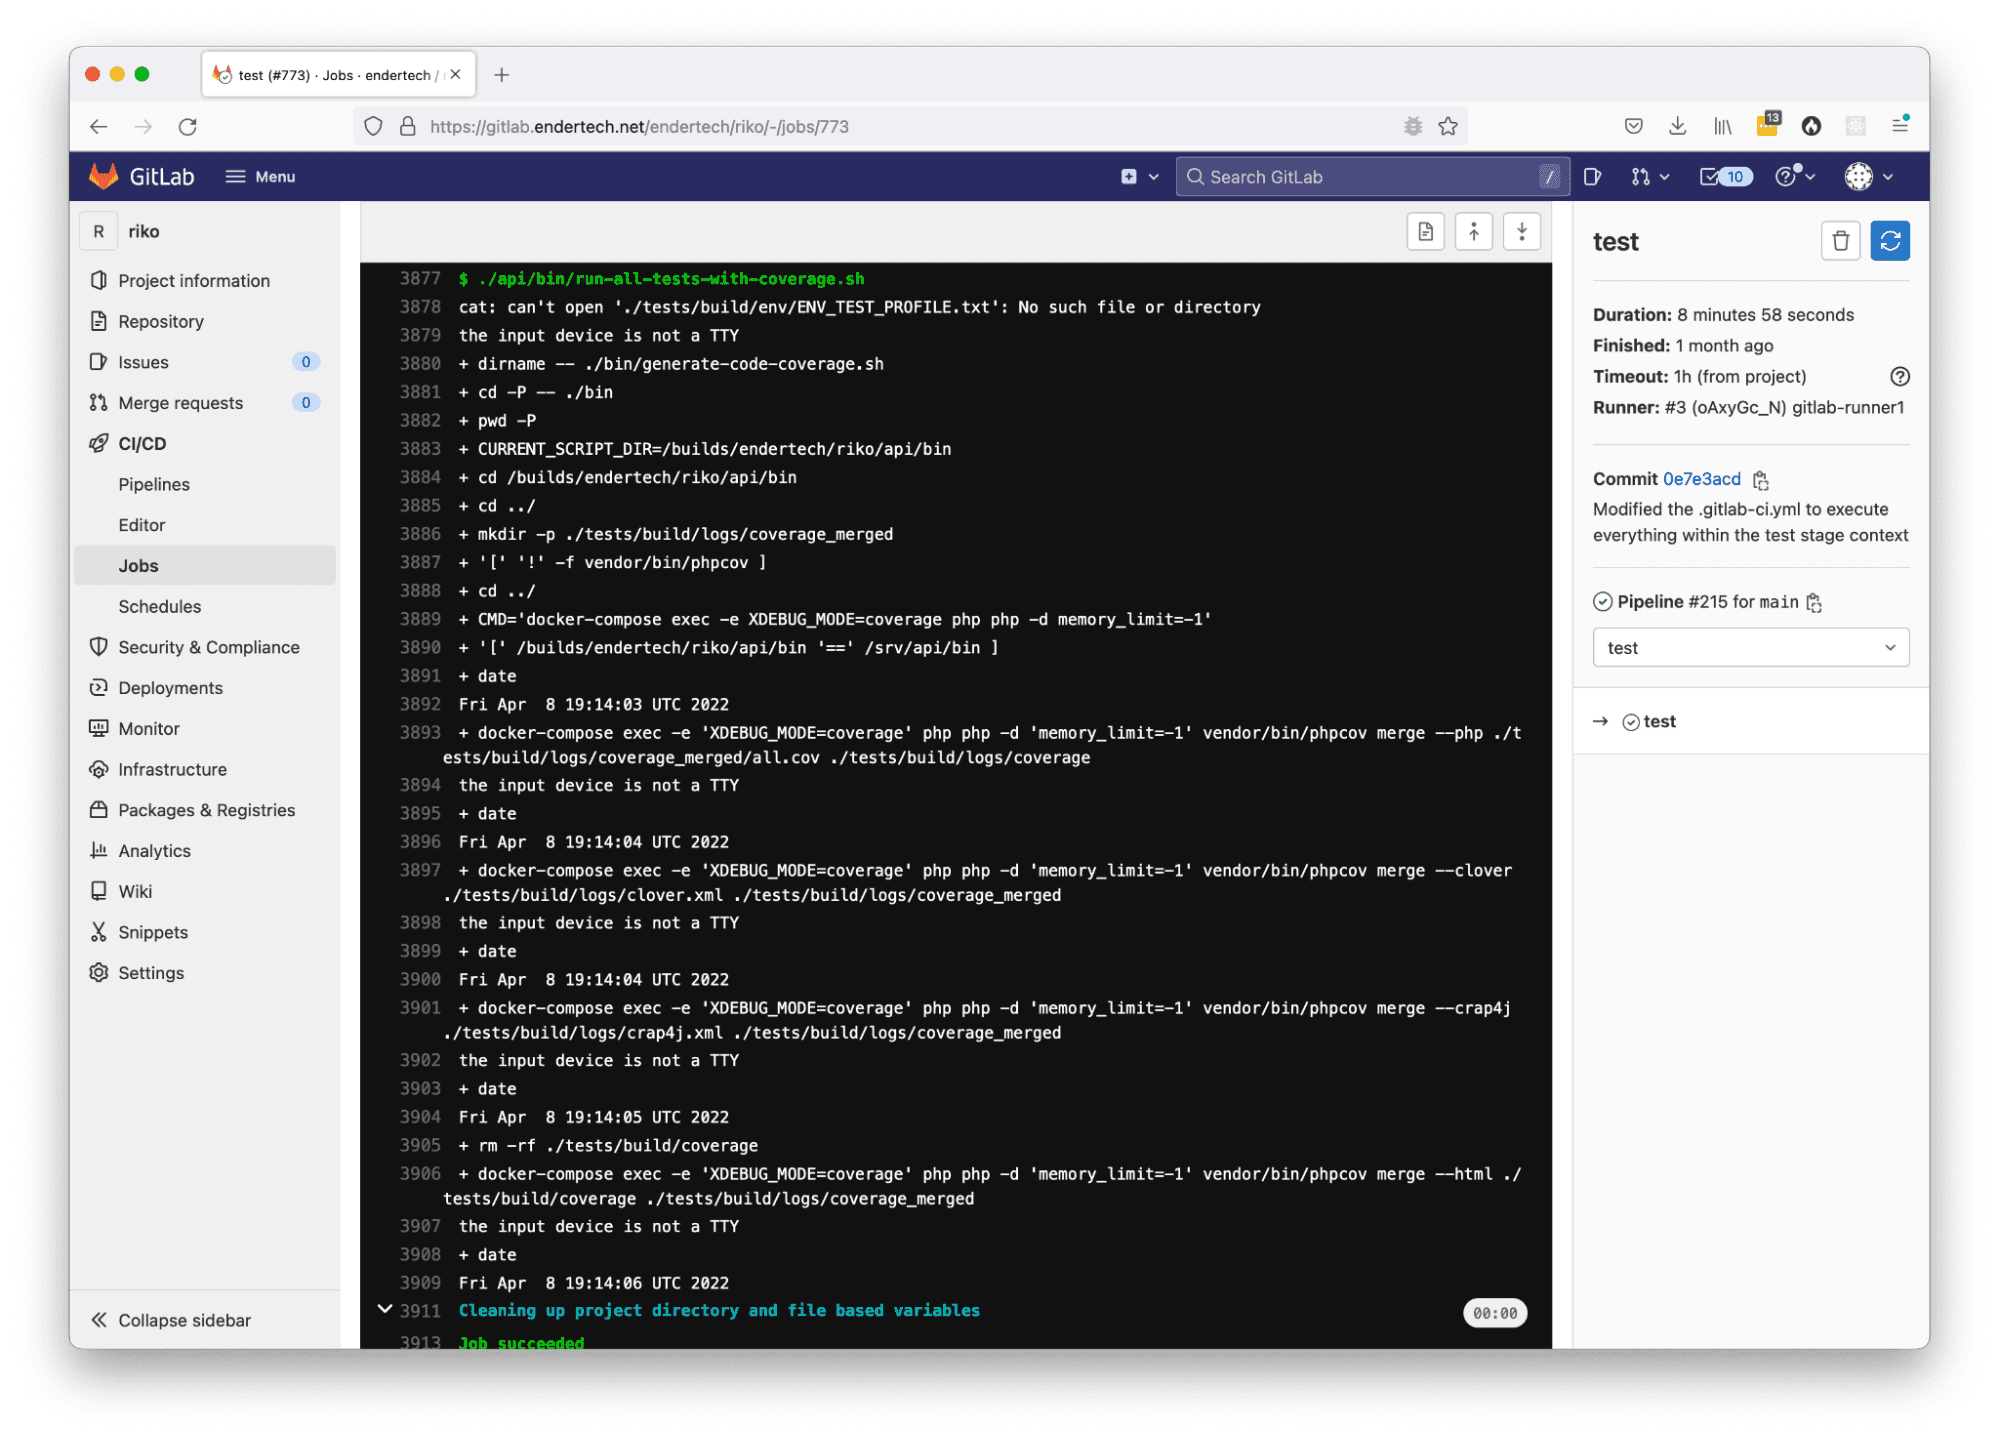
Individual Pipeline Job page with the ‘test’ stage
Individual Pipeline Job output page
Continuous Deployment (CD) Added
Building off of the previous .gitlab-ci.yml file, we wanted to automatically deploy any changes to the related project staging server (after all of the tests pass of course).
.gitlab-ci.yml file
Updated .gitlab-ci.yml file, with staging deployment
variables: DOCKER_HOST: tcp://docker:2375/ DOCKER_TLS_CERTDIR: "" SSH_PRIVATE_KEY: $SSH_PRIVATE_KEY image: name: docker/compose:latest services: - docker:dind # https://gitlab.com/gitlab-cd/ssh-template/-/blob/master/ssh.yml # https://gitlab.com/gitlab-examples/ssh-private-key/-/issues/4#note_35042568 .ssh_helper: &ssh_helper | function ssh_init() { SSH_PRIVATE_KEY="$1" SSH_KNOWN_HOSTS="$2" test -n "$SSH_PRIVATE_KEY" || ( echo "missing variable SSH_PRIVATE_KEY" && exit 1) test -n "$SSH_KNOWN_HOSTS" || ( echo "missing variable SSH_KNOWN_HOSTS" && exit 1) which ssh-agent || ( apk update && apk add openssh-client ) eval $(ssh-agent -s) echo "$SSH_PRIVATE_KEY" | tr -d '\r' | ssh-add - > /dev/null mkdir -p ~/.ssh chmod 700 ~/.ssh ssh-keyscan -H "$SSH_KNOWN_HOSTS" > ~/.ssh/known_hosts chmod 644 ~/.ssh/known_hosts } function ssh_run() { USER=$1 HOST=$2 PKEY=$3 COMMAND=$4 ssh_init "$PKEY" $HOST ssh $USER@$HOST $COMMAND } before_script: - *ssh_helper - docker info - docker version - docker-compose version - export test: stage: test script: - ./api/bin/init-test-environment-files.sh - docker-compose down - docker-compose build - docker-compose up -d - ./api/bin/init-test-environment-wait.sh - ./api/bin/run-all-tests-parallel-with-coverage.sh artifacts: paths: - ./api/tests/build/ deploy_staging: stage: deploy script: - ssh_run "sshuser" "project.stage80.endertech.net" "$SSH_PRIVATE_KEY" "cd ~/project/ && ./deploy.sh"
Within this file, the SSH_PRIVATE_KEY variable reference was added, the .ssh_helper section was added (along with its related before_script *ssh_helper line), and the deploy_staging section was added at the bottom.
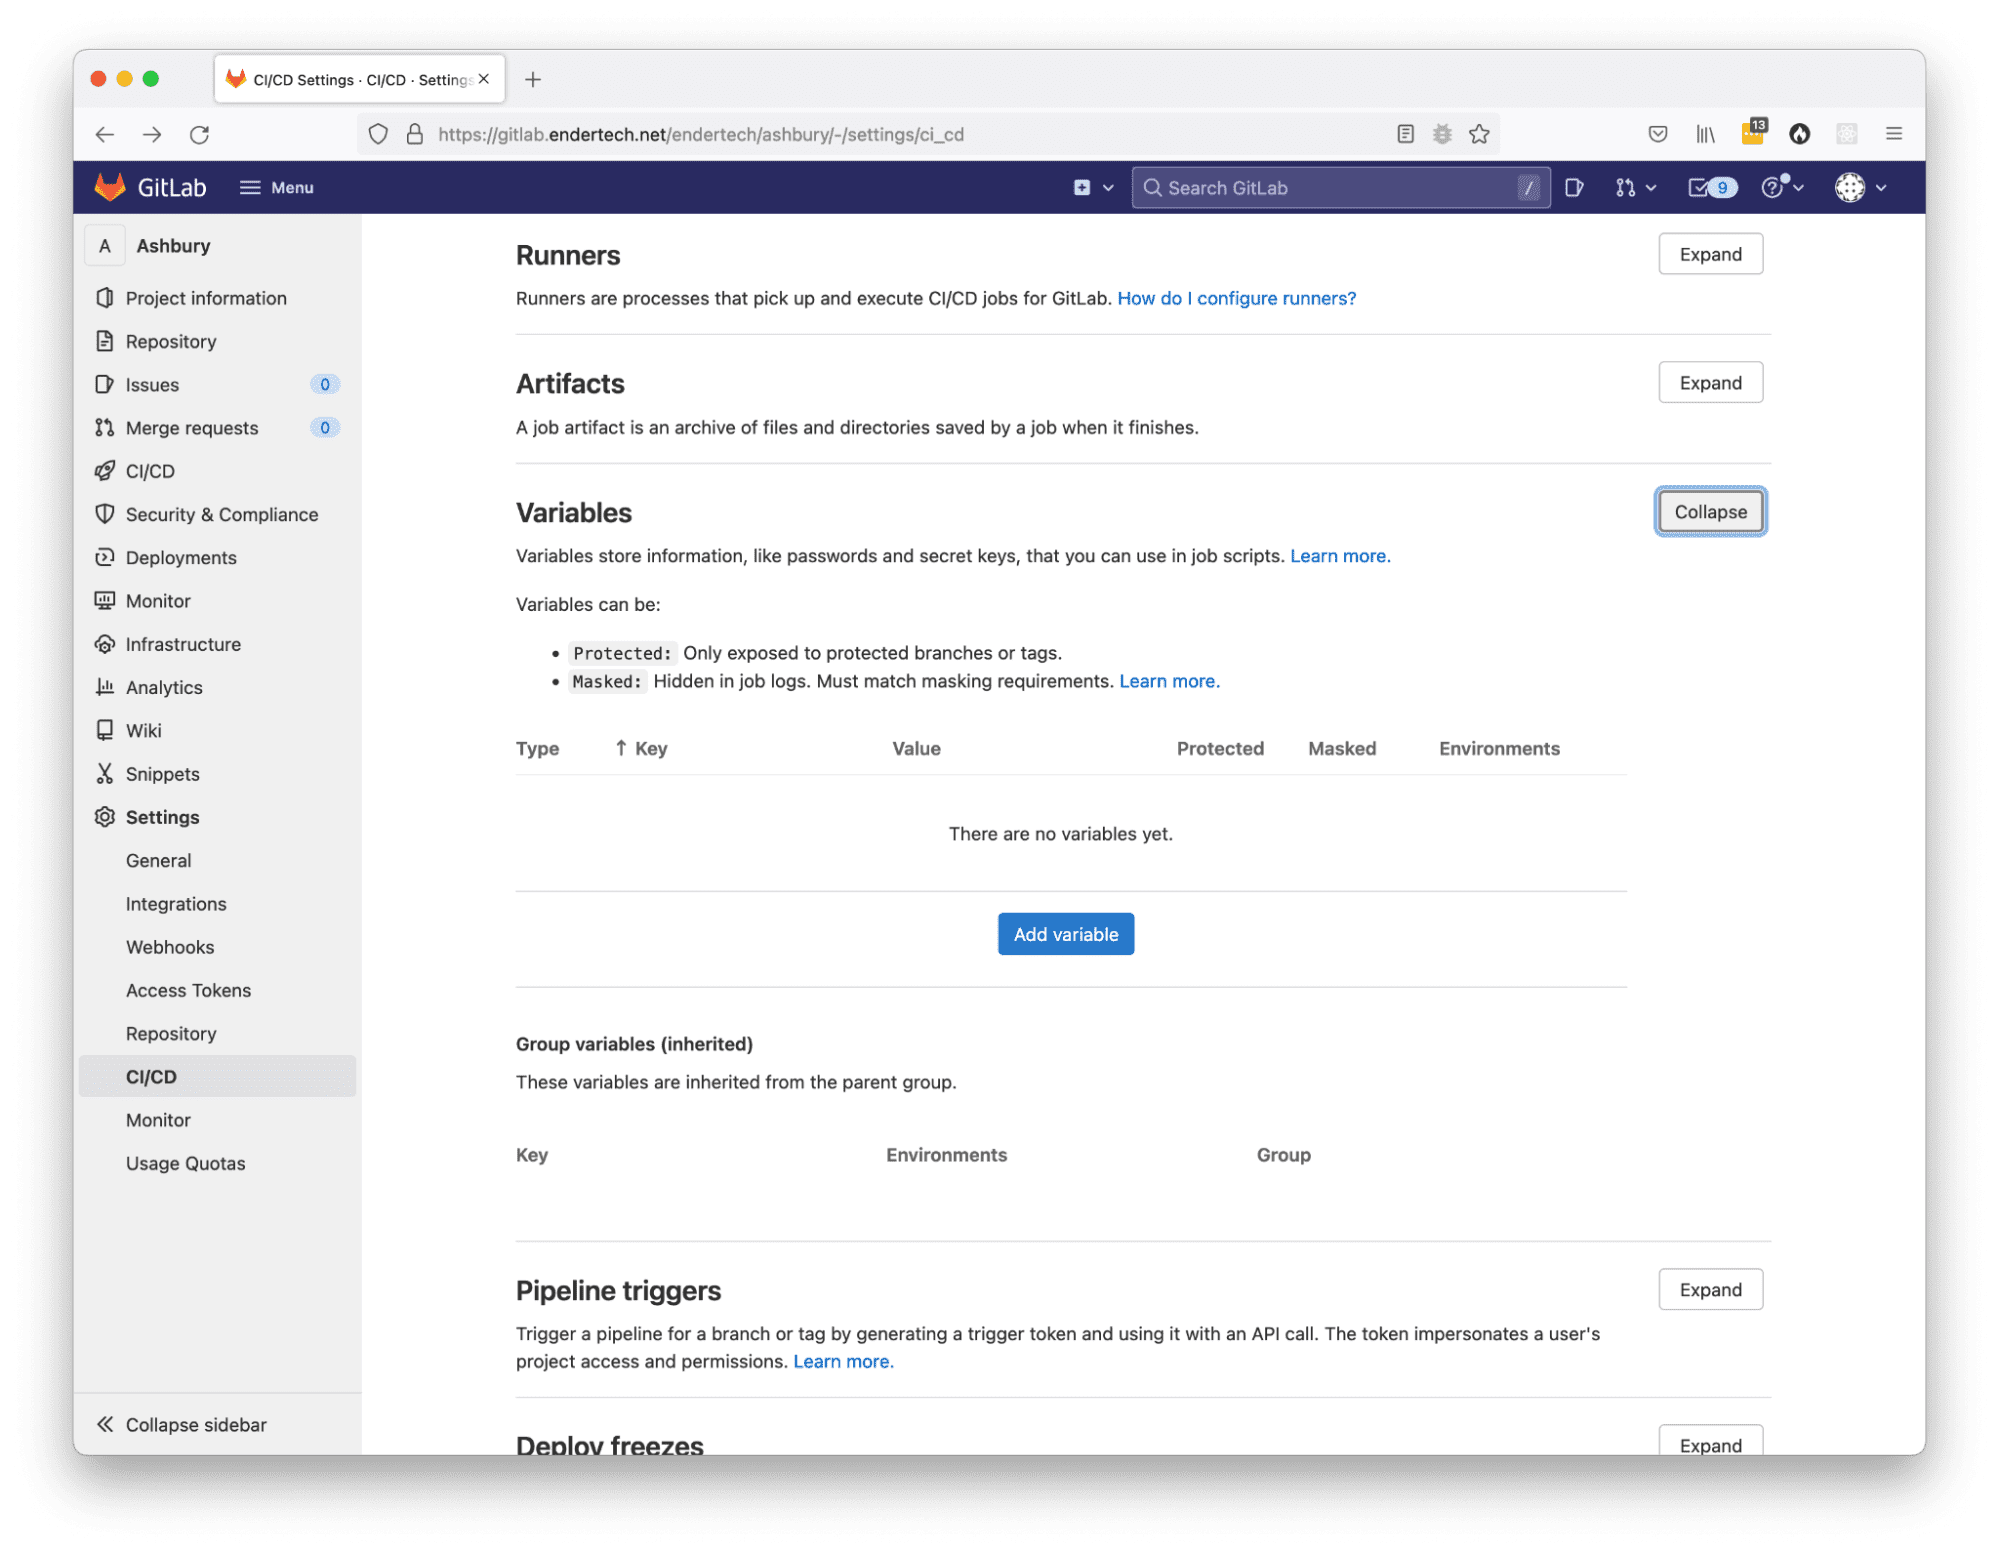
In order for this deployment to work, the SSH_PRIVATE_KEY environment variable would need to be defined. This can be done within the GitLab project’s “Settings > CI/CD > Variables” section.
Add an environment variable
When you use SSH to connect to a remote server, it is possible to send a command to execute on the remote server as well. We are using this feature to execute the deploy.sh script and update the project code on that staging server.
The .ssh_helper section was copied from another helpful source and placed into the .gitlab-ci.yml file because it needed to be adjusted. The project we were working with uses Alpine based Docker images, so the original “apt-get” calls needed to be changed to use “apk” instead.
An error in the deployment setup
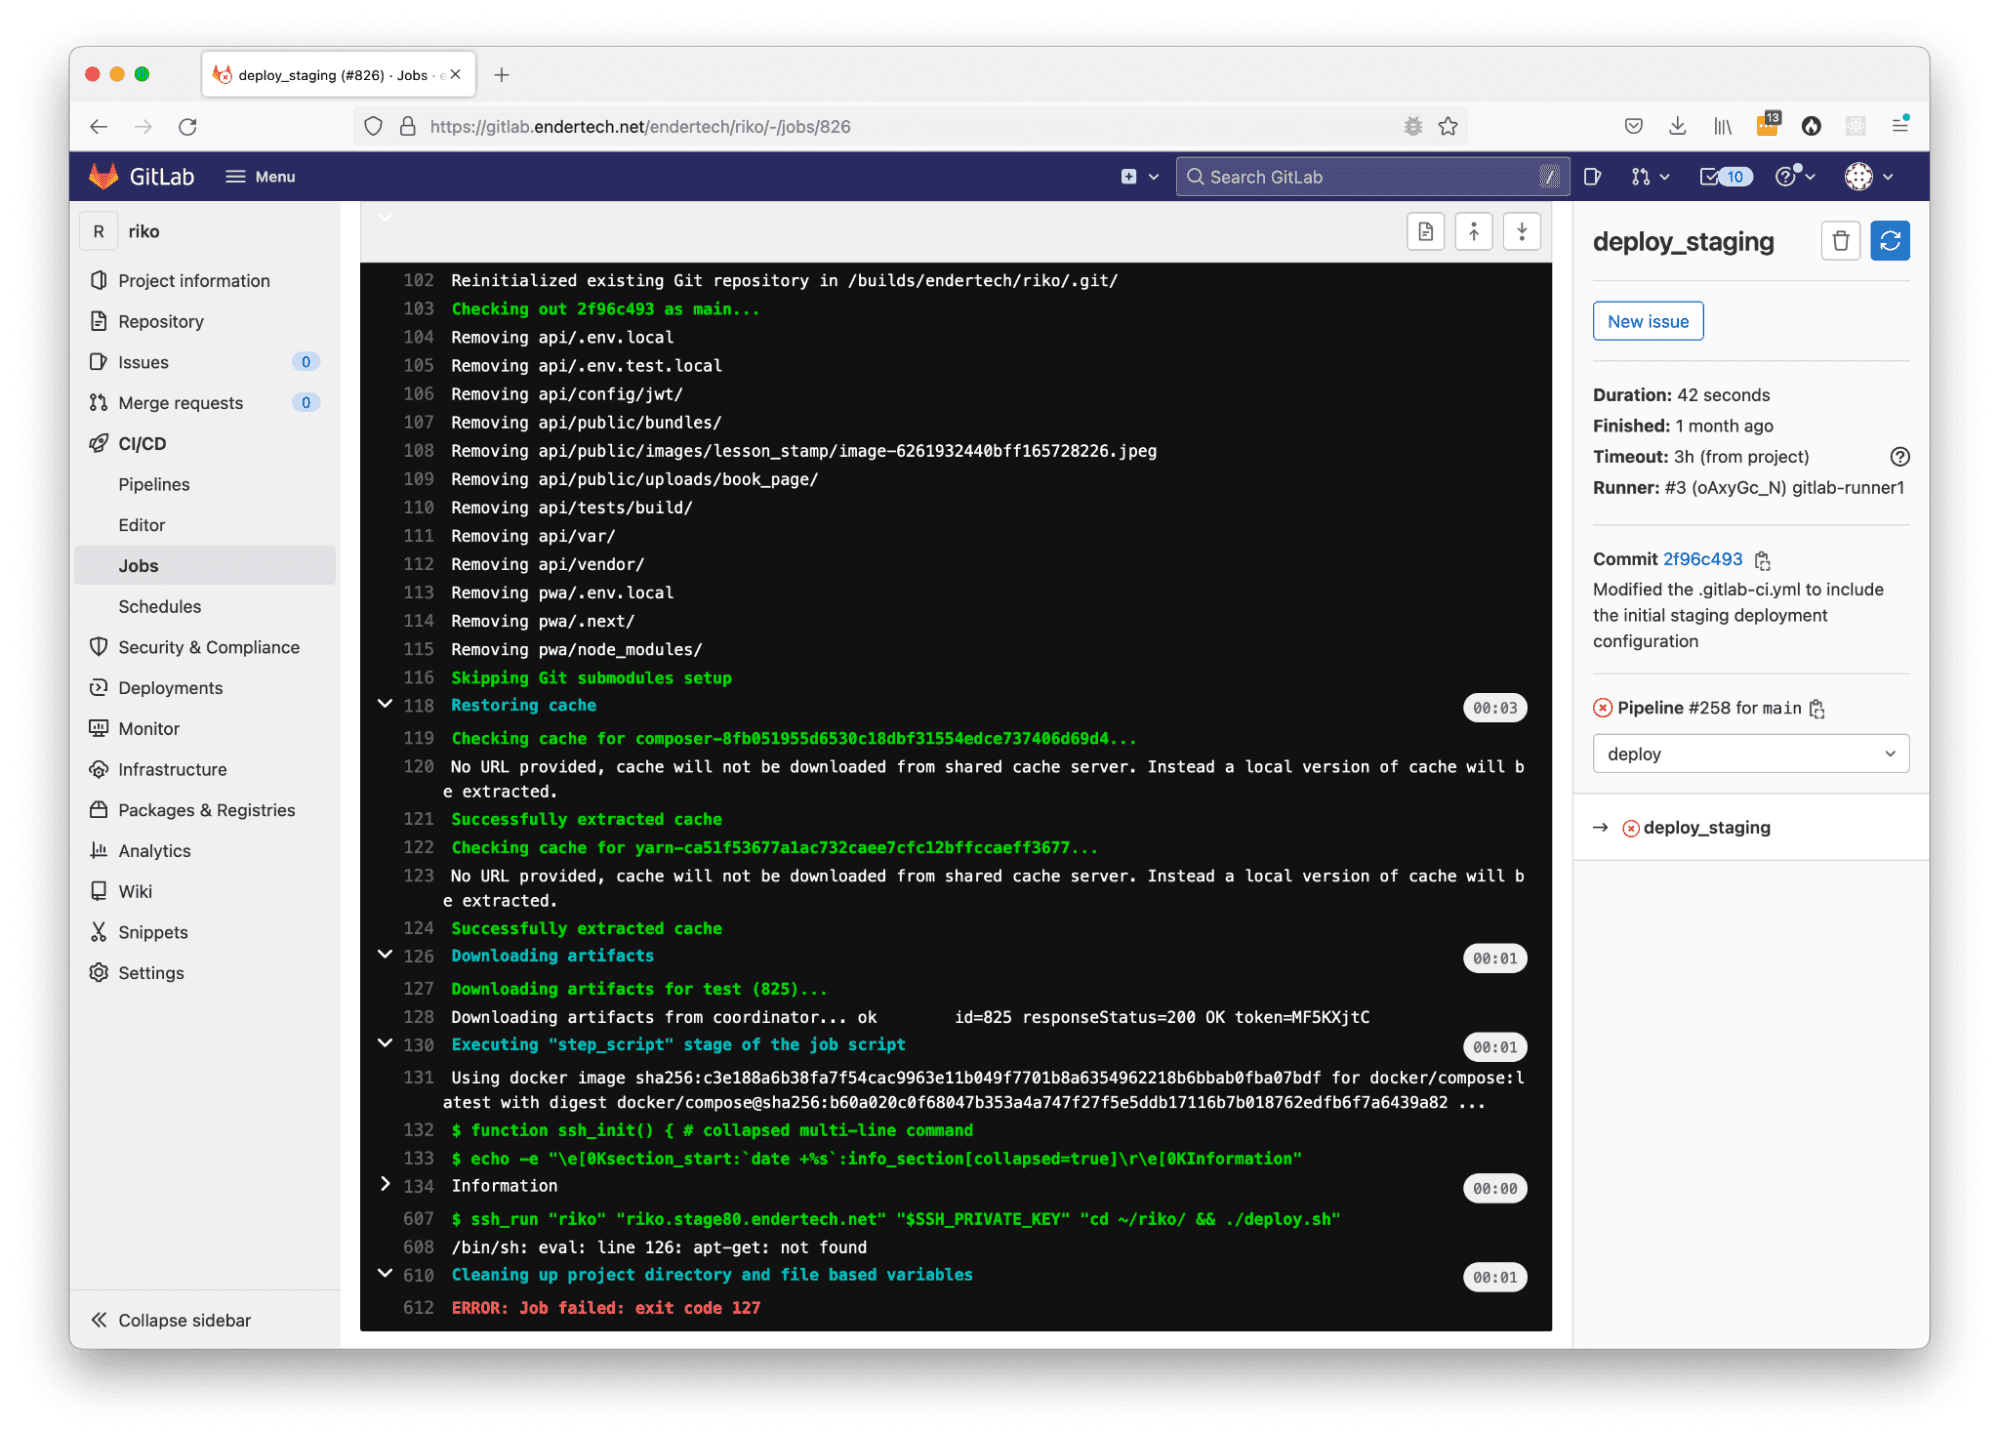
It took a few tries, but we were finally able to trigger the deployment, have it successfully connect, and execute the deploy.sh script on the staging server itself! We were ecstatic to say the least. We actually got the CI/CD system to follow through the workflow configuration to completion. Now we just needed to live with it and work with it awhile.
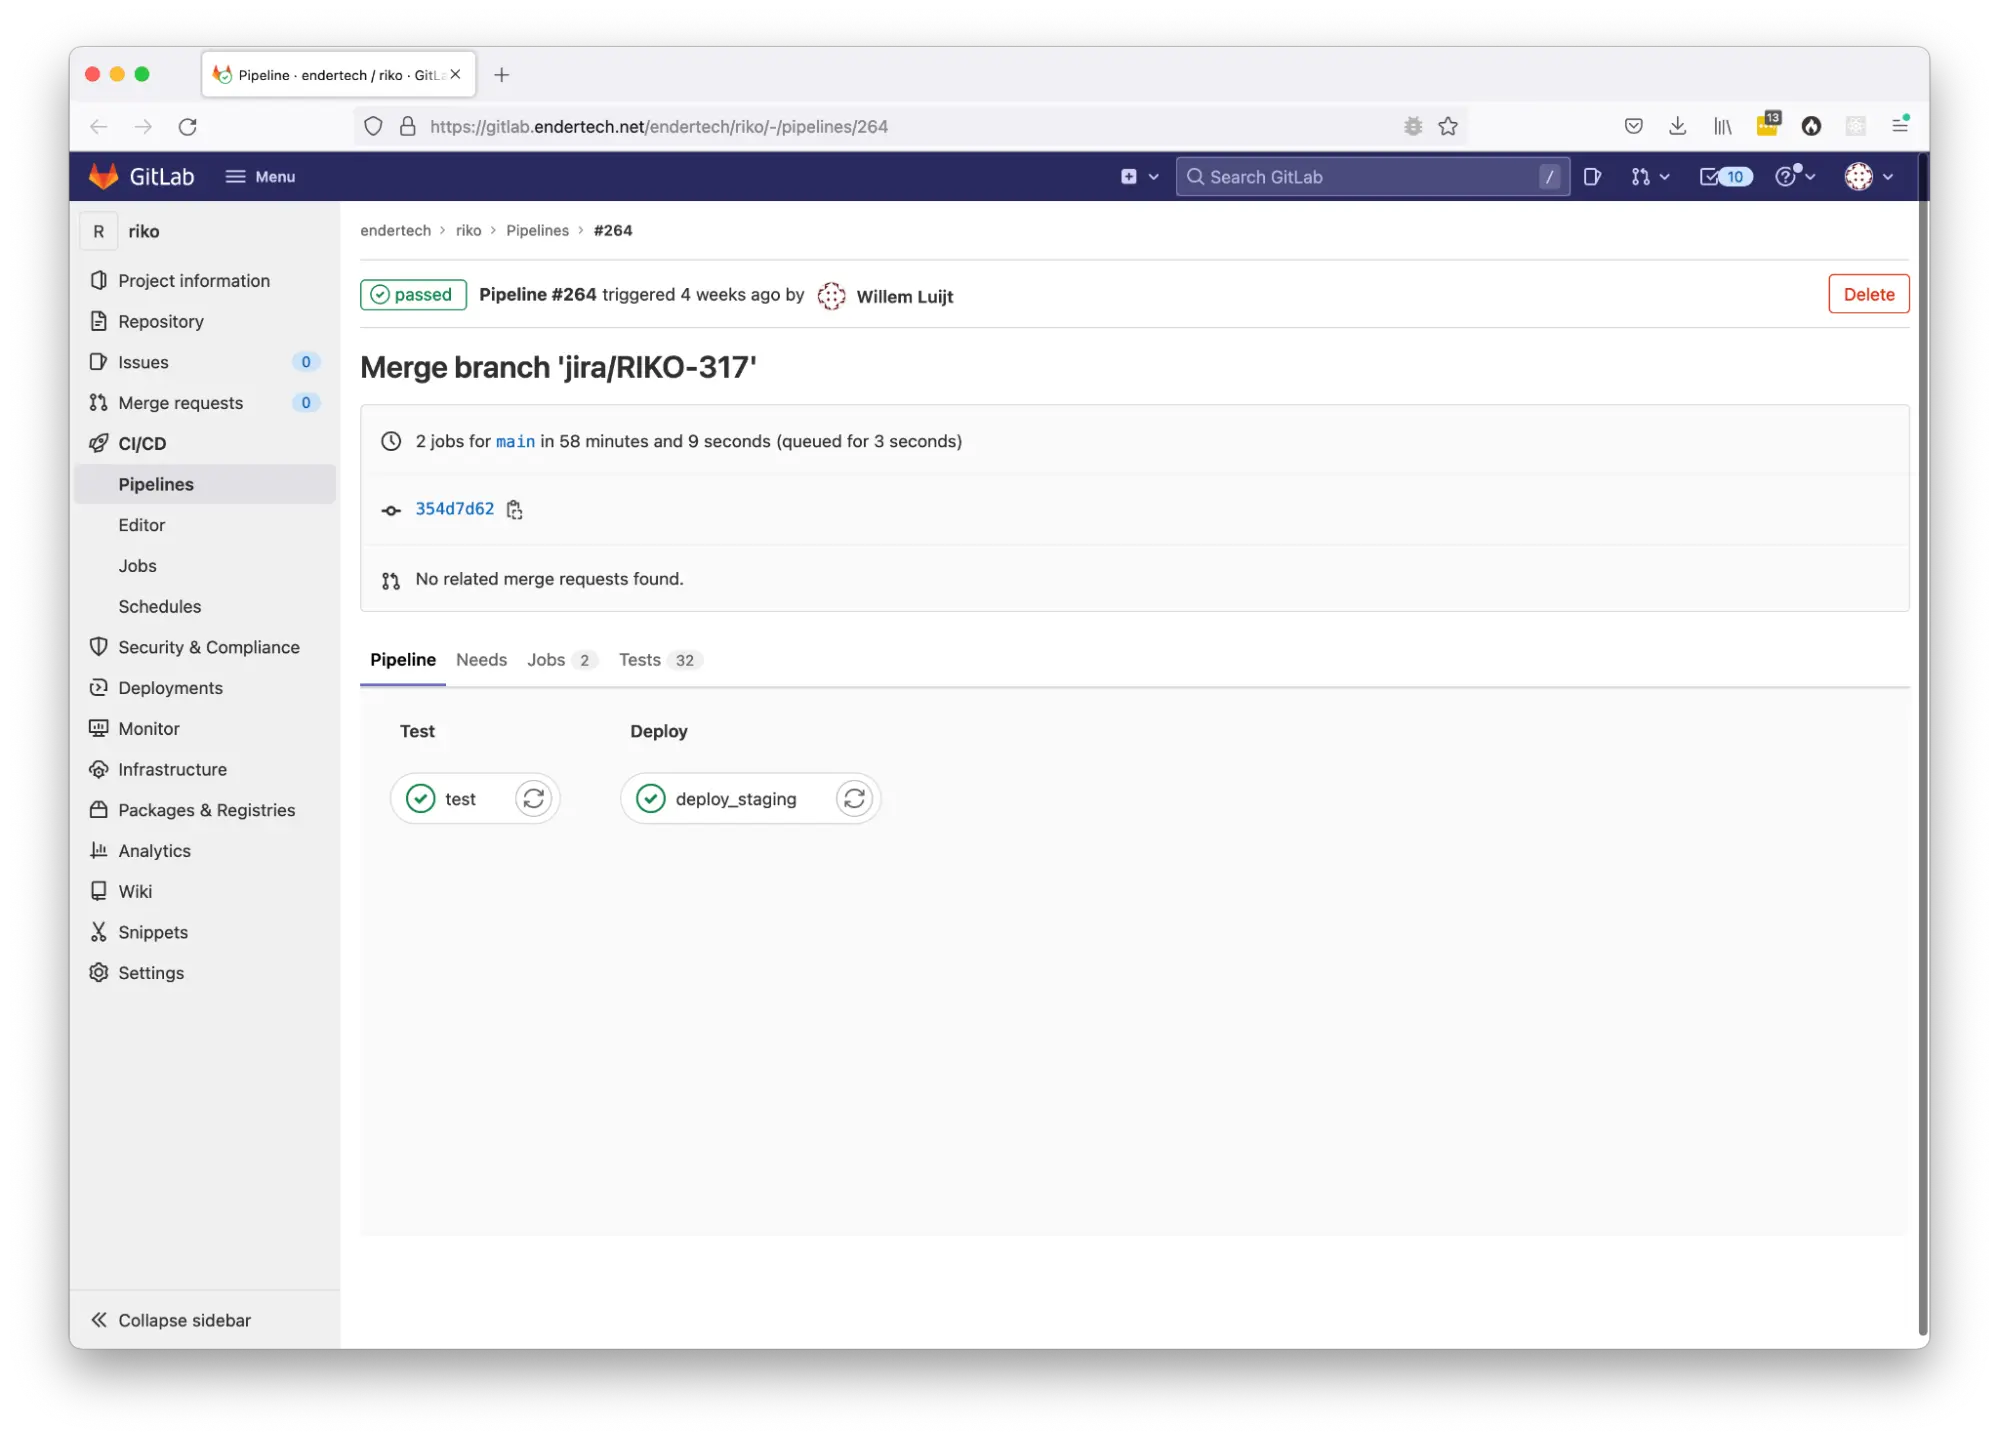
Results
Individual Pipeline Job page with the “test” and “deploy” stages
Improving the Configuration for better quality of life
After some time, there were various changes added to the .gitlab-ci.yml file which helped day-to-day operations when reviewing what happened in a particular job. These changes include formatting the job output to hide large sections of verbose text, caching some downloaded files, and including reports about the test results.
Updated .gitlab-ci.yml file in project, with staging deployment, cache configuration, reports, and output sections
variables: DOCKER_HOST: tcp://docker:2375/ DOCKER_TLS_CERTDIR: "" SSH_PRIVATE_KEY: $SSH_PRIVATE_KEY image: name: docker/compose:latest services: - docker:dind cache: - key: files: - ./api/composer.lock prefix: composer paths: - ./api/vendor - key: files: - ./pwa/yarn.lock prefix: yarn paths: - ./pwa/node_modules # https://gitlab.com/gitlab-cd/ssh-template/-/blob/master/ssh.yml # https://gitlab.com/gitlab-examples/ssh-private-key/-/issues/4#note_35042568 .ssh_helper: &ssh_helper | function ssh_init() { SSH_PRIVATE_KEY="$1" SSH_KNOWN_HOSTS="$2" test -n "$SSH_PRIVATE_KEY" || ( echo "missing variable SSH_PRIVATE_KEY" && exit 1) test -n "$SSH_KNOWN_HOSTS" || ( echo "missing variable SSH_KNOWN_HOSTS" && exit 1) which ssh-agent || ( apk update && apk add openssh-client ) eval $(ssh-agent -s) echo "$SSH_PRIVATE_KEY" | tr -d '\r' | ssh-add - > /dev/null mkdir -p ~/.ssh chmod 700 ~/.ssh ssh-keyscan -H "$SSH_KNOWN_HOSTS" > ~/.ssh/known_hosts chmod 644 ~/.ssh/known_hosts } function ssh_run() { USER=$1 HOST=$2 PKEY=$3 COMMAND=$4 ssh_init "$PKEY" $HOST ssh $USER@$HOST $COMMAND } before_script: - *ssh_helper - echo -e "\e[0Ksection_start:`date +%s`:info_section[collapsed=true]\r\e[0KInformation" - docker info - docker version - docker-compose version - export - echo -e "\e[0Ksection_end:`date +%s`:info_section\r\e[0K" test: stage: test script: - echo -e "\e[0Ksection_start:`date +%s`:init_test_environment_section[collapsed=true]\r\e[0KInitialize test environment" - ./api/bin/init-test-environment-files.sh - docker-compose down - docker-compose build - docker-compose up -d - ./api/bin/init-test-environment-wait.sh - echo -e "\e[0Ksection_end:`date +%s`:init_test_environment_section\r\e[0K" - echo -e "\e[0Ksection_start:`date +%s`:setup_test_environment_section[collapsed=true]\r\e[0KSetup test environment" - ./api/bin/ci-setup.sh - echo -e "\e[0Ksection_end:`date +%s`:setup_test_environment_section\r\e[0K" - echo -e "\e[0Ksection_start:`date +%s`:execute_tests_section\r\e[0KExecute tests" - ./api/bin/run-all-tests-with-coverage.sh - echo -e "\e[0Ksection_end:`date +%s`:execute_tests_section\r\e[0K" - echo -e "\e[0Ksection_start:`date +%s`:coverage_results_section[collapsed=true]\r\e[0KCoverage results" - cat ./api/tests/build/logs/coverage.txt - echo -e "\e[0Ksection_end:`date +%s`:coverage_results_section\r\e[0K" artifacts: paths: - ./api/tests/build/ reports: cobertura: ./api/tests/build/logs/cobertura.xml junit: ./api/tests/build/logs/junit/**/*.xml when: always deploy_staging: stage: deploy script: - ssh_run "sshuser" "project.stage80.endertech.net" "$SSH_PRIVATE_KEY" "cd ~/project/ && ./deploy.sh"
After some time reviewing the output of the test jobs over and over, scrolling through lots of lines you’ve seen before starts to become a bit tiresome. Luckily there is a way to collapse some of that output. Within the configuration file, there are now lines which have “section_start” and “section_end”. These lines help limit the output that one has to review.
Waiting for some downloads could cause issues, which is why we’re glad there is a way to cache things. In the configuration file, a “cache” section was added to store a copy of some of the vendor files that were always being downloaded.
One thing that GitLab can do is incorporate the test results into the project pages. You just have to specify where it can find those test result files. The reports section was added into the artifacts section to allow for that.
Results
Individual Pipeline Job page with the “test” stage report results
Individual Pipeline Job output page with collapsed output sections and cache creation
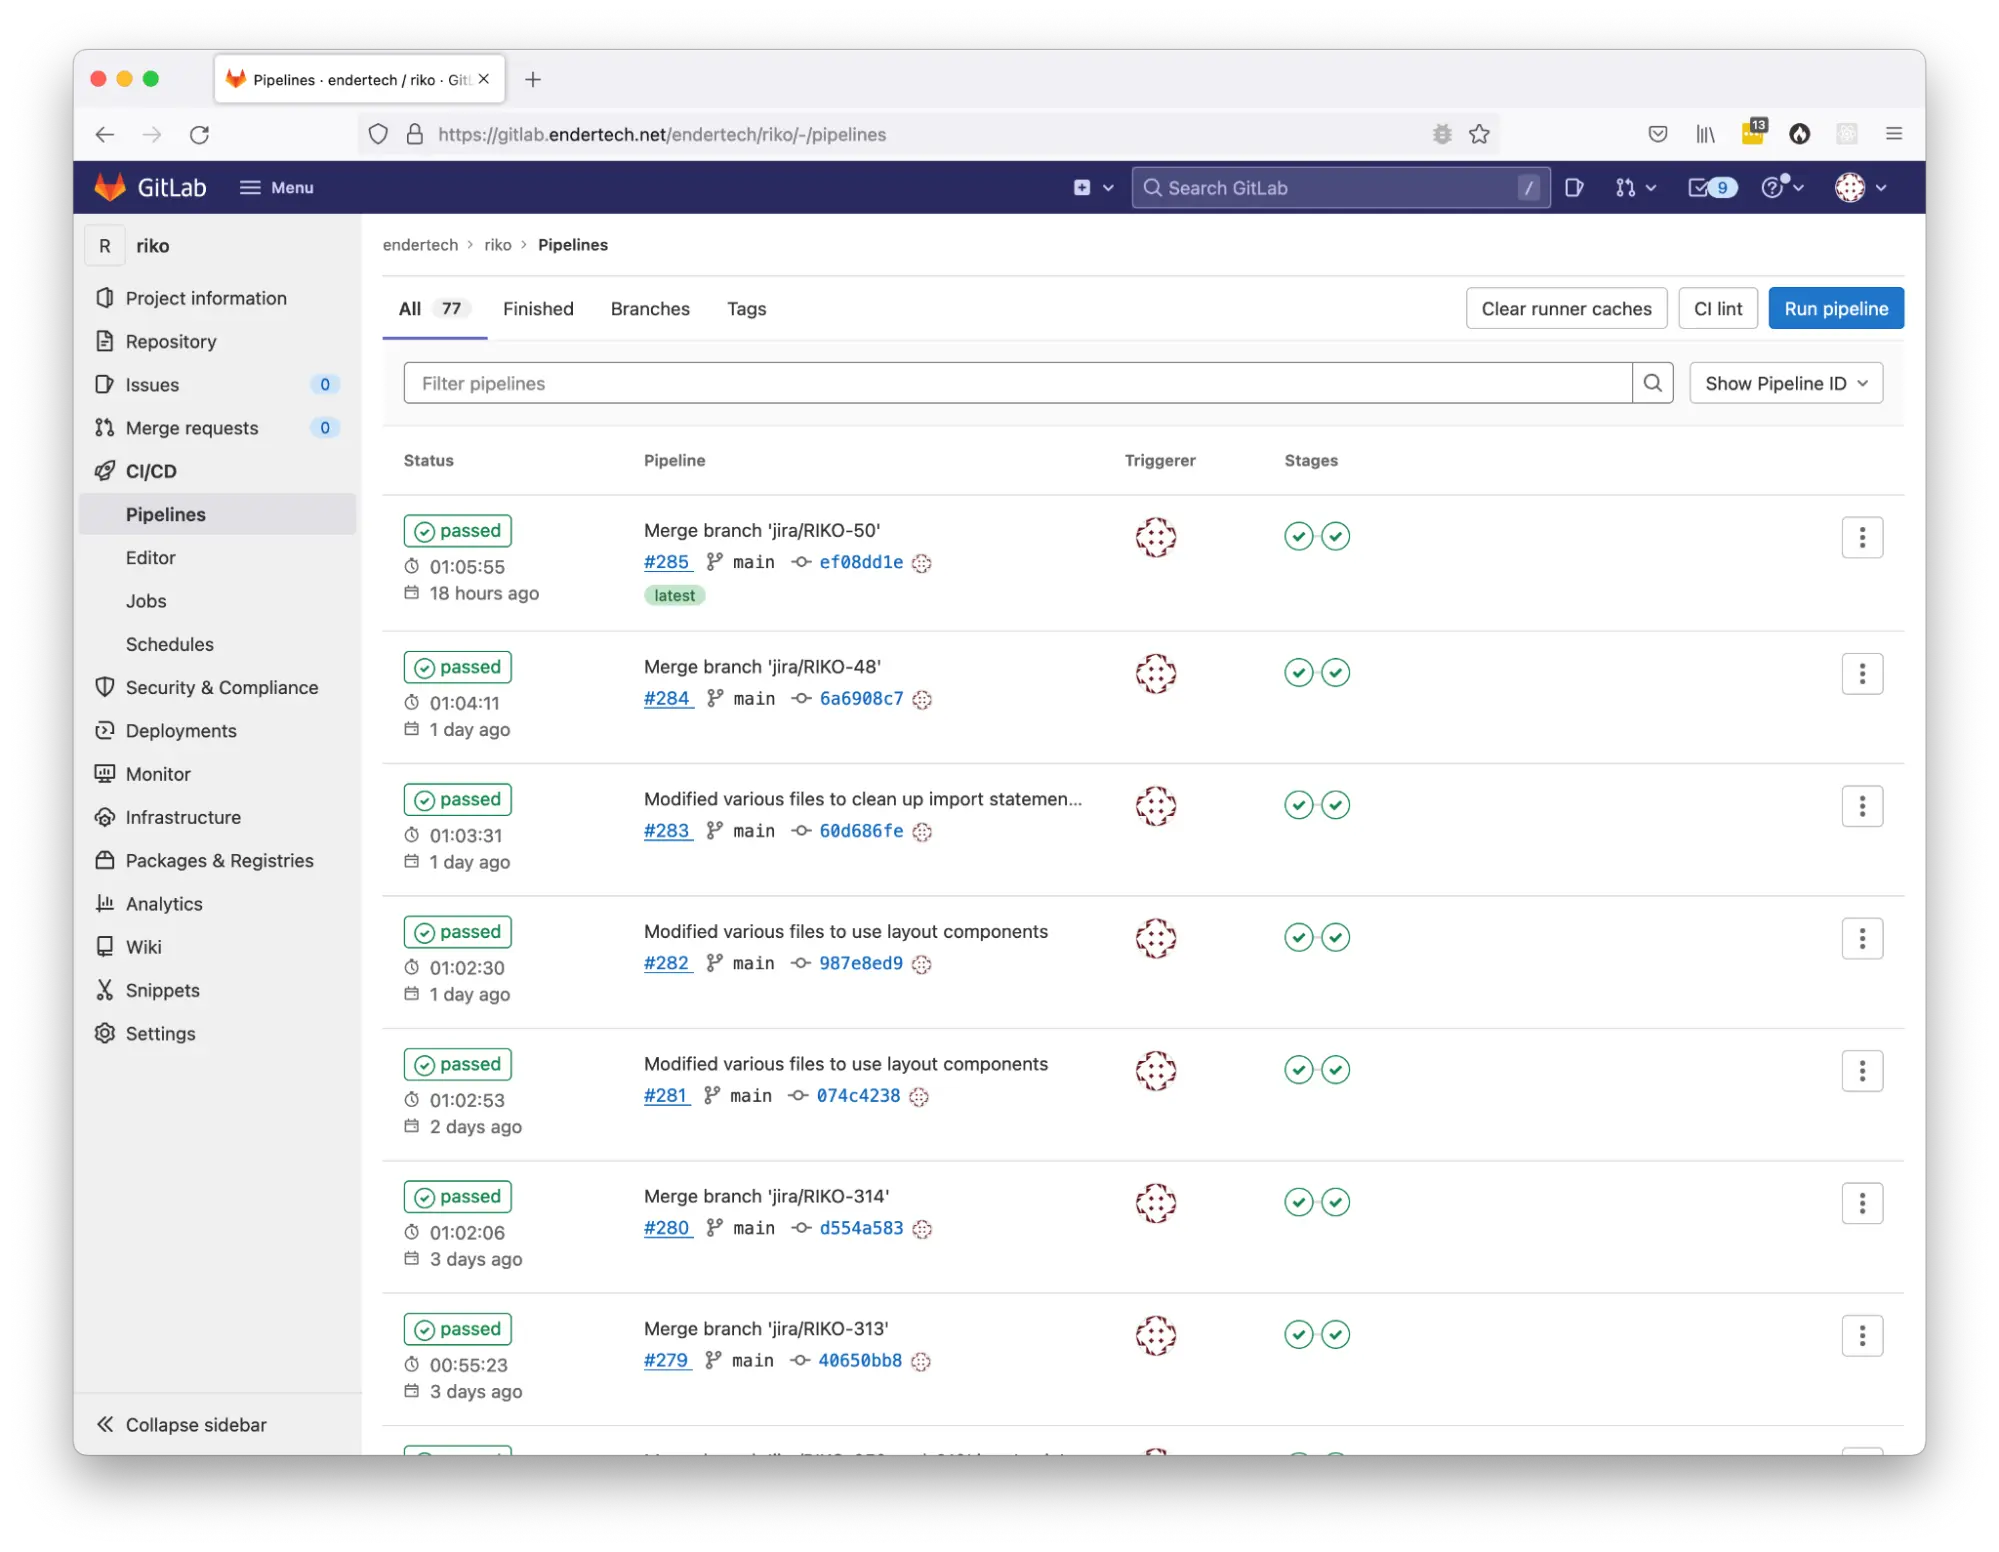
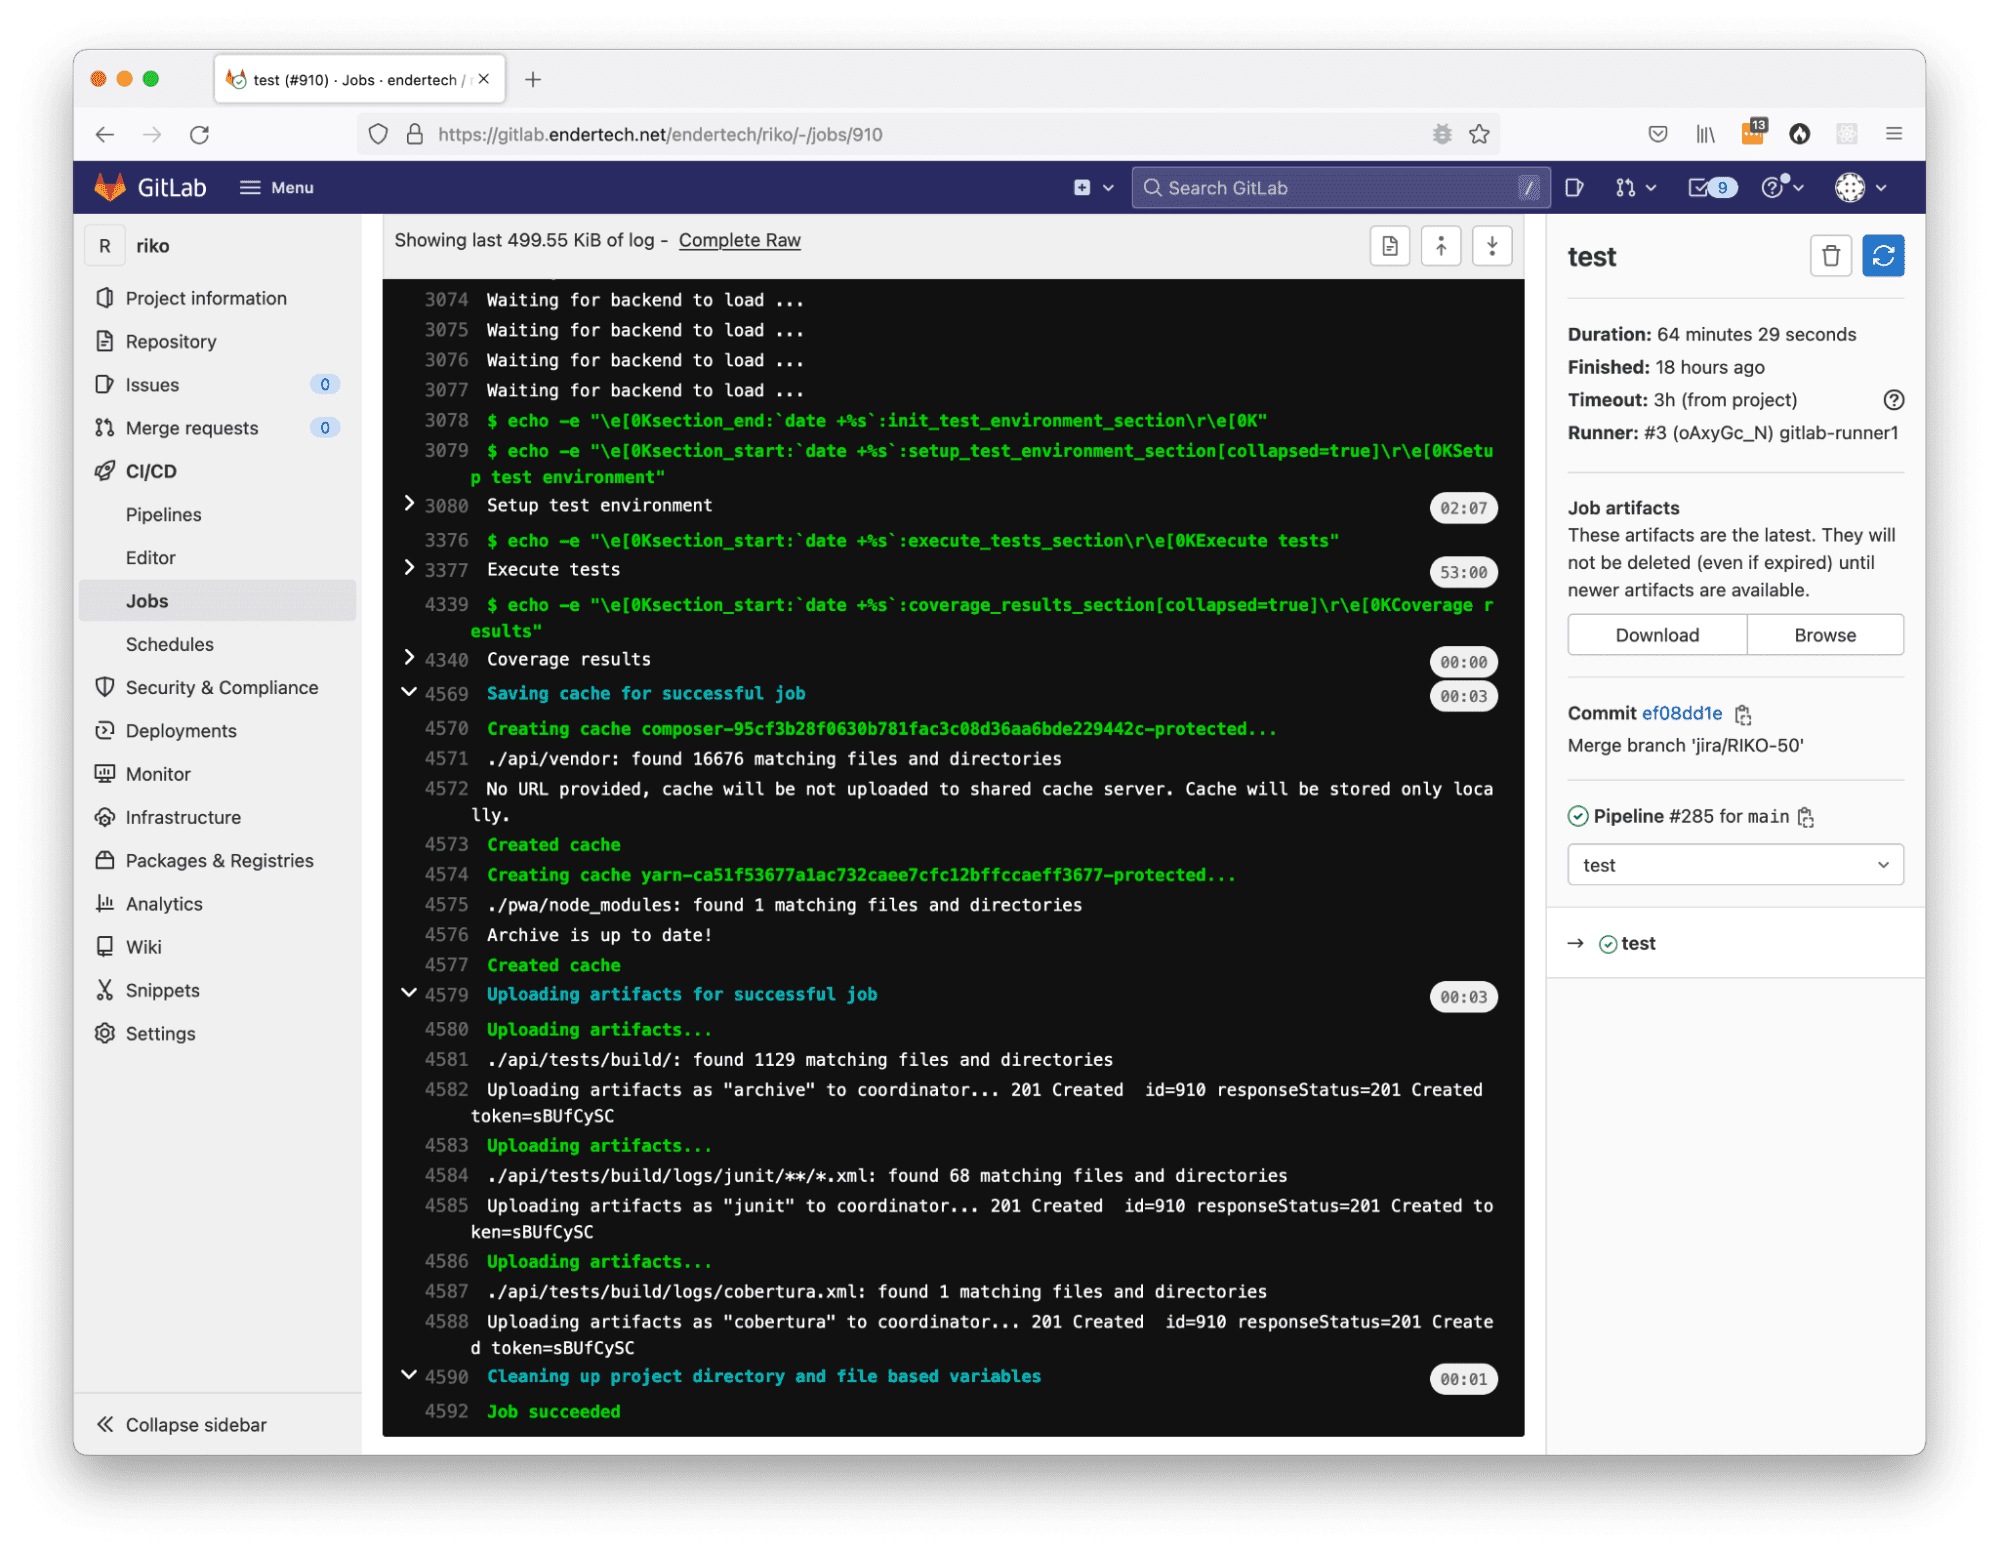
Overall Results
CI/CD Pipelines page showing successful jobs
Individual Pipeline Job page

Individual Pipeline Job output page
Conclusion
Having this GitLab CI/CD system setup is extremely useful. With the completion of this project, it is now possible to create code changes (with tests), git commit/push, and eventually have this work available for other project managers and developers to review.
For the developers, it allows one to finish a code task and then work on another soon after, since the CI/CD system can send you the results later if there is an issue. This can help a developer be more efficient with their time.
Similarly, for the project managers, there is more of an expectation that the code being worked on will actually be available to review without having to wait for someone to manually update servers. We’ll definitely keep adjusting this system and there is still much to learn (how about AutoDevOps?), but it might be time to find another project to incorporate the GitLab CI/CD configuration we have already. We hope you find this useful and fitting to your daily workload in order to help you work smarter and faster.