Creating a Shopify Checkout UI Extension
In today's competitive e-commerce landscape, creating a seamless and personalized checkout experience can significantly impact conversion rates and customer satisfaction. Shopify's Checkout UI extensions provide developers with powerful tools to customize the checkout flow, allowing merchants to enhance their customers' shopping journey at critical touchpoints. Whether you're looking to add product recommendations, customize shipping options, or implement specialized payment features, Checkout UI extensions offer the flexibility needed to create tailored solutions.
This article will guide you through the process of setting up a Shopify Checkout UI extension to add a custom notice banner to the checkout process.
Note: As of publishing this article, Shopify is rolling out the new checkout extensibility editor, but not all stores have it enabled by default. If you see a message about “branding” and not about “app blocks,” your store might still be on the old checkout editor.App blocks only work with the new checkout extensibility editor.
Prerequisites:
A Shopify Partner account
A development store
Node.js (v16 or later)
npm or yarn package manager
Shopify CLI (We're assuming you already have this installed and are up to the latest version)
Step One: Create Your App
1. Initialize a new Shopify app:
npm init @shopify/app@latest
You should see an output looking something like the following:
❯ npm init @shopify/app@latest
Need to install the following packages:
@shopify/[email protected]
# say yes!
Ok to proceed? (y) y

> npx
> create-app

To run this command, log in to Shopify.
User verification code: XXXX-XXXX
👉 Press any key to open the login page on your browser
Opened link to start the auth process: https://accounts.shopify.com/activate-with-code?device_code%5Buser_code%5D=XXXX-XXXX
Follow the process to authorize and log in. When that is complete, continue the setup process. In this case we're just going to build an extension-only app. Respond to the next few questions as follows:
  Build a Remix App (Recommended)
> Build an extension-only app

?  We recommend installing Shopify CLI globally in your system. Would you like to install it now?
✔  No, just for this project

?  Create this project as a new app on Shopify?
✔  Yes, create it as a new app

?  App name:
✔  my-demo-extension-app
You should hopefully see a success message now:
╭─ success ─────────
  my-demo-extension-app is ready for you to build!

  Next steps
    • Run cd my-demo-extension-app
    • For extensions, run shopify app generate extension
    • To see your app, run shopify app dev

  Reference
    • Shopify docs [1]
    • For an overview of commands, run shopify app --help
Change directory into the application you created and continue on to the next step
cd my-demo-extension-app
Step Two: Create the Checkout UI Extension
1. Generate a new extension in your app directory:
npm run shopify app generate extension
2. Select "Checkout UI Extension" from the options.
There are lots of options to choose from, in this example we're creating a Checkout UI Extension. Arrow down through the options until you find Checkout UI under Discounts and checkout and hit enter to confirm. Note these options, names, and ordering may change over time.
   #... other options you scrolled past

     Discounts and checkout
      Post-purchase UI
      Cart and checkout validation - Function
      Cart transformer - Function
   >  Checkout UI
      Delivery customization - Function
      Discount — Function
      Discount orders - Function
      Discount products - Function
      Discount shipping - Function
      Discounts allocator — Function
      Fulfillment constraints - Function
      Local pickup delivery option generators — Function
Next you'll want to name your extension and select your preferred workspace. For the purpose of this demonstration I'm going to call mine banner-notice and select Javascript React.
?  Name your extension:
✔  banner-notice

?  What would you like to work in?
✔  JavaScript React
You should see another success message:
╭─ success ─────────

  Your extension was created in extensions/banner-notice.

  Next steps
    • To preview this extension along with the rest of the project, run npm run shopify app dev

  Reference
    • For more details, see the docs [1]

Now lets go over what was generated.
We'll see that the
my-extension-demo-appproject folder has ashopify.app.toml.This is essentially the "production" configuration file of the entire application.
We want to be careful when working on an actual project to ensure that any changes we make only get deployed to production when we want them to.
Make a copy of this file and name it shopify.app.development.toml. Now we'll make sure our app is using the development toml to avoid deploying anything live until we're ready.
Shopify Docs - App Config Usenpm run shopify app config use
You'll see you're now able to select a configuration to use:

❯ npm run shopify app config use

?  Configuration file:

>  shopify.app.development.toml
   shopify.app.toml

   Press ↑↓ arrows to select, enter to confirm.
Select the development toml and we should see a success message:
?  Configuration file:
✔  shopify.app.development.toml
╭─ success ─────────

  Using configuration file shopify.app.development.toml
We also see that there is an extensions folder in our project folder, along with a nested banner-notice folder. This folder houses the extension we just created.
I would recommend reading the README.md generated within that folder to have any prerequisites handled, as well as gain a deeper of understanding of the options available to you, as it outlines some very helpful pieces information including extension targets (where you want the extension to render), links to documentation, and more.
Step Three: Configure the Extension
1. The shopify.extension.toml file will be automatically generated with the following structure:
api_version = "2023-07"

[[extensions]]
type = "ui_extension"
name = "checkout-notice-banner"
handle = "checkout-ui"

[[extensions.targeting]]
target = "purchase.checkout.block.render"
module = "./Checkout.jsx"
2. Create your extension component in src/Checkout.jsx. Here I am using the component that was generated by Shopify CLI:
import {
  reactExtension,
  Banner,
  BlockStack,
  Checkbox,
  Text,
  useApi,
  useApplyAttributeChange,
  useInstructions,
  useTranslate,
} from "@shopify/ui-extensions-react/checkout";

// 1. Choose an extension target
export default reactExtension("purchase.checkout.block.render", () => (
  <Extension />
));

function Extension() {
  const translate = useTranslate();
  const { extension } = useApi();
  const instructions = useInstructions();
  const applyAttributeChange = useApplyAttributeChange();


// 2. Check instructions for feature availability, see https://shopify.dev/docs/api/checkout-ui-extensions/apis/cart-instructions for details
  if (!instructions.attributes.canUpdateAttributes) {
    // For checkouts such as draft order invoices, cart attributes may not be allowed
    // Consider rendering a fallback UI or nothing at all, if the feature is unavailable
    return (
      <Banner title="banner-notice" status="warning">
        {translate("attributeChangesAreNotSupported")}
      </Banner>
    );
  }

  // 3. Render a UI
  return (
    <BlockStack border={"dotted"} padding={"tight"}>
      <Banner title="banner-notice">
        {translate("welcome", {
          target: <Text emphasis="italic">{extension.target}</Text>,
        })}
      </Banner>
      <Checkbox onChange={onCheckboxChange}>
        {translate("iWouldLikeAFreeGiftWithMyOrder")}
      </Checkbox>
    </BlockStack>
  );

  async function onCheckboxChange(isChecked) {
    // 4. Call the API to modify checkout
    const result = await applyAttributeChange({
      key: "requestedFreeGift",
      type: "updateAttribute",
      value: isChecked ? "yes" : "no",
    });
    console.log("applyAttributeChange result", result);
  }
}
Step Four: Extension Targets
Extension targets determine where your UI will appear in the checkout process. There are two types:
Static Targets: Tied to specific checkout features (contact info, shipping methods, etc.)
Block Targets: Can be displayed anywhere in the checkout process
For our notice banner, we're using the block target purchase.checkout.block.render which allows us to place the banner anywhere in the checkout flow.
Check out the Shopify API Reference on Extension Targets
Step Five: Preview in Store
1. Push your extension to Shopify: npm run deploy
╭─ info ─────────

  Using .env.development for default values:

    • Org:             Test Org
    • App:             my-demo-extension-app
    • Include config:  Yes

   You can pass --reset to your command to reset your app configuration.

?  Release a new version of my-demo-extension-app?
✔  Yes, release this new version

Releasing a new app version as part of my-demo-extension-app

banner-notice │ Bundling UI extension banner-notice...
banner-notice │ banner-notice successfully built
╭─ success ─────────

  New version released to users.

  my-demo-extension-app-3 [1]

[1] https://partners.shopify.com/XXXXXX/apps/XXXXXXXXXX/versions/XXXXXXXX
2. Follow the prompts to select your development store and install the app.
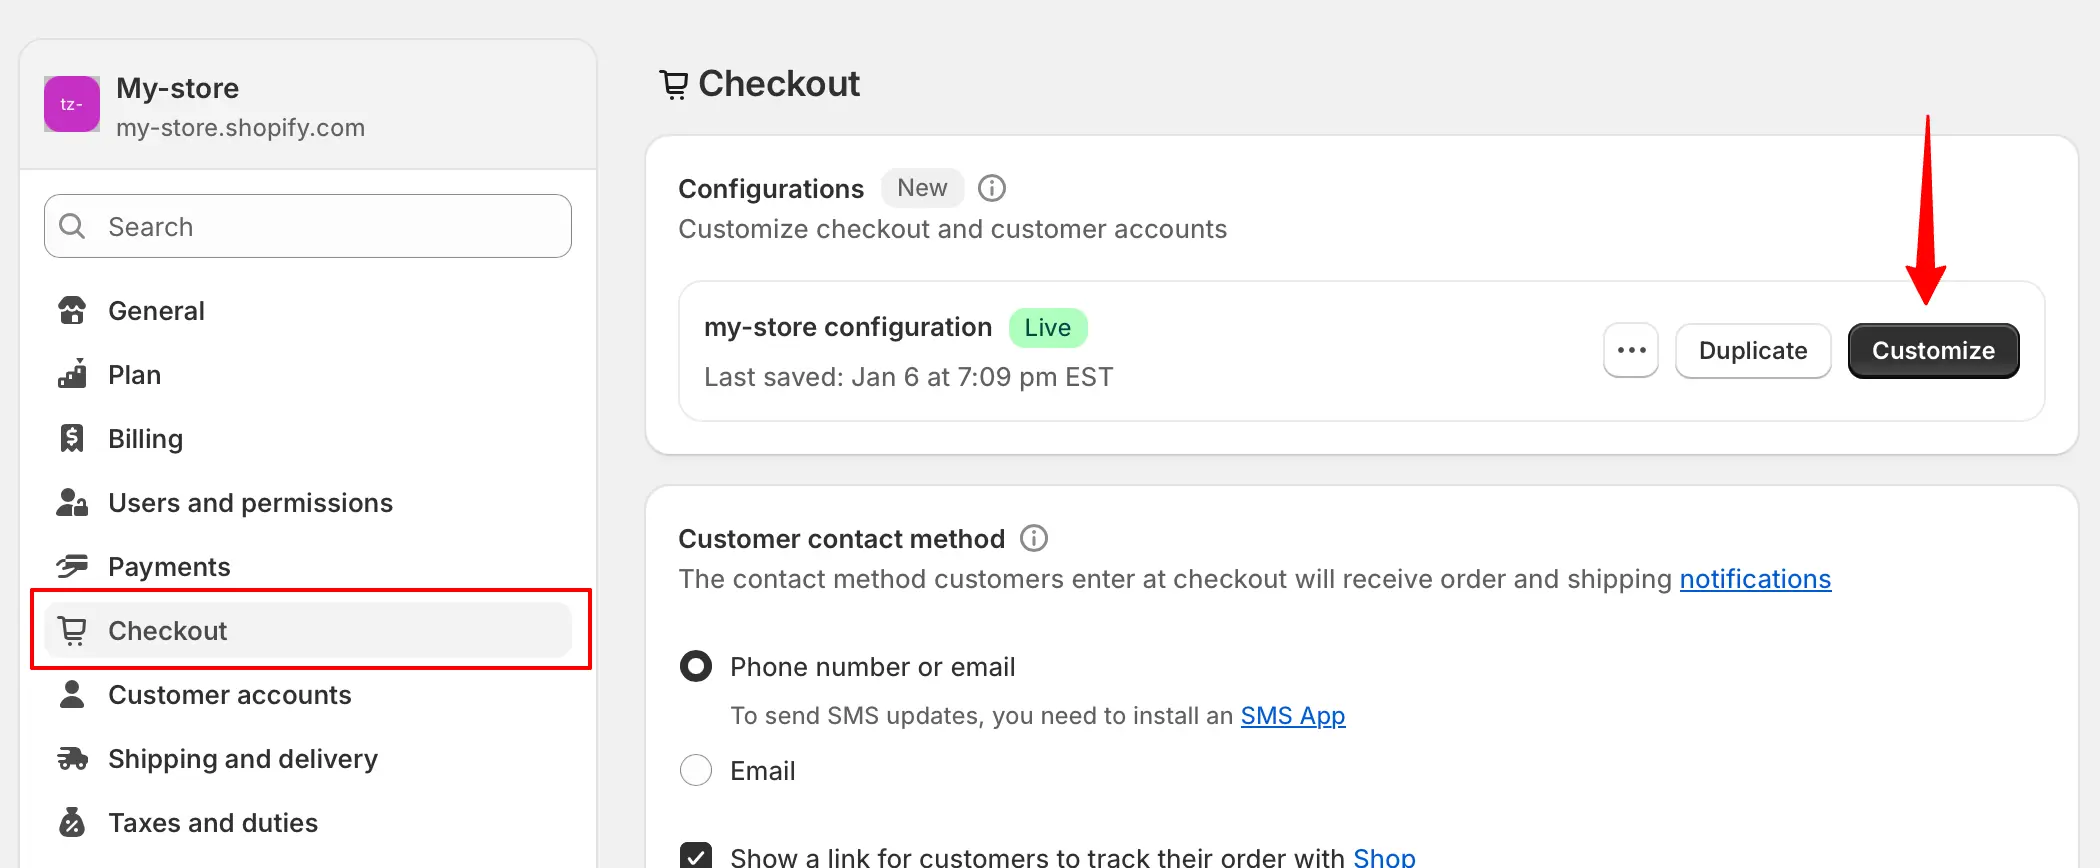
3. Go to your checkout settings and click "Customize"
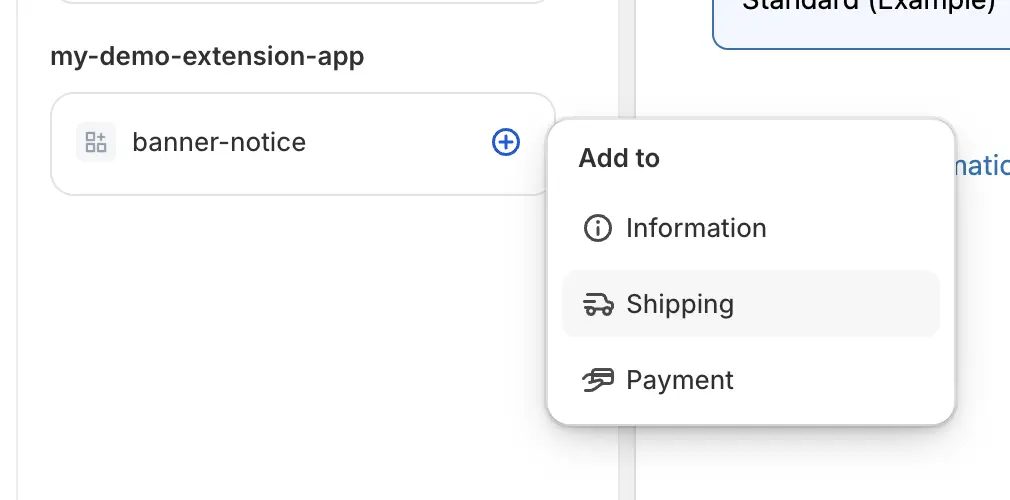
4. Go to the app blocks in the left navigation and select your banner-notice app block
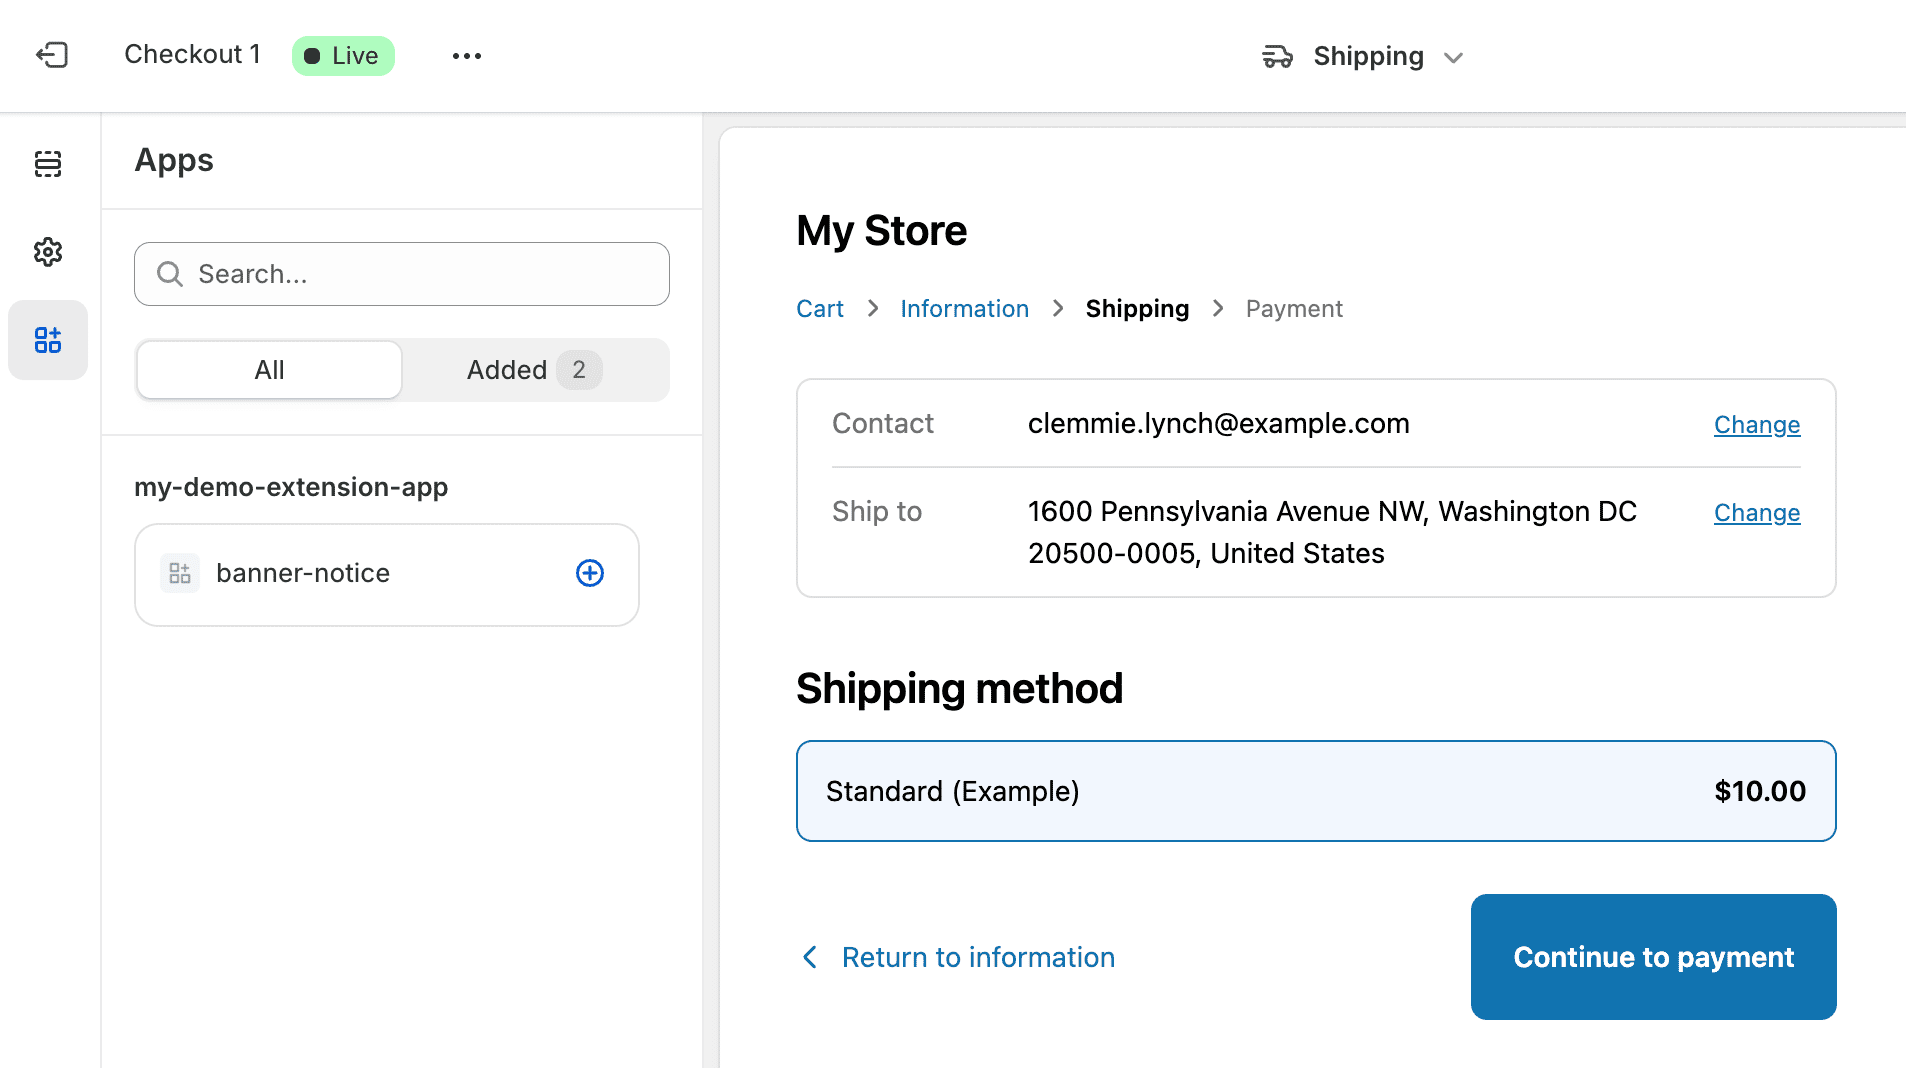
5. Select where you would like the block to appear
6. You should now see a preview of the block in the checkout section
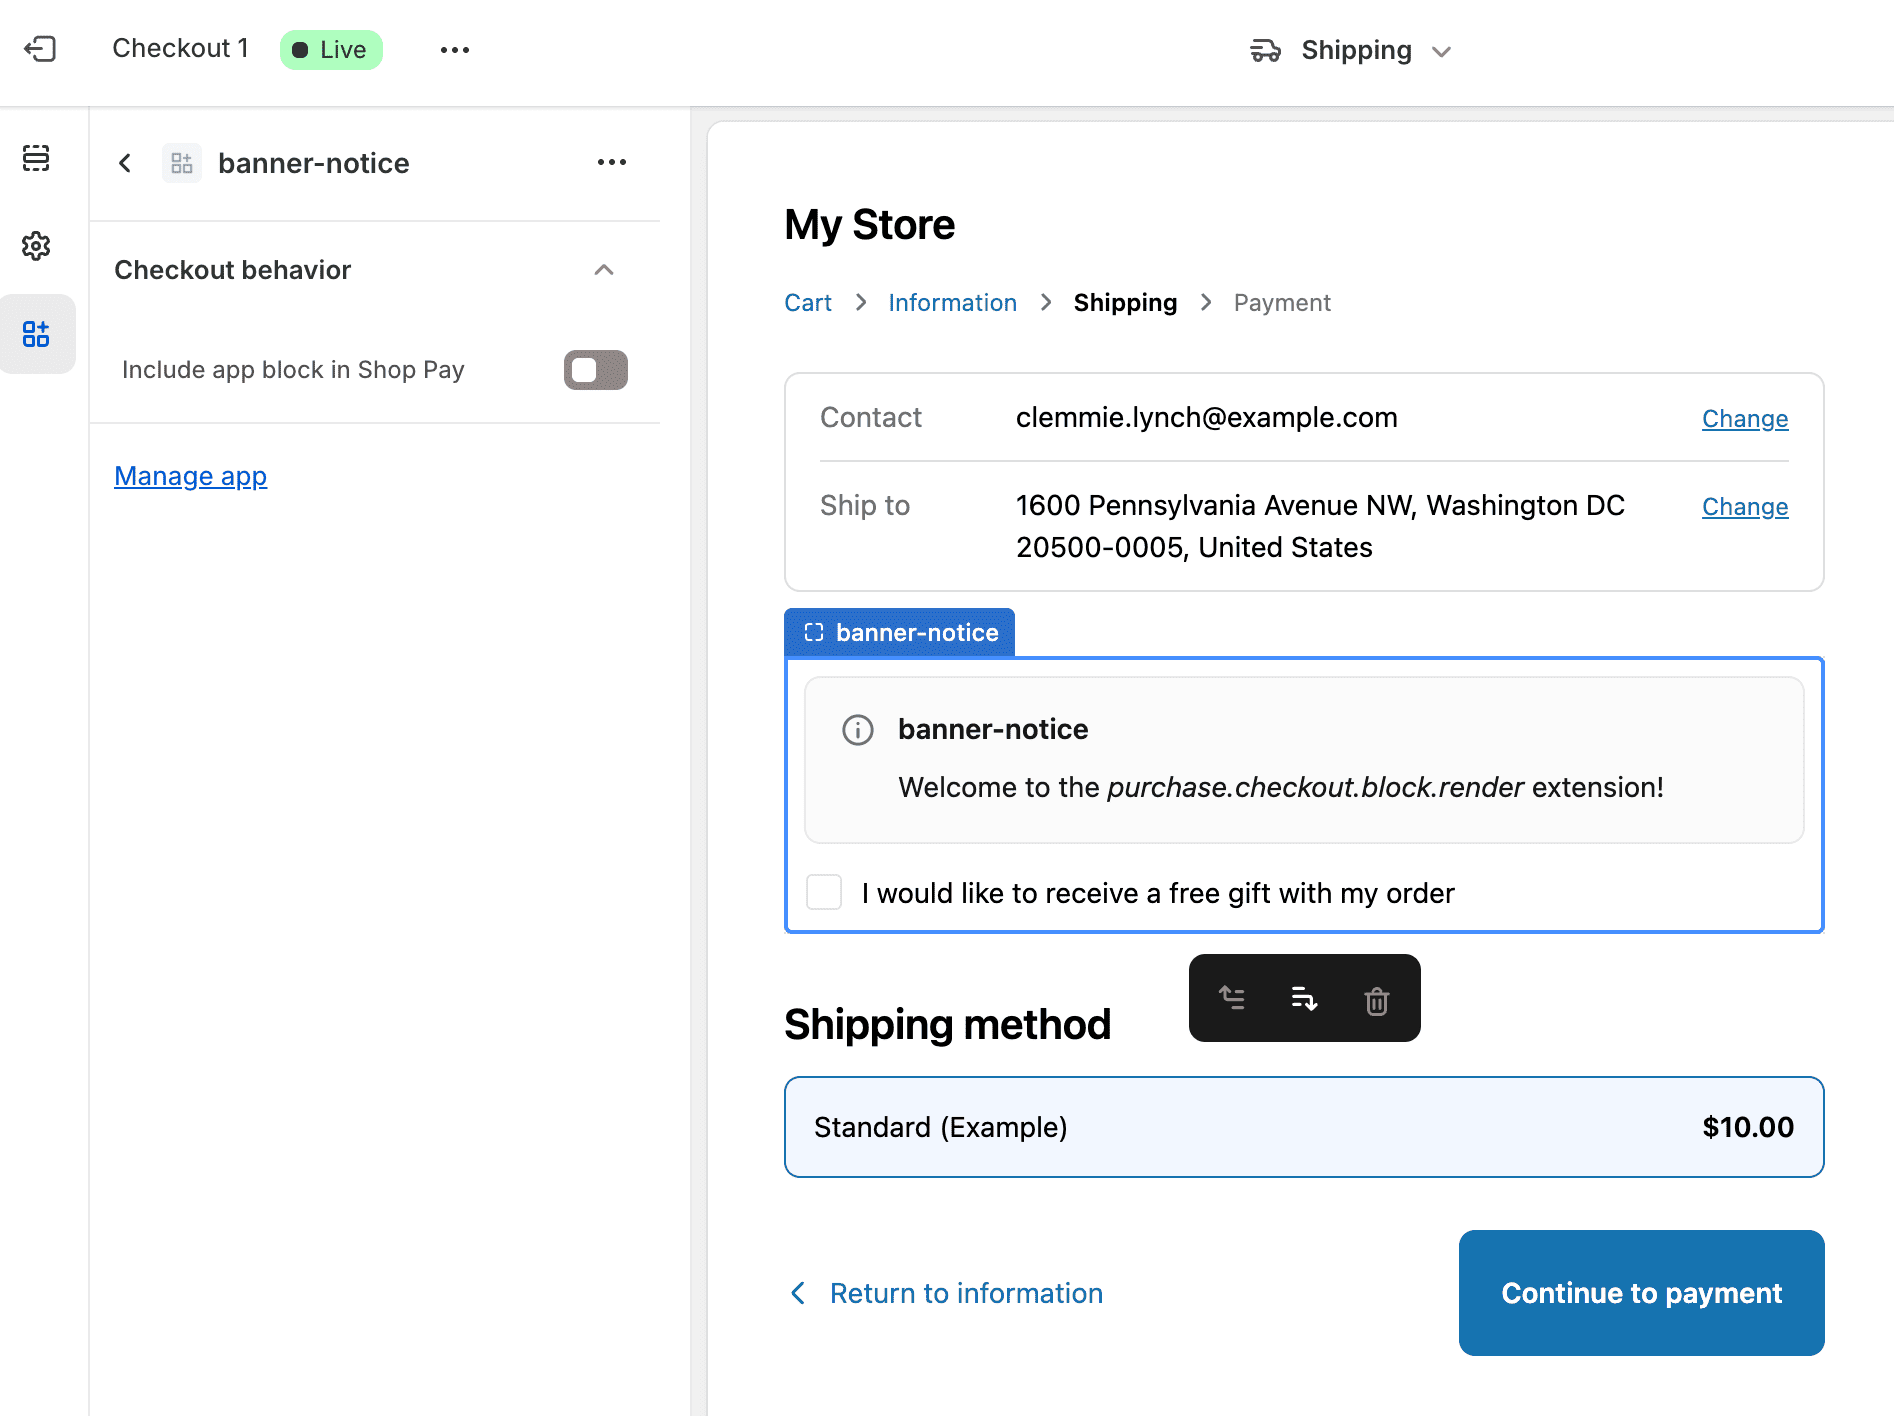
Last is to test your extension on your store! Create a test order and proceed to checkout. You should be seeing your banner during the step you selected!
Security Considerations
Checkout UI Extensions are designed with security in mind:
They run in an isolated sandbox
No access to sensitive payment information
Limited to specific UI components and APIs
You will need to enable scopes in your extension toml files for whatever features you desire to use.
Restricted access to global web APIs
Protected customer data requires additional security review
Important Notes
Checkout UI Extensions require a Shopify Plus plan or an enabled development store
The extension will only work in the checkout process
Changes to the extension require pushing updates or running using
npm run devto see them in the checkoutUI components inherit merchant brand settings and cannot be overridden with custom CSS
Troubleshooting
If you encounter issues:
Ensure you're using the correct Shopify CLI version
Verify your app is properly installed on the store
Check the browser console for any build or deploy errors
Make sure you're testing in a Shopify extension development store or a Shopify Plus store
Verify your extension target is correctly specified in the configuration