In a recent project I spent a considerable amount of time setting up my NestJs Project to use Winston Logger. This should have been a fairly straightforward process according to the documentation, but I found the documentation was lacking an important (to me) implementation detail: how to get your NestJS / Winston logs written to the database.
Sure it's all well and good to have log files, but when it comes time to sort, filter, or otherwise prettify them, you want a bit more flexibility than a log file.
So I decided to reproduce a simplified implementation of my logger and study how it works to satisfy my own curiosity, as well as provide a bit of help for future me or anyone else who might be struggling with a similar issue.
This article will move a little fast on the setup so we can get to meat and potatoes a little quicker. I'm assuming you already have some comfort with NestJs, TypeORM, and nestjsx/crud or @rewiko/crud
Setting up your Winston Logger Project
First we'll need to install Nest CLI globally if it isn't already.
npm install -g @nestjs/cli
Now lets make our project directory and cd into it like this:
mkdir winstonLogger
cd winstonLogger
Then, we'll create the NestJS project for backend API:
nest new winston-logger-project
Use npm as the preferred package manager and wait for install cd into the directory like this:
cd winston-logger-project
Use REST API if prompted.
But first let's set that that up so we can make our database connection:
Let's use TypeORM as our ORM and SQLite. We will also use Swagger to easily interact with our API. First we'll need to install the necessary packages:
npm i typeorm
npm i @nestjs/[email protected]
npm i sqlite3
npm i @nestjs/config
npm i @nestjs/swagger swagger-ui-express
First we will install the sqlite3 package as well as the @nestjs/config package. This package will allow us to use dotenv to grab environment variables from a .env file as well as create a ConfigModule to pass into our application.
Now we can create a .env in the root of our seeder-api directory:
// winston-logger-project/.env

DB_TYPE=sqlite
DB_NAME=data/api.sqlite
DB_SYNCHRONIZE=true
DB_LOGGING=true
Lets create a configuration file that we can pass into the ConfigModule:
// winston-logger-project/src/config/configuration.ts

export default () => ({
  database: {
    type: process.env.DB_TYPE,
    database: process.env.DB_NAME,
    synchronize: process.env.DB_SYNCHRONIZE === 'true',
    logging: process.env.DB_LOGGING === 'true',
    host: process.env.DB_HOST || null,
    port: process.env.DB_PORT || null,
    username: process.env.DB_USER || null,
    password: process.env.DB_PASSWORD || null,
    entities: ['dist/**/*.entity{.ts,.js}'],
  },
});
Update app.module.ts to use our new configuration as well as ConfigModule and TypeOrmModule. Don't worry if your linter complains about the LogsModule, we'll create that in a minute:
// winston-logger-project/src/app.module.ts

import { Module } from '@nestjs/common';
import { AppController } from './app.controller';
import { AppService } from './app.service';
import { ConfigModule, ConfigService } from "@nestjs/config";
import { TypeOrmModule } from "@nestjs/typeorm";
import { LogsModule } from "./logs/logs.module";
import configuration from './config/configuration';

@Module({
  imports: [
    ConfigModule.forRoot({
      envFilePath: ['.env.local', '.env.dev', '.env.prod', '.env'],
      load: [configuration],
      isGlobal: true,
    }),
    TypeOrmModule.forRootAsync({
      imports: [ConfigModule],
      useFactory: async (config: ConfigService) => config.get('database'),
      inject: [ConfigService],
    }),
    LogsModule,
  ],
  controllers: [AppController],
  providers: [AppService],
})
export class AppModule {
}
OK cool! Now let's implement CRUD that will take requests and operate on Logs. I like to use @rewiko/crud because it helps automate the basics.
npm i @rewiko/[email protected] @rewiko/crud
Next lets create our Logs resource with TypeORM:
In Nest, we create “Resources” to organize our code. `g` here stands for "generate", `res` stands for "resource." You can use whichever version you prefer.
nest generate resource logs --no-spec
OR
nest g res logs --no-spec
We're using the `--no-spec` flag to skip creating test files
Select REST API for the transport layer like this:
❯ REST API
  GraphQL (code first)
  GraphQL (schema first)
  Microservice (non-HTTP)
  WebSockets
And Y to Would you like to generate CRUD entry points? (Y/n)
Let’s set up the log entity now. Start with this:
// winston-logger-project/src/logs/entities/log.entity.ts
import { Entity, PrimaryGeneratedColumn, Column} from 'typeorm'

@Entity()
export class Log {
    @PrimaryGeneratedColumn()
    id: number;

    @Column()
    level: string;

	@Column()
    message: string;
}
And the Controller, Service, and Module:
// winston-logger-project/src/logs/logs.service.ts
import { Injectable } from '@nestjs/common';
import { Repository } from 'typeorm';
import { Log } from './entities/log.entity';
import { TypeOrmCrudService } from '@rewiko/crud-typeorm';
import { InjectRepository } from '@nestjs/typeorm';

@Injectable()
export class LogsService extends TypeOrmCrudService<Log> {
  constructor(
    @InjectRepository(Log)
    public repo: Repository<Log>,
  ) {
    super(repo);
  }
}
// winston-logger-project/src/logs/logs.controller.ts
import { Controller } from '@nestjs/common';
import { LogsService } from './logs.service';
import { Crud, CrudController } from '@rewiko/crud';
import { Log } from './entities/log.entity';

@Crud({
  model: {
    type: Log,
  },
})
@Controller('logs')
export class LogsController implements CrudController<Log> {
  constructor(public service: LogsService) {}
}
// winston-logger-project/src/logs/logs.module.ts
import { Module } from '@nestjs/common';
import { LogsService } from './logs.service';
import { LogsController } from './logs.controller';
import { TypeOrmModule } from '@nestjs/typeorm';
import { Log } from './entities/log.entity';

@Module({
  imports: [TypeOrmModule.forFeature([Log])],
  controllers: [LogsController],
  providers: [LogsService],
  exports: [LogsService], // <--- we need this exported so we can use it later with our Logger
})
export class LogsModule {}
Adding Logger Swagger
Start with this:
// winston-logger-project/src/main.ts

import { NestFactory } from '@nestjs/core';
import { AppModule } from './app.module';
import { DocumentBuilder, SwaggerModule } from "@nestjs/swagger";

async function bootstrap() {
    const app = await NestFactory.create(AppModule);

    const config = new DocumentBuilder()
        .setTitle('Winston Logger API')
        .setDescription(
            'The Winston Logger API lets easily query the database',
        )
        .setVersion('1.0')
        .build();
    const document = SwaggerModule.createDocument(app, config);
    SwaggerModule.setup('api', app, document);

    await app.listen(3000);
}

bootstrap();
If all was set up correctly we should be able to run the app with npm run start:dev
How to Add Winston
npm install nest-winston@^1.9.4 winston-transport@^4.5.0
Here's the link!
There are many ways to implement Winston within Nest, but this is what ultimately allowed me to be able to have my Winston Logger save logs to the database.
We are going to create a LoggerModule that will be responsible for setting up the Winston instance.
First let's create the Winston Config. Don't worry about the DatabaseTransportWrapper in the constructor, we'll get to that in a minute.
The customFormat is setting up how the logs will be formatted and logged to the console. This current implementation for instance will render a message that looks something like this:
2023-10-14T22:17:00.651Z - [INFO] - AppController {/}: - CONTEXT: RoutesResolver
// winston-logger-project/src/logger/winston.config.ts

import { createLogger, format, transports } from 'winston';
import { DatabaseTransportWrapper } from "./database-transport-wrapper.service";

export class WinstonConfig {
  constructor(private customTransportWrapper: DatabaseTransportWrapper) {}

  createLogger() {
    const customFormat = format.printf(
      ({ timestamp, level, stack, message, context }) => {
        return (
          `${timestamp} - [${level.toUpperCase()}] - ${stack || message} ` +
          (context ? `- CONTEXT: ${context}` : '')
        );
      },
    );
    const options = {
      file: {
        filename: 'error.log',
        level: 'error',
      },
      console: {
        level: 'silly',
      },
    };

    const devLogger = {
      level: 'silly',
      format: format.combine(
        format.timestamp(),
        format.errors({ stack: true }),
        customFormat,
      ),
      transports: [
        new transports.Console(options.console),
        this.customTransportWrapper.transport,
      ],
    };


    const instanceLogger = devLogger;

    return createLogger(instanceLogger);
  }
}
Winston uses Transports to handle what log levels go where.
// winston-logger-project/src/logger/logs.transport.ts

import TransportStream = require('winston-transport');
import { LogsService } from '../logs/logs.service';

class DatabaseTransport extends TransportStream {
  constructor(
    private logsService: LogsService,
    opts?: TransportStream.TransportStreamOptions,
  ) {
    super(opts);
  }

  log(info: any, callback: () => void): any {
    setImmediate(() => this.emit('logged', info));
    this.saveLogToDatabase(info);
    callback();
  }

  private saveLogToDatabase(info: any) {
    // In the interest of keeping this tutorial simple I am not using/logging these, but I am providing a way to retrieve this data so you can implement that on your own.
    let trace = null;
    let context = null;

    const splat = info[Symbol.for('splat')];
    if (info.level === 'error' && splat && splat?.length > 0) {
      trace = splat[0]?.trace;
      context = splat[0]?.context;
    } else {
      context = info?.context;
    }

    this.logsService.repo.save({
      level: info.level,
      message: info.message,
    });
  }
}

export default DatabaseTransport;
In order for this transport to be able to have access to the LogsService, we need to inject it. This DatabaseTransportWrapper will help us with that injection.
// winston-logger-project/src/logger/database-transport-wrapper.service.ts

import { Injectable } from '@nestjs/common';
import { LogsService } from '../logs/logs.service';
import DatabaseTransport from './logs.transport';

@Injectable()
export class DatabaseTransportWrapper {
  transport: DatabaseTransport;

  constructor(private logsService: LogsService) {
    this.transport = new DatabaseTransport(logsService);
  }
}
And this Custom Logger to translate nestJs LoggerService logs to Winston
//winston-logger-project/src/logger/nestToWinstonLogger.service.ts

import { Injectable } from '@nestjs/common';
import { LoggerService } from '@nestjs/common';
import { Logger as WinstonLogger } from 'winston';

@Injectable()
export class CustomLogger implements LoggerService {
  constructor(private readonly winstonLogger: WinstonLogger) {}

  log(
    message: any,
    context?: string,
  ) {
    this.winstonLogger.info(message, {context});
  }

  error(
    message: any,
    stack?: string,
    context?: string,
  ) {
    this.winstonLogger.error(message, {
      context,
      stack,
    });
  }

  warn(message: any, context?: string) {
    this.winstonLogger.warn(message, { context });
  }

  debug(
    message: any,
    context?: string,
  ) {
    this.winstonLogger.debug(message, {
      context,
    });
  }

  verbose(message: any, context?: string, payload?: string) {
    this.winstonLogger.verbose(message, { context, payload });
  }
}
Finally let's put it all together in the LoggerModule.
// winston-logger-project/src/logger/logger.module.ts
import { Module, Global } from '@nestjs/common';
import { DatabaseTransportWrapper } from './database-transport-wrapper.service';
import { LogsModule } from '../logs/logs.module';
import { CustomLogger } from './nestToWinstonLogger.service';
import { WinstonConfig } from './winston.config';

@Global()
@Module({
  imports: [LogsModule],
  providers: [
    DatabaseTransportWrapper,
    {
      provide: 'WINSTON',
      useFactory: (customTransportWrapper: DatabaseTransportWrapper) => {
        const winstonConfig = new WinstonConfig(customTransportWrapper);
        return winstonConfig.createLogger();
      },
      inject: [DatabaseTransportWrapper],
    },
    {
      provide: CustomLogger,
      useFactory: (winston) => new CustomLogger(winston),
      inject: ['WINSTON'],
    },
  ],
  exports: ['WINSTON', CustomLogger ],
})
export class LoggerModule {}
In this module:
We have decorated it as a @Global() to make it available throughout the app.
We imported the LogsModule in order to use the exported LogsService.
We created a list of providers:
the DatabaseTransportWrapper we created.
a provider where we inject that wrapper and used it in the useFactory in order to create an instance of the Winston Logger that can call the LogsService methods and is provided as a token called 'WINSTON' to the array.
a provider where we inject the 'WINSTON' token and use that to create our CustomLogger which is then provided to the array.
Finally, we export 'Winston' and CustomLogger
Get LoggerModule Running
Add the LoggerModule and DatabaseTransport to our AppModule:
// winston-logger-project/src/app.module.ts
import { Module } from '@nestjs/common';
import { AppController } from './app.controller';
import { AppService } from './app.service';
import { ConfigModule, ConfigService } from "@nestjs/config";
import { TypeOrmModule } from "@nestjs/typeorm";
import { LogsModule } from "./logs/logs.module";
import configuration from './config/configuration';
import {LoggerModule} from "./logger/logger.module";
import DatabaseTransport from "./logger/logs.transport";

@Module({
  imports: [
    ConfigModule.forRoot({
      envFilePath: ['.env.local', '.env.dev', '.env.prod', '.env'],
      load: [configuration],
      isGlobal: true,
    }),
    TypeOrmModule.forRootAsync({
      imports: [ConfigModule],
      useFactory: async (config: ConfigService) => config.get('database'),
      inject: [ConfigService],
    }),
    LogsModule,
    LoggerModule,
  ],
  controllers: [AppController],
  providers: [AppService, DatabaseTransport],
})
export class AppModule {
}
Now all that is left is to update our main.ts to tell it to use this Logger with the app.get(CustomLogger) and app.useLogger(customLogger)
import { NestFactory } from '@nestjs/core';
import { AppModule } from './app.module';
import { DocumentBuilder, SwaggerModule } from '@nestjs/swagger';
import { CustomLogger } from "./logger/nestToWinstonLogger.service";

async function bootstrap() {
  const app = await NestFactory.create(AppModule);
  const customLogger = app.get(CustomLogger);
  app.useLogger(customLogger);

  const config = new DocumentBuilder()
    .setTitle('Winston Logger API')
    .setDescription('The Winston Logger API lets easily query the database')
    .setVersion('1.0')
    .build();
  const document = SwaggerModule.createDocument(app, config);
  SwaggerModule.setup('api', app, document);

  await app.listen(3000);
}

bootstrap();
Now run npm run start:dev and look at the console output. You'll see our custom Winston logs:
2023-10-14T22:17:00.651Z - [INFO] - AppController {/}: - CONTEXT: RoutesResolver
2023-10-14T22:17:00.652Z - [INFO] - Mapped {/, GET} route - CONTEXT: RouterExplorer
2023-10-14T22:17:00.653Z - [INFO] - LogsController {/logs}: - CONTEXT: RoutesResolver
2023-10-14T22:17:00.653Z - [INFO] - Mapped {/logs/:id, GET} route - CONTEXT: RouterExplorer
2023-10-14T22:17:00.653Z - [INFO] - Mapped {/logs, GET} route - CONTEXT: RouterExplorer
2023-10-14T22:17:00.653Z - [INFO] - Mapped {/logs, POST} route - CONTEXT: RouterExplorer
2023-10-14T22:17:00.653Z - [INFO] - Mapped {/logs/bulk, POST} route - CONTEXT: RouterExplorer
2023-10-14T22:17:00.654Z - [INFO] - Mapped {/logs/:id, PATCH} route - CONTEXT: RouterExplorer
2023-10-14T22:17:00.654Z - [INFO] - Mapped {/logs/:id, PUT} route - CONTEXT: RouterExplorer
2023-10-14T22:17:00.654Z - [INFO] - Mapped {/logs/:id, DELETE} route - CONTEXT: RouterExplorer
You may also see our logs being inserted into the database:
query: INSERT INTO "log"("id", "level", "message") VALUES (NULL, ?, ?) -- PARAMETERS: ["info","Mapped {/, GET} route"]
query: INSERT INTO "log"("id", "level", "message") VALUES (NULL, ?, ?) -- PARAMETERS: ["info","LogsController {/logs}:"]
query: INSERT INTO "log"("id", "level", "message") VALUES (NULL, ?, ?) -- PARAMETERS: ["info","Mapped {/logs/:id, GET} route"]
query: INSERT INTO "log"("id", "level", "message") VALUES (NULL, ?, ?) -- PARAMETERS: ["info","Mapped {/logs, GET} route"]
query: INSERT INTO "log"("id", "level", "message") VALUES (NULL, ?, ?) -- PARAMETERS: ["info","Mapped {/logs, POST} route"]
query: INSERT INTO "log"("id", "level", "message") VALUES (NULL, ?, ?) -- PARAMETERS: ["info","Mapped {/logs/bulk, POST} route"]
query: INSERT INTO "log"("id", "level", "message") VALUES (NULL, ?, ?) -- PARAMETERS: ["info","Mapped {/logs/:id, PATCH} route"]
query: INSERT INTO "log"("id", "level", "message") VALUES (NULL, ?, ?) -- PARAMETERS: ["info","Mapped {/logs/:id, PUT} route"]
query: INSERT INTO "log"("id", "level", "message") VALUES (NULL, ?, ?) -- PARAMETERS: ["info","Mapped {/logs/:id, DELETE} route"]
Putting Winston Logger all Together
Okay, so what if we want to log things explicitly? Let's set up a test route on our controller that we can use to trigger some logs. Head over to your logs resource and update the LogsController to add a GET /test route.
// winston-logger-project/src/logs/logs.controller.ts

import {Controller, Get } from '@nestjs/common';
import { LogsService } from './logs.service';
import { Crud, CrudController } from '@rewiko/crud';
import { Log } from './entities/log.entity';
import { CustomLogger } from "../logger/nestToWinstonLogger.service";

@Crud({
  model: {
    type: Log,
  },
})
@Controller('logs')
export class LogsController implements CrudController<Log> {
  constructor(
      public service: LogsService,
      public logger: CustomLogger,
  ) {}

  @Get('test')
  getTestLogs() {
    this.logger.debug(`Test run!`);
    this.logger.log('Test run! of level info');
    try {
      let lala;
      console.log(lala.doesntExist);
    } catch (e) {
      this.logger.error(
          `${e.name}: ${e.message}`,
      );
    }
    this.logger.warn('This is a warning message!');
  }
}
Go to your swagger interface (localhost:3000/api) and find the GET logs/test route. You may need to refresh your page for this to appear. Click "Try it out" and then click "Execute."
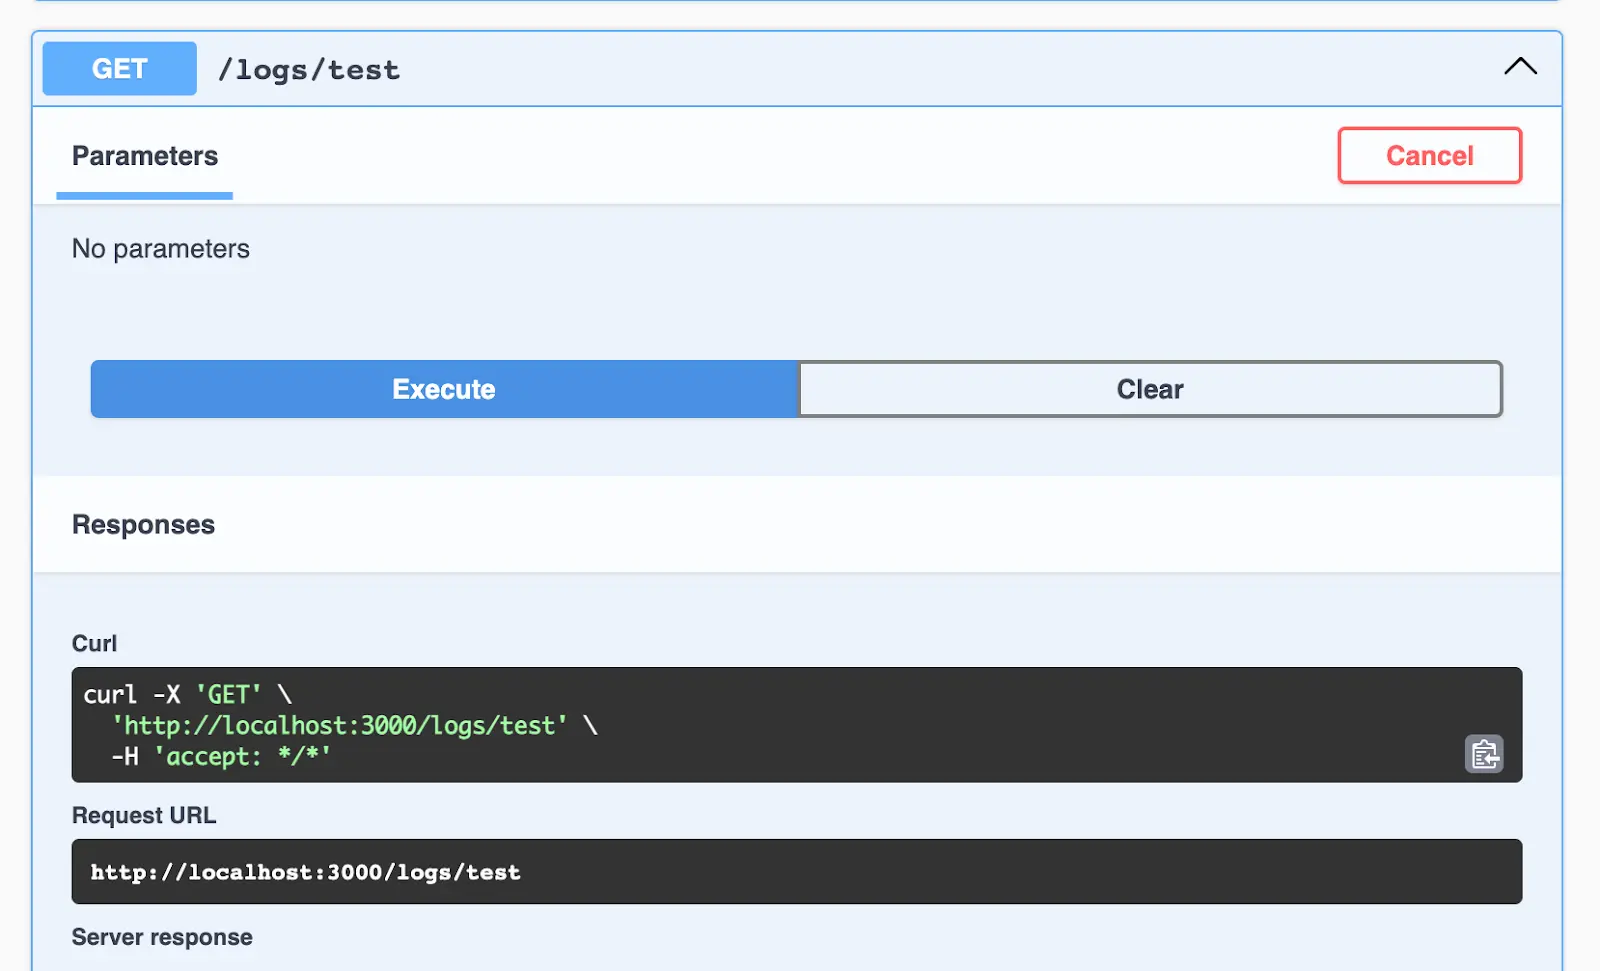
You'll probably see these various logs we just created execute in your app's console output.
Now scroll down to where you see GET /logs and click "Try it out" and scroll down in this expanded view and click "Execute."
If we did everything right, you should see a result with all of your logs. Scroll down to the bottom of this list and there should be the following output. (Your Ids may not match, that's okay.)
[
   // ...other logs,
  {
    "id": 57,
    "level": "info",
    "message": "Test run! of level info"
  },
  {
    "id": 58,
    "level": "warn",
    "message": "This is a warning message!"
  },
  {
    "id": 59,
    "level": "error",
    "message": "TypeError: Cannot read properties of undefined (reading 'doesntExist')"
  },
  {
    "id": 60,
    "level": "debug",
    "message": "Test run!"
  },
]
There you have it! Winston is now set up to log to your database! Happy Logging!