WWDC 2018: Create a Machine Learning model to categorize blog articles with CreateML

One of my favorite announcements at WWDC 2018 was the unveiling of CreateML, a new framework that helps developers create machine learning models using Swift and Xcode.
Last year, during WWDC 2017, Apple unleashed a tool that helped developers convert trained third-party machine learning models to a new format called CoreML so that they can be directly incorporated into your apps. It supported third-party tools like TensorFlow and Keras.
With the unveiling of CreateML it is apparent that Apple’s focus is to make machine learning more accessible for developers without having to delve into third-party tools. Right now CreateML is at its infant stages right now; and it’s focused on helping developers create models that classify text, image, and tabular data.
Background
At Endertech, we have a content initiative in which we are encouraged to share our knowledge and expertise with others via blog articles that are posted monthly on Endertech.com. Since we are a Web and Software Development & Design Agency our content can fall within various topics from Design and Development to Management and Marketing. With that being said let me show you how you can easily create a blog article categorizer using CreateML.
Prerequisites
Before we get started make sure that you have Mojave Mac OS and Xcode 10 installed, note that both Mojave Mac OS and Xcode 10 are beta releases and should be released to end users in the Fall. If you don’t have them make sure to download them from your Apple Developer portal.
Step 1: Collect Data & Organized Training Data
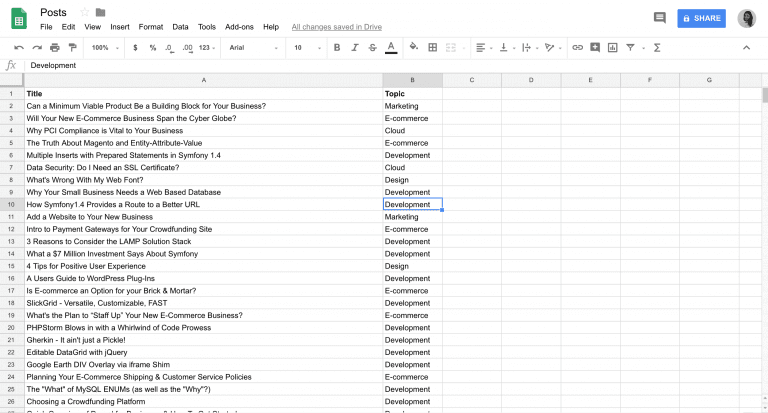
The first step after having your environment set up is to collect data. For our blog article categorizer I developed a Google Sheet of all article titles currently on the Endertech site with their appropriate topics and exported it as a csv. I was able to gather 130 article titles, these article titles will be used as the training data set for our model.

Step 2: Train & Evaluating your Model
Once we have collected and organized our data we can begin training our model.
Import CreateML
First, we open up a new playground and import the CreateML framework.
https://gist.github.com/noemiquezada/9936648b3c62046eb18b75974fe714e8/raw/a25570d679a59766afdceb40735ba28d466103b7/BlogArticleCategorizer.swift
Import Training Data
Then we follow by importing the training data from our csv and create a MLDataTable with the training data.
https://gist.github.com/noemiquezada/9936648b3c62046eb18b75974fe714e8/raw/a25570d679a59766afdceb40735ba28d466103b7/BlogArticleCategorizer.swift
Create Model
Finally we generate our model, a MLTextClassifier, where the blog article titles are the input data (textColumn) and the topic of the articles are the result (labelColumn). Make sure that the textColumn and labelColumn match the headers in your csv.
https://gist.github.com/noemiquezada/a77d7f9deeadd3efe98c696f7713015d/raw/5c9c6c85a1f893990ef2889403ff62a776d5aa77/BlogArticleCategorizer.swift
From the debug area you will see that the training data csv had been parsed, uploaded and the model had started training with 130 samples, referencing to the 130 blog articles, the model then went through 2 iterations before reaching 99% accuracy. At this point the model has finished training and we can move onto the next step.

Evaluate Model
Now that our model has been created and trained. The next step is to evaluate the trained model created against test data.
Collect & Organized Test Data
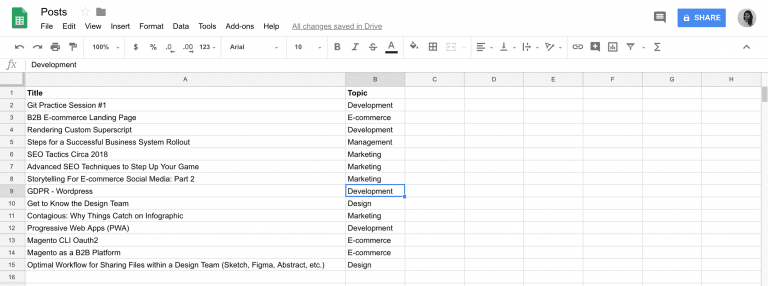
Since we are in the middle of our next content round I decided to take the list of in-progress articles that my fellow coworkers are working on and use it as the test data set. Since we are testing the following data set with our trained model I also had to specify the Topic I felt was most relevant to the blog articles and exported the Google Sheet as a csv.

Import Test Data
Similarly to the training data set, we import the test data set and generate an MLDataTable off of it.
https://gist.github.com/noemiquezada/5e6140ad52f7cddadd5e57f33abff3b4/raw/7257e75b7940f734a70576423cfdf7a8ad666d1e/BlogArticleCategorizer.swift
Evaluate Model against Test Data
Then proceed to evaluate the model with the test data.
https://gist.github.com/noemiquezada/b0329bb091771cc6a2ee71aaf1f7b943/raw/bd5cd1579bc91fe1260b1470f136a7a07843d985/BlogArticleCategorizer.swift
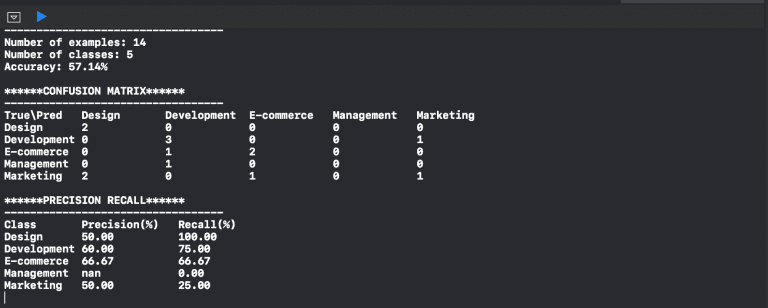
To display the results in the debug area I print(result). We get a summary of how the model performed based on the training data set.

What we can see is that the model was not that accurate with the test data as it was with the training data. Why is that? 🤔
There could be various reasons for the disparity between the test and training data. A few reasons could be:
The training dataset was not large enough.
The test dataset was not large enough.
Some blog article titles could be related to multiple topics.
Step 3: Save Model
Even though the results of my blog article classifier weren’t as fruitful as I would have liked. Once you have reached a level of confidence and accuracy in your model you can export it so you can use it in your own apps. This will create a .mlmodel file that can be then imported into your projects.
https://gist.github.com/noemiquezada/78514a9f42015039df3f8afa24f2e90a/raw/537325f236dc6ddb79f27b703265a7b2b89492d2/BlogArticleCategorizer.swift
Well, that is it! 👍 With a few simple steps we were able to create an ML model that classifies blog articles that can be easily portable to your own apps without having to learn third-party tools like TensorFlow. While, we shouldn’t disregard the power of third-party tools. Create ML is a great tool to create text, images and tabular data classifiers; definitely the start of great Machine Learning tools for the mobile community.
As a departing thought…
What are your thoughts on CreateML? How do you plan to use CreateML in your apps?
Reach out to us on Twitter via @Endertech and or on my personal twitter @noemiiquezada. I would love to know your thoughts!
